background image

BRP-Rotax

REPAIR MANUAL

Chapter: Chapter 3

ENGINE

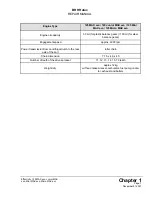
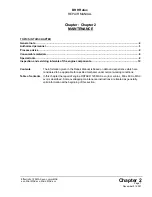
TOPICS IN THIS CHAPTER

System description .................................................................................................................................2

Preparation for removal...........................................................................................................................3

Removal of the ignition system ...............................................................................................................3
Removal of the exhaust system ..............................................................................................................6
Removal of radiator with cap assy. ..........................................................................................................6
Removal of the fuel line..........................................................................................................................7
Removal of the Bowden cable ................................................................................................................8
Removal of the engine from kart chassis .................................................................................................8
Positioning the engine on the trestle mounting plate .................................................................................9

Contents

This chapter describes the disassembly and assembly of the ROTAX® 125 MAX evo (incl.
Junior-, Mini-, Micro MAX evo) engine.

Effectivity: 125 MAX evo, Junior MAX
evo, Mini MAX evo, Micro MAX evo

Chapter 3

Page 1

November 01 2021

Summary of Contents for Rotax 125 JUNIOR MAX evo

Page 1: ...ROTAX KART COM REPAIR MANUAL 125 SENIOR MAX EVO 125 JUNIOR MAX EVO 125 MINI MAX EVO 125 MICRO MAX EVO ...

Page 2: ...mbols to emphasize particular information This information is important and must be observed m WARNING Identifies an instruction which if not followed may cause injury or endanger the life of the driver mechanic or third party ATTENTION Denotes an instruction which if not followed may severely damage the engine Noncompliance might lead to health hazards under certain conditions ENVIRONMENTAL NOTE ...

Page 3: ...Page 2 November 01 2021 Effectivity 125 MAX evo Junior MAX evo Mini MAX evo Micro MAX evo NOTES BRP Rotax REPAIR MANUAL ...

Page 4: ... parts you can also contact your nearest authorized ROTAX Engine distributor ROTAX distributors ROTAX Authorized Distributors for Kart Engines See on web at the official Homepage http www rotax kart com Engine serial number If you have any concerns or questions always keep your engine serial number ready for questions from your dealer as the manufacturer makes modifications to the engine for produ...

Page 5: ...ini MAX evo see Manual Type designation 125 Micro MAX evo see Manual Type designation INTRO Introduction IPC Illustrated Parts Catalog h hours OM Operators Manual kg kilograms MON Motor Octane Number n a not available Nm Newton meter Rev Revision RON Research Octane Number RM Repair Manual S N Serial Number SI Service Instruction SL Service Letter part no Part number V Volt Chapter 1 Page 2 Novemb...

Page 6: ...erified by a highly skilled pro fessional mechanic Manual This Manual has been prepared as a guide to correctly service and maintain all ROTAX Kart engines This Manual uses technical terms which may be slightly different from the ones used in the Illustrated Parts Catalog It is understood that this Manual may be translated into another language In the event of any discrepancy the English version p...

Page 7: ...hnical Manual passages concerning safety are especially marked Pass on safety warnings to other users Modifications Non approved modifications to the engine and associated components likewise releases BRP Rotax from its warranty obligations Accessories This engine must only be operated with accessories supplied recommended and re leased by BRP Rotax Modifications are only allowed after the excepti...

Page 8: ...ax if not stated otherwise Illustrations The illustrations in this Manual are sketches and show a typical arrangement They may not represent in full detail or the exact shape of the parts which have the same or similar function Therefore deduction of dimensions or other details from illustrations is not permit ted as the scale may not be 1 1 NOTE The Illustrations and Documents in this Manual are ...

Page 9: ...GR9DI optional Electrode gap Refer to the valid technical regulations you are partic ipating in Fuel Super unleaded fuel RON min Min 95 Octane Cooling Liquid cooling Cooling circuit with coolant pump inte grated in the engine Flow rate of the coolant pump approx 22 liters at 11000 rpm Coolant mixture 100 Water distilled Drain water after operation in cold condition to prevent freezing Coolant capa...

Page 10: ...peed approx 4000 rpm Power transmission from centrifugal clutch to the rear axle of the kart roller chain Chain dimension 7 75 x 4 6 x 4 5 Number of teeth of the drive sprocket 11 12 13 14 15 16 teeth Weight dry approx 12 kg without intake silencer carburetor fuel pump radia tor exhaust and battery Effectivity 125 MAX evo Junior MAX evo Mini MAX evo Micro MAX evo Chapter 1 Page 7 November 01 2021 ...

Page 11: ...Page 8 November 01 2021 Effectivity 125 MAX evo Junior MAX evo Mini MAX evo Micro MAX evo NOTES BRP Rotax REPAIR MANUAL ...

Page 12: ...Repair Manual is based on data and experience which are considered to be applicable for a skilled mechanic under normal working conditions Table of contents In this chapter the repair of engine ROTAX 125 MAX evo incl Junior Mini Micro MAX evo is described Some overlapping maintenance instructions are treated as generally valid information at the beginning of this section Effectivity 125 MAX evo Ju...

Page 13: ...the use of components and auxiliary components not corresponding to the installation instructions exclude any liability of the engine manufacturer Parts and accessories We particularly emphasize that parts and accessories not supplied as genuine BRP Rotax parts are not verified for suitability by BRP Rotax and thus are not authorized for use In stallation and or use of such products may possibly c...

Page 14: ...rforming the task and knowledge of ROTAX Installation Operators Manual and Repair Manual Including Suitable work environment to prevent contamination or damage to engine parts or modules Appropriate tools and fixtures as outlined in the ROTAX Repair Manual Reasonable maintenance practices are utilized Information Maintenance organizations and individuals are encouraged to contact BRP Rotax through...

Page 15: ... this instruction may cause severe burns or scalding Hot engine parts Always allow the engine to cool down to ambient temperature before starting work At maintenance of cooling lubricating and fuel system take care without that no contami nation metal chips foreign material and or dirt enters the system Disassembly At disassembly of the engine mark the components as necessary to avoid any mix up T...

Page 16: ... low tolerance measurements s 0 1 mm and in measuring bearing and housing components the temperature of the components and their surroundings must be in the range 20 C 25 C 68 F 77 F Only used certified measuring tools Nuts Once loosened always replace self securing nuts Sealing rings O rings At reassembly of the engine replace all sealing rings gaskets securing elements O rings and oil seals Re a...

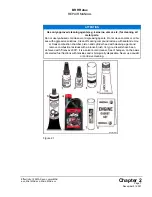
Page 17: ...articular surface sealing compound The materials specified have been tested for a long time and are suitable for all operating conditions indicated by the manufacturer No Part no Description Application Qty 1 897651 LOCTITE 243 blue medium duty screw securing agent 10 ml 0 003 US gal 2 899788 LOCTITE 648 geen high strength screw securing agent 5 ml 0 001 US gal 3 297434 LOCTITE Anti Seize 15378 fo...

Page 18: ...th sealant remov er Soak combustion chamber piston and cylinder head with cleaning agent and remove combustion residues with a bronze brush Very good results have been achieved with Clenvex 2000 It is a solvent cold cleaner free of halogen on the basis of selected fuel fractions with tensides and is biologically disposable Never use caustic or corrosive cleaning Figure 2 1 Effectivity 125 MAX evo ...

Page 19: ...BRP Rotax REPAIR MANUAL SPECIAL TOOLS Figure 2 2 Chapter 2 Page 8 November 01 2021 Effectivity 125 MAX evo Junior MAX evo Mini MAX evo Micro MAX evo ...

Page 20: ...upport 9 580132 Tin wire 3 mm 100 GR 10 580130 Tin wire 2 mm 100 GR 11 676205 Fixation tool assy MAX 12 276051 Crankshaft repair jig 13 276070 Assembly tool bellow spring exhaust v 14 277364 Fixation Tool for sprocket 15 676110 Wrench adapter 11 8 16 297041 ROTAX SEAL with bar code For authorised distributors only 17 276110 ROTAX SEAL CALLIPER For authorised distributors only 18 297240 ENGINE IDEN...

Page 21: ...t from the overflow orifice have the pump re paired by an authorised service center Inspect before every operation of vehicle Inspect the cooling water connections on the cooler housing and cylinder head cover for tightness and sealing Inspect before every operation of vehicle Inspect the radiator hoses and hose clamps on the engine and radiator for tightness and sealing Inspect before every opera...

Page 22: ...Outlet control Clean the exhaust valve and check for free movement Every 10 hours of operation 7 Gearbox Check the oil level top up if necessary Every 2 hours of operation Renew gear oil Every 5 hours of operation 8 Starter drive Inspect for wear replace if necessary Every 50 hours of operation de pending on the conditions of use 9 Clutch Inspect clutch drum needle bearing for wear replace if nece...

Page 23: ...Page 12 November 01 2021 Effectivity 125 MAX evo Junior MAX evo Mini MAX evo Micro MAX evo NOTES BRP Rotax REPAIR MANUAL ...

Page 24: ...iator with cap assy 6 Removal of the fuel line 7 Removal of the Bowden cable 8 Removal of the engine from kart chassis 8 Positioning the engine on the trestle mounting plate 9 Contents This chapter describes the disassembly and assembly of the ROTAX 125 MAX evo incl Junior Mini Micro MAX evo engine Effectivity 125 MAX evo Junior MAX evo Mini MAX evo Micro MAX evo Chapter 3 Page 1 November 01 2021 ...

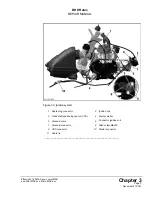
Page 25: ...verview Engine Figure 3 1 Engine components 1 Engine 2 Carburetor 3 Exhaust system 4 Intake silencer 5 Fuel pump 6 Radiator 7 Battery mounting ECU Chapter 3 Page 2 November 01 2021 Effectivity 125 MAX evo Junior MAX evo Mini MAX evo Micro MAX evo ...

Page 26: ...ing the battery be sure to always disconnect the negative termi nal before the positive terminal Remember that when the engine is running the ignition system has a high voltage of 35 kV the spark plug therefore must not be removed with the engine running Instruction Proceed as follows to disconnect battery See Figure Battery 1 Remove the Allen screw with rounded flange head M6x20 3 with O ring 5x2...

Page 27: ...nition system 4 Pull the spark plug connector 1 off the spark plug Minimum removal force 30 N 5 Remove the cable tie 11 6 Disconnect the plug connections 6 on the ignition coil 2 7 Disconnect the plug connection 7 on the solenoid valve 5 8 Disconnect the connector 9 for the pick up sensor 3 9 Disconnect the connector 10 for the starter 4 Chapter 3 Page 4 November 01 2021 Effectivity 125 MAX evo Ju...

Page 28: ...ensor CPS 4 Electric starter 5 Solenoid valve 6 Connector ignition coil 7 Solenoid connector 8 Allen screw M6x25 9 CPS connector 10 Starter connector 11 Cable tie ______________________________________________________ Effectivity 125 MAX evo Junior MAX evo Mini MAX evo Micro MAX evo Chapter 3 Page 5 November 01 2021 ...

Page 29: ...rocedure 1 Removal of the exhaust system See Chapter 9 REMOVAL OF RADIATOR WITH CAP ASSY General Proceeds follows to dismantle the radiator with cap assy Step Procedure 1 Removal of radiator with cap assy See Chapter 8 Chapter 3 Page 6 November 01 2021 Effectivity 125 MAX evo Junior MAX evo Mini MAX evo Micro MAX evo ...

Page 30: ...s and sources of ignition Fuel must not come into contact with hot parts such as engine or exhaust since this may cause a fire Instruction Proceed as follows to remove the fuel line 1 Pull off fuel line 2 from the fuel pump 1 Figure 3 4 Fuel components 1 Fuel pump 2 Fuel line 3 Impulse hose ______________________________________________________ Effectivity 125 MAX evo Junior MAX evo Mini MAX evo M...

Page 31: ...____________________________________ REMOVAL OF THE ENGINE FROM KART CHASSIS General Loosen the engine from chassis following the chassis manufacturer s instruction Remove both screws engine clamps and disconnect all cables NOTE The following repair tasks can be performed without removing the engine from the chassis Centrifugal clutch Cylinder with combustion chamber insert and cylinder head cover...

Page 32: ...s for handling of chemicals Dispose of chemicals as per local environmental regulations Cleaning the engine removes fuel and oil residues and other environmentally damaging substances which must be disposed of according to the local regulations Special tools The following special tools and equipment are required Part no Description Field of application 877390 Trestle mounting plate trestle support...

Page 33: ...g plate 1 Clean the engine and adjacent parts before the next step 2 Unscrew the base plate from the engine position the engine on the trestle mounting plate and fix it securely with the 4 fixing screws Chapter 3 Page 10 November 01 2021 Effectivity 125 MAX evo Junior MAX evo Mini MAX evo Micro MAX evo ...

Page 34: ...ustion chamber insert 17 Inspection of the exhaust socket 18 Inspection of the carburetor flange and reed valve 19 Inspection of the exhaust valve 125 MAX only 20 Cylinder components installation 21 Installation of exhaust valve 125 MAX only 21 Installation of exhaust valve gasket valve rod housing 22 Installation of the exhaust valve piston 22 Installation of piston 24 Installation of the cylinde...

Page 35: ...iew Top End Components Figure 4 1 MAX evo engine shown in figure 1 Cylinder 2 Cylinder head cover 3 Intake socket 4 E Rave cover 5 Exhaust socket assy Chapter 4 Page 2 November 01 2021 Effectivity 125 MAX evo Junior MAX evo Mini MAX evo Micro MAX evo ...

Page 36: ... Do not damage the piston piston ring and wall when dismantling these components Special tools The following special tools and equipment are required Part no Description Field of application 676110 Wrench adapter 11 8 Cylinder Instruction See Figure 4 2 Cylinder Proceed as follows to remove the cylinder 1 Remove 4 M8 collar nuts from the crankcase by using the wrench adapter 11 8 2 Lift the cylind...

Page 37: ...h the following parts Cylinder head cover Intake socket E Rave 125 MAX and 125 MAX DD2 Exhaust socket assy Spark plug Carburetor flange ______________________________________________________ REMOVAL OF THE SPARK PLUG Instruction 1 Remove the spark plug connector 2 Remove the spark plug with the spark plug socket Chapter 4 Page 4 November 01 2021 Effectivity 125 MAX evo Junior MAX evo Mini MAX evo ...

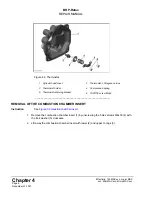
Page 38: ...er head cover 2 O ring 105x2 5 3 Allen screw M6x25 4 Allen screw M6x16 ______________________________________________________ REMOVAL OF THE THERMOSTAT Instruction See Figure Thermostat 1 Remove the coolant thermostat from the cylinder head cover 1 by removing the 2 TAPTITE screws M4x8 6 on the thermostat retaining bracket 5 2 Remove the compression spring 4 3 Remove the thermostat 2 from the ther...

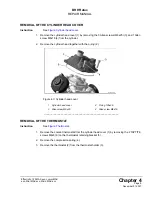
Page 39: ...___________________________________ REMOVAL OF THE COMBUSTION CHAMBER INSERT Instruction See Figure Combustion chamber insert 1 Remove the combustion chamber insert 1 by unscrewing the 5 Hex screws M8x30 4 with the lock washer 5 crosswise 2 Lift away the combustion chamber insert with lower 2 and upper O rings 3 Chapter 4 Page 6 November 01 2021 Effectivity 125 MAX evo Junior MAX evo Mini MAX evo ...

Page 40: ...OF THE EXHAUST SOCKET Instruction See Figure Exhaust socket 1 Remove the exhaust socket 1 from the cylinder 5 by unscrewing the 2 Allen screws 3 2 Remove the gasket 4 Figure 4 6 Exhaust socket 1 Exhaust socket 2 Exhaust gasket 3 Allen screw M8x20 4 Gasket 5 Cylinder ______________________________________________________ Effectivity 125 MAX evo Junior MAX evo Mini MAX evo Micro MAX evo Chapter 4 Pa...

Page 41: ...ssy 6 Gasket ______________________________________________________ REMOVAL OF THE EXHAUST VALVE 125 MAX ONLY General The closed valve improves the performance in the low and mid range In the upper rpm range the valve opens to reduce flow resistance of the exhaust gases For a detailed ex planation please visit our website and watch our animated video that will explain the func tion in detail https...

Page 42: ...by holding the exhaust valve blade assy 14 15 16 and the gasket 13 7 Remove the inner hose spring 9 and remove along with the bellow 8 Figure 4 8 Exhaust valve RAVE 1 Adjustment screw 2 O ring 15 9 2 3 3 TAPTITE screw M5x25 4 Valve cover 5 Compression spring 48 5 0 8 mm 6 Hose spring 134 3 0 0 65 7 Exhaust valve piston 8 Bellow 9 Hose spring 70 1 7 0 3 10 Valve rod housing assy 11 Allen screw M6x2...

Page 43: ... following special tools and equipment are required Part no Description Field of application 676035 Insertion tool Piston 976380 Circlip puller Circlip Instructions Proceed as follows to remove the piston 1 Pull out the circlip 2 with the circlip puller 1 Use safety goggles to protect your eyes 2 Press the piston pin 4 out of the piston with the point of the special tool 3 Figure 4 9 Piston 1 Circ...

Page 44: ...ing preparation is required before removal 1 Remove lime deposits 1 from the water cooling of the cylinder 2 Clean combustion residues from the exhaust valve and slider duct 2 3 Clean O ring groove 3 4 Inspect all threads 5 All sealing surfaces must be clean and smooth 6 Inspect the cylinder bore for abnormal wear 7 Inspect the impulse bore 4 Figure 4 10 Cylinder 1 Water duct 2 Exhaust valve port ...

Page 45: ...th a discarded piston ring 5 Measure the piston ring clearance in the ring groove with a feeler gauge 1 a If the piston ring clearance has reached the wear limit of 0 1 mm the piston must be replaced 6 Remove the piston ring from the piston insert it approx 10 mm from top into the cylinder use the piston to do so and check ring end gap by means of a feeler gauge 7 Check the piston ring locking pin...

Page 46: ...e piston perpendicular to the piston pin axis 2 Determine the piston clearance after measuring the cylinder as a next step NOTE The clearance of a new piston cylinder pairing should be min 0 05 mm The wear limit is 0 11 mm Figure 4 12 Piston diameter 1 Micrometer ______________________________________________________ Effectivity 125 MAX evo Junior MAX evo Mini MAX evo Micro MAX evo Chapter 4 Page ...

Page 47: ... 2 Measure the piston diameter as described in chapter 4 Inspection of the piston diameter and install a piston to match the required minimum clearance of 0 060 mm 0 005 mm and make sure to stay within the maximum wear limit of 0 10 mm Cylinder classification Cylinder labeling Cylinder dimension A 54 000 54 010 mm AB 54 010 54 015 mm B 54 015 54 025 mm Piston classification f Piston labeling Toler...

Page 48: ...____________ INSPECTION OF THE PISTON PIN CIRCLIP Instructions See Figure Piston pin circlip 1 Inspect the piston pin 1 for wear and discoloration 2 Check the needle cage 2 for cracks and abrasion 3 The circlips 3 are replaced at every repair Notice the position of the circlip NOTE Direction of circlips is up or downside direction Figure 4 13 Piston pin circlip 1 Piston pin 2 Needle cage 3 Circlip...

Page 49: ... breakage Pos 4 melted electrode Pos 5 oil carbon deposits 3 Check the electrode gap of the spark plug with a feeler gauge and adjust if required to s 0 45 mm to 0 7 mm ATTENTION Pay attention to the electrode gap mentioned in the technical regulation Bending the electrode can cause damage or misfire Figure 4 14 Spark plug 1 Spark plug 2 Electrode __________________________________________________...

Page 50: ...______________ INSPECTION OF THE COMBUSTION CHAMBER INSERT Instructions See Figure Combustion chamber insert NOTE The sealing area of the combustion chamber insert is slightly tapered from Ø 63 mm 1 Clean combustion residues and lime deposits from the outer area 1 of the combustion chamber 2 Inspect combustion chamber insert for cracks visual inspection 3 Make sure that spark plug thread 3 is in g...

Page 51: ...EXHAUST SOCKET Instructions See Figure Exhaust socket 1 Inspect the exhaust socket for damage or deformation 2 Inspect exhaust gasket 2 for wear and replace if applicable Figure 4 17 Exhaust socket 1 Exhaust socket ball 2 Exhaust gasket ______________________________________________________ Chapter 4 Page 18 November 01 2021 Effectivity 125 MAX evo Junior MAX evo Mini MAX evo Micro MAX evo ...

Page 52: ...rubber lining of reed valves 1 for perishing if applicable replace complete reed valve 2 Check the two reed petal 2 for cracks or damage 3 Check the oval head screw M3x6 3 for secure seating LOCTITE 648 Tightening torque 1 5 2 Nm 13 18 in lb 4 Inspect carburetor flange 4 for cracks porosity or swelling and replace if applicable Figure 4 18 Carburetor port and valve guide 1 Reed valve assy 2 Reed p...

Page 53: ...of O ring 2 4 Check that the impulse bore in the valve rod housing 3 is open 5 Inspect bellow 5 for cracks or porous areas and replace if applicable 6 Inspect exhaust valve piston 6 for cracks or deformation by caused overheating and re place if applicable 7 Inspect valve cover 7 for cracks or deformation caused by overheating Figure 4 19 Exhaust valve 1 Exhaust valve 2 O ring RED 3 Valve rod hous...

Page 54: ...e Proceed as follows to install the exhaust valve ATTENTION If the exhaust valve or the stud bolt is replaced the stud bolt must be secured with LOCTITE 648 in the exhaust valve 1 Lock exhaust valve 1 and stud M6x52 5 2 with LOCTITE 648 2 Wipe away the surplus LOCTITE 3 Make sure the bolt is screwed in completely Tightening torque 10 Nm 90 in lb Figure 4 20 Exhaust valve 1 Exhaust valve 2 Stud M6x...

Page 55: ... tighten 5 Check the movement of the exhaust valve 6 Tighten Allen screws 7 Tightening torque 10 Nm 90 in lb Figure 4 21 Installation direction of exhaust valve 1 Cylinder head 2 Exhaust valve 3 O ring 6x2 5 RED 4 Gasket 5 Valve rod housing assy 6 Oil seal 6x11x3 4 5 7 Allen screw M6x25 8 Spring washers B6 ______________________________________________________ INSTALLATION OF THE EXHAUST VALVE PIS...

Page 56: ...n the valve cover 7 with 2 TAPTITE screw M5x25 8 8 Insert the O ring 15 9 2 3 9 into the valve cover 9 Turn the adjustment screw 10 into the valve cover 7 Figure 4 22 Exhaust valve piston 1 Valve rod housing assy 2 Bellow 3 Exhaust valve piston 4 Hose spring 70 1 7 0 3 5 Hose spring 134 3 0 0 65 6 Compression spring 48 5 0 8 mm 7 Valve cover 8 TAPTITE screw M5x25 9 O ring 15 9 2 3 10 Adjustment sc...

Page 57: ...truction See Figure Piston pin Proceed as follows to install the piston pin 1 Coat the piston pin needle cage 2 with Engine oil 2 Insert the piston pin needle cage 2 into the upper connecting rod eye 3 Mount the piston 3 and piston pin 4 on the con rod 4 Place the new circlip 1 flat on a level surface 5 Push the mounting sleeve 5 with the circlip over it 6 Push the circlip deeper into the mounting...

Page 58: ...__________________________ INSTALLATION OF THE CYLINDER General ATTENTION Use only the piston cylinder pairings specified by the table in Chapter 4 Section 3 2 All other combinations may lead to engine damage Special tools The following special tools and equipment are required Part no Description Field of application 897651 LOCTITE 243 Stud bolts Effectivity 125 MAX evo Junior MAX evo Mini MAX evo...

Page 59: ...sh gap measurement to adjust the squish gap to the correct value 3 Coat cylinder bore and piston 2 with Engine oil 4 Press piston ring into the piston with two fingers ATTENTION Do not damage the gasket 5 Position the cylinder 3 over the piston 6 Screw cylinder crosswise to the crankcase with the four studs Tightening torque 24 Nm 18 ft lb Figure 4 24 Cylinder head 1 Stud bolts 2 Piston 3 Cylinder...

Page 60: ...20 Nm 177 in lb 3 Check that the exhaust port is tightly seated on the cylinder Figure 4 25 Exhaust socket 1 Exhaust socket assy 2 Exhaust gasket 3 Allen screws M8x20 4 Gasket 5 Cylinder ______________________________________________________ INSTALLATION OF THE CARBURETOR FLANGE AND REED VALVE Special tools The following special tools and equipment are required Part no Description Field of applica...

Page 61: ...t 1 Attach the reed petal 2 and the valve detent 3 to the valve guide using recessed head screws 4 Use LOCTITE 648 to lock the screws 2 Position the gasket 5 on the cylinder 3 Position the reed valve 1 and intake socket 6 and fasten together with the support bracket 7 using 5 head screws M6x25 8 9 Tightening torque 7 Nm 62 in lb Figure 4 26 Carburetor flange and reed valve 1 Reed valve 2 Reed peta...

Page 62: ...Nm initially ensuring that the O ring 3 is not crushed Tighten to tightening tor que 30 Nm 22 ft lb Figure 4 27 Combustion chamber insert 1 Combustion chamber insert 2 O ring 64x2 3 O ring 23 3x2 4 4 Hex screw M8x30 5 Lock washer ______________________________________________________ INSTALLATION OF CYLINDER HEAD COVER Special tools The following special tools and equipment are required Part no De...

Page 63: ..._____________________________________________________ Instructions See Figure Combustion chamber insert Proceed as follows to install the combustion chamber insert 2 Position O ring 1 on the combustion chamber insert 3 Grease the O ring 2 lightly to ensure that it adheres better to the groove of the cylinder head cover otherwise fix it with sealant Silastic 4 Insert O ring 2 into the groove of the...

Page 64: ...ish gap is partly responsible for the power characteristics of the engine and re sponsible for smooth running NOTE The smaller the squish gap the higher the engine compression This means that the engine response to the feed from the carburetor becomes more critical under changing operating conditions temperature air pressure humidity Special tools The following special tools and equipment are requ...

Page 65: ...f min 1 100 mm is required for this measurement ATTENTION Calculate the average of the sum of both measurements on both cylinder wall sides The squish gap must be within the specified tolerance You find the latest valid regulations on http www rotax kart com de Max Challenge MAX Challenge Regulations NOTE The squish gap can be adjusted using cylinder base gaskets Cylinder base gas kets are availab...

Page 66: ..._______________________________ INSTALLATION OF SPARK PLUG Instructions Proceed as follows to install the spark plug 1 Screw in spark plug hand tight and use tightening torque to tighten it with 27 Nm 20 ft lb Effectivity 125 MAX evo Junior MAX evo Mini MAX evo Micro MAX evo Chapter 4 Page 33 November 01 2021 ...

Page 67: ...Page 34 November 01 2021 Effectivity 125 MAX evo Junior MAX evo Mini MAX evo Micro MAX evo NOTES BRP Rotax REPAIR MANUAL ...

Page 68: ...ump drive 30 Inspection of water pump shaft 31 Inspection of balance shaft drive 31 Inspection of balance shaft 32 Inspection of the housing halves 33 Crankcase assembly 34 Installation of oil seal ball bearing and needle bushing 34 Installation of ball bearing and oil seal for crankcase 36 Assembly of crankshaft water pump shaft and balance shaft 39 Assembly of the crankcase 40 Installation of cr...

Page 69: ...BRP Rotax REPAIR MANUAL SYSTEM DESCRIPTION Overview Figure 5 1 Position on the engine Chapter 5 Page 2 November 01 2021 Effectivity 125 MAX evo Junior MAX evo Mini MAX evo Micro MAX evo ...

Page 70: ...r 5 Gasket 6 Retaining ring with lug 20x1 2 7 Water pump gear 19 T 8 Locating pin 8 small M6x40 9 Idle gear 28 13 T 10 Water pump pinion 16 T 11 Needle pin 4x15 8 12 Thrust washer 10 1 17 1 13 Balance gear crankshaft 14 Balance gear balance shaft Effectivity 125 MAX evo Junior MAX evo Mini MAX evo Micro MAX evo Chapter 5 Page 3 November 01 2021 ...

Page 71: ...6 Stud M8x28 20 27 Ball bearing 6302 28 Ball bearing 6206 29 Ball bearing 6005 30 Crankshaft assy 31 Needle cage K 15x19x20 32 Piston assy 33 Piston pin 15x10x12 5x45 6 34 Circlip 15 35 Balance shaft 36 Impeller 37 Dowel 4x16 38 Water pump shaft 39 Oil seal A 10x26x7 40 Oil seal AS 28x38x7 41 Air vent screw M18x1 5 42 Closure cap for impulse joint Chapter 5 Page 4 November 01 2021 Effectivity 125 ...

Page 72: ...er 3 3 Positioning the engine on the trestle mounting plate See also Chapter 3 4 Removal of cylinder head See also Chapter 4 5 Drain oil See also Chapter 5 6 Removal of carburetor See also Chapter 6 7 Removal of starter See also Chapter 7 8 Removal of radiator See also Chapter 8 DRAIN OIL Instruction See Figure Drain oil 1 Remove the Allen screw 3 with sealing ring 2 from the crankcase and gearbox...

Page 73: ...EARS Special tools The following special tools and equipment are required Part no Description Use n a Circlip pliers Drive wheel n a Hot air gun Compensating wheels Instructions See Figure Gearbox cover 1 Unscrew and remove Allen screws 1 2 Remove sealing ring 2 gear cover 3 with gasket 4 Chapter 5 Page 6 November 01 2021 Effectivity 125 MAX evo Junior MAX evo Mini MAX evo Micro MAX evo ...

Page 74: ...eedle pins 3 and thrust washer 4 from the water pump shaft 5 Remove retaining ring 5 with circlip pliers 6 Remove the drive gear 9 from the crankshaft 7 Heat balance gear 8 7 evenly with hot air if they do not move freely and remove them from crankshaft or balance shaft 8 Remove O ring 9 from the crankshaft 9 Inspect crankcase see Chapter 5 section Crankcase inspection Effectivity 125 MAX evo Juni...

Page 75: ...16T 3 Needle pin 4x15 8 4 Thrust washer 5 Retaining ring with lug 20x1 2 6 Water pump gear 19 T 7 Balance gear 50 T 8 Balance gear 50T 9 O ring 18x3 5 ______________________________________________________ Chapter 5 Page 8 November 01 2021 Effectivity 125 MAX evo Junior MAX evo Mini MAX evo Micro MAX evo ...

Page 76: ...kcase NOTE Use two hex screws to separate the case halves 1 Unscrew all M6 screws 1 and remove them 2 Unscrew one half of the crankcase from the trestle mounting plate 3 Screw Allen screws 2 evenly into the extraction thread and press the case halves evenly apart Figure 5 6 Crankcase 1 2 Allen screws ______________________________________________________ Effectivity 125 MAX evo Junior MAX evo Mini...

Page 77: ...rom the case Figure 5 7 Balance shaft 1 Crankcase half 2 Gasket 3 Balance shaft 4 Water pump shaft ______________________________________________________ 7 Gently tap the crankshaft 1 with the plastic hammer 3 to remove the crankshaft from the case half 2 Chapter 5 Page 10 November 01 2021 Effectivity 125 MAX evo Junior MAX evo Mini MAX evo Micro MAX evo ...

Page 78: ...nstructions See Figure Bearing and oil seal for shaft 1 Remove oil seal 1 and 2 from the two halves with suitable tools 2 Remove oil seals 3 from water pump with suitable tools 3 Remove pick up sensor 4 for the ignition system by removing the two Allen screws 5 4 Remove air vent screw 6 5 Remove countersunk screw 7 and thrust washer 8 6 Heat the two halves of the case to approx 150 C in the convec...

Page 79: ...anger of severe burns and scalds Wear heat resistant gloves during this process DRIVETRAIN SIDE OF THE CRANKCASE Instruction See Figure Clutch end case half 7 Remove case half 1 from the convention oven and drop onto a flat wood board This re leases the ball bearing 2 of the crankshaft and the ball bearing 3 from the case 8 Invert the case half and remove the needle bushing 5 with the installation...

Page 80: ...ls 1 and the locating pin 2 to form a flat base for the case half If it is necessary to replace the locating pin 8 2 it can be removed from the hot case with a pipe wrench Instruction See Figure Ignition side crankcase 9 Remove case half 3 from the convection oven and drop onto a flat wood board This re moves the ball bearings from the crankshaft and the balance shaft 10 Allow both crankcase halve...

Page 81: ... crankcase 1 Pin 8x12 2 Locating pin 8 small M6x40 3 Crankcase assy 4 Ball bearing 6206 5 Ball bearing 6005 ______________________________________________________ Chapter 5 Page 14 November 01 2021 Effectivity 125 MAX evo Junior MAX evo Mini MAX evo Micro MAX evo ...

Page 82: ...nd bearing The parts of the crankshaft repair kit are paired together and must therefore be exclusively used together NOTE Before disassembling the crankshaft clean the parts thoroughly with a cleaning agent grease free Special tools The following special tools and equipment are required Part no Description Field of application n a Press Crankshaft disassembling n a Dial gauge Crankshaft measureme...

Page 83: ...Top section of the repair jig 3 Thrust plate 4 Sleeve 5 Thrust ring 6 Crowbar 7 Thrust pin old piston pin NOTE Con rod parts are not part of the crankshaft repair jig The crankshaft repair kit con rod is available at your ROTAX Dealer Chapter 5 Page 16 November 01 2021 Effectivity 125 MAX evo Junior MAX evo Mini MAX evo Micro MAX evo ...

Page 84: ...______________________________________________ Instructions See Figure Disassembling of the crankshaft NOTE Position the con rod above the bore of the bottom of the crankshaft repair jig Oth erwise the con rod pin the crankshaft half or the bottom section may be damaged NOTE An adapter which is directly attached to the press stamp can be used instead of the old con rod pin Effectivity 125 MAX evo ...

Page 85: ... the crankshaft half ______________________________________________________ 2 Position the crankshaft on the thrust plate 2 on bottom section of the tool 1 and make sure that the crankshaft matches the bore in the bottom section at the crankshaft repair jig 1 Chapter 5 Page 18 November 01 2021 Effectivity 125 MAX evo Junior MAX evo Mini MAX evo Micro MAX evo ...

Page 86: ...e stamp of the press with a diameter of 10 mm or the thrust pin 4 on the connect ing rod pin and press the crankshaft apart 4 Take an available con rod pin 1 and push the old con rod 2 with needle bearing and thrust washer onto the con rod pin Note the installation instructions on following figure Effectivity 125 MAX evo Junior MAX evo Mini MAX evo Micro MAX evo Chapter 5 Page 19 November 01 2021 ...

Page 87: ... rod ______________________________________________________ 5 Take the gearbox end of the crankshaft half other half and press the crank pin out completely Chapter 5 Page 20 November 01 2021 Effectivity 125 MAX evo Junior MAX evo Mini MAX evo Micro MAX evo ...

Page 88: ...ermine the axial play of the con rod bearing CS04 using a feeler gauge 4 Check the specific dimension CS07 5 Determine the radial clearance of the connecting rod bearing CS05 6 Check the run out of the crankshaft CS06 NOTE If one of the wear limits CS01 or CS02 is reached the complete crankshaft must be replaced NOTE If one of the wear limits CS03 CS04 or CS05 is reached BRP Rotax recom mends use ...

Page 89: ...g seat CS02 14 98 mm 15 003 mm 14 95 mm Piston pin bearing seat CS03 18 99 mm 19 005 mm 19 015 mm Conrod bearing axial play CS04 0 52 mm 0 87 mm 0 90 mm Conrod bearing radial play CS05 0 020 mm 0 026 mm 0 03 mm Stroke of crankshaft CS06 0 03 mm Chapter 5 Page 22 November 01 2021 Effectivity 125 MAX evo Junior MAX evo Mini MAX evo Micro MAX evo ...

Page 90: ... Field of application 276051 or 276052 Crankshaft repair jig Crankshaft n a Vise Instructions See Figure Aligning the crankshaft 1 To align the crankshaft clamp the drive end or engine end of the crankshaft half 1 in a vise 2 Use a soft material to cover the crankshaft inside the vise to project the surface 2 Use the lever 3 to lift up the upper half of the crankshaft Figure 5 18 Aligning the cran...

Page 91: ...ment are required Part no Description Field of application n a Press Crankshaft 276051 or 276052 Crankshaft repair jig Crankshaft 899788 LOCTITE 648 Crank pin Instructions See Figure Crankshaft assembly 1 Apply LOCTITE 648 to the inside of the crank pin bore in both crankshaft halves NOTE Remove excess LOCTITE after pressing in otherwise adjacent parts may be damaged 2 Insert the new con rod pin 4...

Page 92: ...leeve 3 Drive end crankshaft half 4 Con rod pin ______________________________________________________ 5 Before positioning the con rod on the pressed in con rod pin check for corrosion or damage dirt or dust particles all bearing needles must be present Slide the new con rod assy with cage 2 from the mounting device onto the pressed in con rod pin 1 Effectivity 125 MAX evo Junior MAX evo Mini MAX...

Page 93: ...shaft assembly 6 Slide the gearbox end crankshaft half 1 into the bottom section of the tool 2 7 Clean the drive end crankshaft web hole with cleaning agent grease free 8 Coat the hole with LOCTITE 648 Remove excess LOCTITE otherwise the con rod may be damaged Chapter 5 Page 26 November 01 2021 Effectivity 125 MAX evo Junior MAX evo Mini MAX evo Micro MAX evo ...

Page 94: ...asy to align the web hole with the con rod pin Make sure that the crankshaft pin is not facing towards the slot in the crankshaft repair jig 11 Loosen the threaded pin in the upper part of the crankshaft repair jig again and position the thrust ring 4 on the top section of the repair jig and press the two crankshaft halves together 12 Measure all features of the crankshaft CS01 CS07 and make sure ...

Page 95: ...bly 1 Press stamp 2 Bottom section of the repair jig 3 Top section of the repair jig 4 Thrust ring ______________________________________________________ Chapter 5 Page 28 November 01 2021 Effectivity 125 MAX evo Junior MAX evo Mini MAX evo Micro MAX evo ...

Page 96: ...NUAL Figure 5 24 Measurement of crank webs CS 07 49 mm 0 05 0 05 ______________________________________________________ Effectivity 125 MAX evo Junior MAX evo Mini MAX evo Micro MAX evo Chapter 5 Page 29 November 01 2021 ...

Page 97: ...hole and the two axial surfaces of the idle gear 2 for signs of wear 3 If the water pump gear 1 the idle gear 2 or the water pump pinion 3 show any sign of wear replace them in pairs Figure 5 25 Water pump drive 1 Water pump gear 19 T 2 Idle gear 28 13 T 3 Water pump pinion 16 T ______________________________________________________ Chapter 5 Page 30 November 01 2021 Effectivity 125 MAX evo Junior...

Page 98: ...______________________________________________ INSPECTION OF BALANCE SHAFT DRIVE General NOTE If one of the balance wheels has cracks or if backlash of the balance wheels at the spline can be seen both balance wheels must be replaced Instructions See Figure Balance shaft drive 1 Check balance gears 1 for any kind of wear signs 2 Place balance gears on the spline the balance shaft or crankshaft and...

Page 99: ...ached the balance shaft must be replaced Instructions See Figure Balance shaft 1 Inspect the groove 3 for the locking ring for damage and wear 2 Check the diameter of the bearing seats BS10 and BS11 for wear Description Code New dimension Wear limit Measured value Main bearing seat BS10 14 96 mm 14 99 mm 14 94 mm Clutch bearing seat BS11 24 97 mm 24 99 mm 24 94 mm Chapter 5 Page 32 November 01 202...

Page 100: ...heck sealing surfaces 2 for damage visual inspection 4 Check threads 3 for cleanliness and clearance 5 Check that lubrication holes 4 are open and clean with compressed air as required Figure 5 29 Crankcase 1 Case halves 2 Sealing surfaces 3 Thread 4 Main bearing lubrication hole ______________________________________________________ Effectivity 125 MAX evo Junior MAX evo Mini MAX evo Micro MAX ev...

Page 101: ...er of severe burns and scalds Wear heat resistant gloves during this process Instruction See Figure Oil seal installation 1 Heat both crankcase halves to 150 C 302 F in the convection oven 2 Remove the drivetrain side of the crankcase and place on a flat wood board 3 Coat the oil seal AS 28x38x7 1 with engine oil in the area between the sealing lip and dust lip 4 Press in the oil seal for shaft to...

Page 102: ...op so the closed side of the cage is facing to the crankshaft NOTE The labeling of the ball bearing must be visible 6 Slide the ball bearing 2 of the balance shaft into the crankcase half to the limit stop so the closed side of the cage is facing to the balance shaft Figure 5 31 Ball bearing 1 Ball bearing 6206 2 Ball bearing 6302 ______________________________________________________ Effectivity ...

Page 103: ...rain side of the crankcase and place on a flat wood board 2 Slide the ball bearing 1 of the balance shaft into the crankcase half to the limit stop so the closed side of the cage is facing the balance drive 3 Install the thrust washer 2 and countersunk screw 3 with the phase of the lock washer pointing to the countersunk screw 4 Coat the oil seal 4 for the ignition end crankcase half with oil in t...

Page 104: ...se the two oil seals for shaft 10x26x7 with KLUEBER ISOFLEX TOPAS NB52 in the area of the sealing lip 9 Press in the first oil seal for shaft to the limit stop with the Insertion jig 3 part no 676021 so the closed end of the oil seal 2 for shaft is visible 10 Grease the installed oil seal for shaft with KLUEBER ISOFLEX TOPAS NB52 11 Press in the second oil seal for shaft to the limit stop with the...

Page 105: ...on jig 1 Ball bearing 6206 2 Oil seal 10x26x7 3 Insertion jig 4 Oil seal 10x26x7 open end ______________________________________________________ Chapter 5 Page 38 November 01 2021 Effectivity 125 MAX evo Junior MAX evo Mini MAX evo Micro MAX evo ...

Page 106: ...shown on the picture into the crankcase half 3 Coat bearing seats of the balance shaft 2 with LOCTITE Anti Seize 4 Insert the balance shaft 2 as shown on the picture into the crankcase half 5 Insert the water pump shaft 3 as shown on the picture into the crankcase half 6 Position new gasket 4 as shown on the picture into the crankcase half Figure 5 35 Crankshaft Balance shaft Water pump shaft 1 Cr...

Page 107: ...n the middle of the housing 1 Insert a new housing gasket part no 650494 included in the gasket set part no 296160 2 Mount both housing halves together with 8 Allen screws M6x45 and 2 Allen screws M6x60 see mounting plan together Tightening torque 10 Nm 3 Attach the crankcase assy on trestle mounting plate with 4 attachment screws Figure 5 36 Tightening sequence 1 10 1 Allen screw M6x45 2 Allen sc...

Page 108: ... See Chapter 6 9 Install the water pump hoses See Chapter 8 10 Install the ignition system See Chapter 3 INSTALLATION OF BALANCE AND WATER PUMP SHAFT DRIVE Instruction See Figure Crankcase 1 Insert the O ring 1 in the crankshaft groove 2 Rotate crankshaft to TDC 3 Slide the balance gear 4 with hub collar outwards on the crankshaft until the markings 6 on the crankshaft and the balance gear match 4...

Page 109: ...he retaining ring during installation Install a new retaining ring on the balance shaft and crankshaft 6 Check that the retaining ring 2 is correctly seated in the grooves of the balance shaft and crankshaft 7 Install the thrust washer 3 needle pin 4 and water pump pinion 5 on the water pump shaft 8 Check the seating of the needle pin 4 in the cutout in the water pump pinion 9 Install the idle gea...

Page 110: ...8 13 T ______________________________________________________ 10 Position new gasket 1 on the case 11 Screw on gear cover 2 with 6 Allen screws M6x25 4 with sealing ring A 6x10 3 and 2 Al len screws M6x30 5 Tightening torque 10 Nm 90 in lb NOTE Use sealing ring A6x10 to seal the oil drainage plug and oil level plug Effectivity 125 MAX evo Junior MAX evo Mini MAX evo Micro MAX evo Chapter 5 Page 43...

Page 111: ...Gasket 2 Gearbox cover 3 Sealing ring A 6x10 4 Allen screw M6x25 5 Allen screw M6x30 ______________________________________________________ Chapter 5 Page 44 November 01 2021 Effectivity 125 MAX evo Junior MAX evo Mini MAX evo Micro MAX evo ...

Page 112: ...n of the carburetor 8 Inspection of the fuel pump 9 Inspection of the intake silencer 9 Installing the carburetor and intake silencer 11 Assembly of carburetor 11 Assembly of float housing 11 Assembly of intake silencer 12 Installation of fuel pump carburetor 13 Contents This chapter describes the removal and installation of the carburetor and intake silencer assembly for the ROTAX 125 MAX evo inc...

Page 113: ...N Overview Position on engine Figure 6 1 Position on engine TYPICAL Figure shows 125 MAX evo engine 1 Intake silencer 2 Carburetor 3 Fuel pump Chapter 6 Page 2 November 01 2021 Effectivity 125 MAX evo Junior MAX evo Mini MAX evo Micro MAX evo ...

Page 114: ...el pump from the fuel pump 4 and seal it with a screw 2 Remove the Bowden cable See also Chapter 3 REMOVAL OF THE CARBURETOR AND INTAKE SILENCER Instruction See Figure Carburetor and intake silencer ATTENTION Fuel may spill out when removing the carburetor ENVIRONMENTAL NOTE Protect the environment Use a container to collect the fuel from the carburetor To remove the carburetor and intake silencer...

Page 115: ...ntake silencer ______________________________________________________ REMOVAL OF THE FUEL PUMP Instruction See Figure Fuel pump To remove the fuel pump the following steps are required 1 Loosen 2 Allen screws M6 with washers fixed by lock nuts 2 Remove the fuel pump 1 from the support bracket 2 Chapter 6 Page 4 November 01 2021 Effectivity 125 MAX evo Junior MAX evo Mini MAX evo Micro MAX evo ...

Page 116: ... 5 Allen screw M6x20 ______________________________________________________ DISASSEMBLY OF THE CARBURETOR 1 Disassembly of the carburetor to the parts shown in Figure Carburetor and clean them with fuel Effectivity 125 MAX evo Junior MAX evo Mini MAX evo Micro MAX evo Chapter 6 Page 5 November 01 2021 ...

Page 117: ...BRP Rotax REPAIR MANUAL Figure 6 4 Carburetor Chapter 6 Page 6 November 01 2021 Effectivity 125 MAX evo Junior MAX evo Mini MAX evo Micro MAX evo ...

Page 118: ... Figure Figure 6 5 Intake silencer 1 Intake silencer case 2 Intake silencer cover 3 Intake silencer tube 4 Filter element support holder 5 Filter element 6 Support bracket 7 Washer 6 4 8 Allen screw M6x20 9 Nut M6 ______________________________________________________ Effectivity 125 MAX evo Junior MAX evo Mini MAX evo Micro MAX evo Chapter 6 Page 7 November 01 2021 ...

Page 119: ...sed air through the holes in the carburetor housing 2 and the jets 3 4 5 6 and 7 and make sure that there is no pollution to have an easy and free flow 3 Check that the clip 8 is tightly seated on the jet needle 9 Figure 6 6 Carburetor 1 Fuel filter 2 Carburetor housing 3 Needle jet DP 267 4 Idling and starter jets 5 Main jet 6 Main jet cup 7 Needle valve 150 standard 200 optional 8 Clip 9 Jet nee...

Page 120: ...______________ INSPECTION OF THE INTAKE SILENCER General ATTENTION A damaged filter element must be replaced immediately Otherwise dirt particles can enter the intake and cause damage to the engine Instruction See Figure Intake silencer 1 Inspect the silencer case 1 and silencer cover 2 for cracks 2 Inspect the intake silencer tube 3 and carburetor socket 10 for cracks or porosity 3 Clean the filt...

Page 121: ...cover 3 Intake silencer tube 4 Filter element support holder 5 Filter element 6 Support bracket 7 Washer 6 4 8 Allen screw M6x20 9 Nut M6 ______________________________________________________ Chapter 6 Page 10 November 01 2021 Effectivity 125 MAX evo Junior MAX evo Mini MAX evo Micro MAX evo ...

Page 122: ...nstruction The following steps are required to install the float housing See Figure Float chamber 1 Check the position of the float attachment 1 in its installed state 2 When the floats 2 are inserted you should be able to see the word ALTO on their top surfaces 3 Install and adjust the Bowden cable in accordance with the operating instructions 4 Set the idle adjuster screw 3 and adjustment screw ...

Page 123: ...ze out excess oil Instruction The following steps are required to install the intake silencer 1 Assemble the components in the opposite succession as you disassembled them See also Chapter 6 section Disassembly of the intake silencer Chapter 6 Page 12 November 01 2021 Effectivity 125 MAX evo Junior MAX evo Mini MAX evo Micro MAX evo ...

Page 124: ...re connected to the correct terminal Preparation The following preparations should be carried out before installing the components Installation of fuel pump Install the fuel pump with two M6x20 cylinder screws and new locknuts with washers onto the support bracket Tightening torque 10Nm 89 in lb Install support bracket with fuel pump onto the carburetor flange using 3 Allen screws M6x25 Tightening...

Page 125: ...owden cable 11 for wear especially where it bends Bends can cause the throt tle to be stuck in fully open See Chapter 9 6 Connect the fuel feed line 9 and Bowden cable 11 to the carburetor 7 Connect the impulse pipe 10 Figure 6 11 Carburetor and intake silencer 1 Carburetor 2 Carburetor flange 3 Hose clamp 4 Intake silencer 5 Hose clamp 51 6 Support bracket 7 Allen screw M6x25 8 Washer 6 4 9 Fuel ...

Page 126: ...lectric starter repair kit 14 Disassembling of electric starter 14 Assembling of electric starter 15 Installation of clutch and starter gear assy 17 Installation of the starter reduction gear assy 17 Installation of the starter gear assy 17 Assembly of the clutch drum 19 Installation of the sprocket 19 Installation of bearing sleeve for sprockets with 11 teeth only 20 Installation of the clutch dr...

Page 127: ...sition on engine Figure 7 1 Clutch and starter gear assy 1 Starter gear assy 2 Clutch drum 3 Sprocket ______________________________________________________ Chapter 7 Page 2 November 01 2021 Effectivity 125 MAX evo Junior MAX evo Mini MAX evo Micro MAX evo ...

Page 128: ...ng 11T sprockets or needle cage all other sprockets 8 Needle pin 5x5 9 Hex nut 28x1 10 O ring 11 Thrust washer 15 2 12 Hex nut M20x1 5 13 Starter gear 14 Clutch 15 Allen screw M6x12 16 Starter reduction gear assy 17 Thrust washer 8 5 18 Electric starter 19 Starter support 20 Allen screw M6x35 Effectivity 125 MAX evo Junior MAX evo Mini MAX evo Micro MAX evo Chapter 7 Page 3 November 01 2021 ...

Page 129: ...y disposed of Do not work with open flames and sources of ignition Fuel must not be allowed to come into contact with hot engine parts and components REMOVAL OF THE ELECTRIC STARTER Instruction See Figure Electric starter 1 Disconnect electrical connection from the starter 2 Remove the electric starter 1 completely by unscrewing 2 Allen screws M6x35 3 from the crankcase and gearbox case Figure 7 3...

Page 130: ...in protection 1 Figure 7 4 Cover 1 Chain protection 2 Allen screw M6x25 ______________________________________________________ Instructions 1 Remove the spark plug 2 Preferred method 1 screw in fixation tool for crankshaft 1 into the spark plug hole to the limit stop 3 Method 2 insert fixation tool assembly 2 part no 676205 in the starter gear assembly Effectivity 125 MAX evo Junior MAX evo Mini M...

Page 131: ...crew and remove hex nut 1 5 Remove thrust washer 2 clutch drum with sprocket 3 needle cage 4 O ring 5 and thrust washer 15 2 6 NOTE With the sprocket with 11 teeth a plain bearing is used instead of the needle cage 4 It is pressed into the sprocket Chapter 7 Page 6 November 01 2021 Effectivity 125 MAX evo Junior MAX evo Mini MAX evo Micro MAX evo ...

Page 132: ..._________ REMOVAL OF THE SPROCKET Instruction See Figure Fixation tool 1 Fix fixation tool for sprocket 1 in a vise 2 Insert clutch drum 4 with installed sprocket 2 into the corresponding toothed cutout 3 Unscrew the hex nut 5 for the sprocket 4 Remove the sprocket from the clutch drum Effectivity 125 MAX evo Junior MAX evo Mini MAX evo Micro MAX evo Chapter 7 Page 7 November 01 2021 ...

Page 133: ...ription Field of application 276016 Puller assy Starter gear assy 277381 Fixation tool Spark plug thread 676205 Fixation tool assy Starter gear assy Instructions Proceed as follows to remove the starter gear assy 1 Method 1 screw in fixation tool for crankshaft 1 into the spark plug thread to the limit stop 2 Method 2 insert fixation tool assy 2 part no 676205 in the starter gear assy Chapter 7 Pa...

Page 134: ...________________________________________________ 3 Remove the clutch 3 4 Unscrew hex nut M20 4 Figure 7 9 Clutch 1 Clutch 2 Allen screw M6x12 3 Hex nut M28x1 ______________________________________________________ Effectivity 125 MAX evo Junior MAX evo Mini MAX evo Micro MAX evo Chapter 7 Page 9 November 01 2021 ...

Page 135: ...far 6 Pull out starter gear assy 3 7 Remove starter reduction gear assy 4 with the thrust washer 5 below Figure 7 10 Starter gear assy 1 Puller assy 2 Allen screws M6x60 3 Starter gear assy 4 Starter reduction gear 5 Thrust washer ______________________________________________________ Chapter 7 Page 10 November 01 2021 Effectivity 125 MAX evo Junior MAX evo Mini MAX evo Micro MAX evo ...

Page 136: ...ear and replace if applicable 2 Inspect the needle cage 4 or bearing sleeve for signs of wear and replace if applicable 3 Inspect the teeth of the sprocket 5 for wear compare and replace if applicable Figure 7 11 Clutch drum plain bearing needle cage sprocket 1 Clutch drum 2 Thrust washer 3 Thrust washer 15 2 4 Plain bearing needle cage 5 Sprocket __________________________________________________...

Page 137: ..._ INSPECTION OF THE ELECTRIC STARTER General NOTE If the electric starter is malfunctioning the cause is generally that the two carbon brushes are worn or defective In this case all parts in the electric starter repair kit must be renewed Instructions See Figure Electric starter 1 Check starter cable 1 NOTE If the starter cable is faulty the starter cable assy can be replaced 2 Inspect parts of th...

Page 138: ...ear assy 1 Check the hole 1 in the clutch 2 2 Check the teeth of the starter gear assy 3 for damage or deformation 3 Remove LOCTITE residue from the taper 4 of the starter gear assy Figure 7 14 Clutch and starter gear assy 1 Clutch hole 2 Clutch 3 Starter gear 4 Taper Effectivity 125 MAX evo Junior MAX evo Mini MAX evo Micro MAX evo Chapter 7 Page 13 November 01 2021 ...

Page 139: ...ion 5 from the starter 4 3 Unscrew the starter housing screws 8 Figure 7 15 Electric starter 1 Allen screw M6x30 2 Allen screw M6x35 3 Starter support 4 Electric starter 5 Pick up sensor 6 Starter cable 7 Allen or TAPTITE screw M6x20 8 Starter housing screws ______________________________________________________ DISASSEMBLING OF ELECTRIC STARTER Instructions See Figure Electric starter disassembly...

Page 140: ...ole from the starter sup port and clean them Figure 7 16 Electric starter disassembly ASSEMBLING OF ELECTRIC STARTER Instructions NOTE The brushes must contact the slip ring correctly 1 Inspect the carbon brushes and replace if necessary with new parts ROTAX part no 281262 2 Insert the plastic ring in the starter motor support so that it does not rotate 3 Insert the positive contact from inside th...

Page 141: ...f the plastic ring press the brushes against them 8 Carefully insert the rotor shaft 9 Fill the starter motor support with LOCTITE 5910 in the region of the positive This protects the fragile carbon brushes from vibration 10 Insert the O ring into the starter motor support 11 Hold the rotor shaft with a suitable tool and secure the solenoid housing on the starter motor support Chapter 7 Page 16 No...

Page 142: ... with lithium based grease in the area of the two bearing seats and the two gears 2 Slide the thrust washer 8 1 150 5 2 and starter reduction gear assy 1 into the bearing seat in the housing together Figure 7 17 Starter reduction gear assy 1 Starter reduction gear 2 Thrust washer INSTALLATION OF THE STARTER GEAR ASSY Special tools The following special tools and equipment are required Part no Desc...

Page 143: ...on 2 insert fixation tool assy 3 into the starter gear assy 1 3 Lubricate taper of starter gear assy 1 with LOCTITE 648 4 Install starter gear assy 1 onto crankshaft and tighten with hex nut M28x1 SW 30 H 4 6 2 Tightening torque 120 Nm 89 ft lb 5 Wipe away the surplus LOCTITE 6 Install the clutch 4 with 3 Allen screws M6x12 5 and secure with LOCTITE 648 Tighten ing torque 17 Nm 150 in lb Chapter 7...

Page 144: ... Description Field of application 944231 Locating locking device Clutch drum 277362 Locating locking device Clutch drum 899788 LOCTITE 648 Hex nut Instruction See Figure Fixation tool 1 Fix fixation tool for sprocket 1 in a vise 2 Remove LOCTITE residue from the clutch drum 4 and the hex nut 5 3 Position clutch drum 4 on the sprocket 2 with needle pin 3 4 Tighten hex nut 5 and secure with LOCTITE ...

Page 145: ...he following special tools and equipment are required Part no Description Field of application 676040 Installation tool Sprocket Instruction See Figure Installation of bearing sleeve 1 Put the new bearing sleeve 1 with the beveled edge 2 down onto the clutch drum with sprocket 11 teeth and press with installation tool part no 676040 until end stop Chapter 7 Page 20 November 01 2021 Effectivity 125...

Page 146: ... thread 897330 Lithium based grease Running areas Instruction 1 Lubricate crankshaft with lithium based grease in the running area of the needle cage 4 2 Position thrust washer 15 2 6 and O ring 5 on the crankshaft 3 Lubricate the needle cage 4 with lithium based grease and position on crankshaft 4 Slide clutch drum 3 onto the crankshaft 5 Lubricate the crankshaft with LOCTITE 243 in the thread ar...

Page 147: ...Thrust washer 15 2 ______________________________________________________ 8 Lubricate starter reduction gear assy in the area shown in the following figure 9 Install chain protection with 3 Allen screws M6x25 Tightening torque 5 Nm 44 in lb 10 Install spark plug Tightening torque 24 Nm 18 ft lb Chapter 7 Page 22 November 01 2021 Effectivity 125 MAX evo Junior MAX evo Mini MAX evo Micro MAX evo ...

Page 148: ... Instructions 1 Lubricate O ring 2 on the center of the electric starter 1 Figure 7 24 1 Electric starter 2 O ring ______________________________________________________ 2 Install starter support 2 with electric starter 1 using 2 Allen screws M6x35 5 Tightening torque 10 Nm 89 in lb Effectivity 125 MAX evo Junior MAX evo Mini MAX evo Micro MAX evo Chapter 7 Page 23 November 01 2021 ...

Page 149: ...not forget to put on the ground cable 6 3 Tighten Allen screw M6x30 4 on the opposite side of the electric starter 1 Tightening tor que 10 Nm 89 in lb Figure 7 25 1 Electric starter 2 Starter support 3 Centering of housing 4 Allen screw M6x30 5 Allen screw M6x35 6 Ground cable ______________________________________________________ Chapter 7 Page 24 November 01 2021 Effectivity 125 MAX evo Junior M...

Page 150: ...tructions See Figure Adding oil 1 Remove air vent screw 1 2 Add the specified volume of gear oil 100 ml through the filling hole 2 in the housing 3 Use sealing rings A6x10 for the Allen screws 3 oil drain plug 4 Screw in the vent screw 1 hand tight Figure 7 26 Adding oil 1 Air vent screw 2 Filling hole 3 Oil drain plug ______________________________________________________ Effectivity 125 MAX evo ...

Page 151: ...Page 26 November 01 2021 Effectivity 125 MAX evo Junior MAX evo Mini MAX evo Micro MAX evo NOTES BRP Rotax REPAIR MANUAL ...

Page 152: ...ts 6 Installing the radiator 7 Installation of the cooling water hoses 7 Installation of the radiator on engine 8 Final tasks 10 Contents This chapter describes the removal and installation of the cooling system for the ROTAX 125 MAX evo incl Junior Mini Micro MAX evo engine The description is broken down into subsections Effectivity 125 MAX evo Junior MAX evo Mini MAX evo Micro MAX evo Chapter 8 ...

Page 153: ...RIPTION Overview Figure 8 1 Radiator 1 Radiator 2 Cooling water hose 3 Hose clamp ______________________________________________________ Chapter 8 Page 2 November 01 2021 Effectivity 125 MAX evo Junior MAX evo Mini MAX evo Micro MAX evo ...

Page 154: ...t M6 7 Radiator bracket Max evo Junior evo Mini evo 8 Allen screw M6x20 with rounded flange head 9 Washer 6 2 10 Radiator Micro evo Mini evo 11 Windshield Micro evo 12 Radiator bracket Micro evo 13 Lock washer A8 14 Allen screw M8x75 15 Cooling water hose NW 18 16 Clamp 16 25 ______________________________________________________ Effectivity 125 MAX evo Junior MAX evo Mini MAX evo Micro MAX evo Ch...

Page 155: ...olant in a suitable vessel Instructions See Figure Cooling water hoses 1 Loosen the engine side of the hose clamps 2 of the cooling water hoses 1 2 Pull off the radiator with cooling water hose from the bottom 90 elbow and drain coolant 3 Pull of cooling water hose at the cylinder head cover Unscrew the hose clamp and pull the cooling water hose from the port 4 Loosen Allen screw M8x75 3 with lock...

Page 156: ...3 Cooling water hoses 1 Hoses 2 Hose clamps 3 Allen screw M8x75 4 Lock washer A8 ______________________________________________________ Effectivity 125 MAX evo Junior MAX evo Mini MAX evo Micro MAX evo Chapter 8 Page 5 November 01 2021 ...

Page 157: ...assy for any cracks or other damage 3 Check that the radiator cap gasket is in perfect condition 4 Check the cooling water hoses for porosity and leakage 5 Check the radiator s windshield for cracks and damage visual check 6 Check the rubber grommets for wear and cracks Figure 8 4 Radiator typical 1 Cooling fins 2 Radiator 3 Radiator cap 4 Cooling water hose 5 Radiator bracket 6 Rubber grommet ___...

Page 158: ...ration for radiator installation 1 Radiator 2 Rubber grommet 3 Allen screw M6x20 with rounded flange head 4 Washer 6 2 5 Radiator bracket ______________________________________________________ 2 Fit the cooling water hoses 1 to the radiator connection 2 and align with the port on the engine then tighten the hose clamps 3 to make it watertight Effectivity 125 MAX evo Junior MAX evo Mini MAX evo Mic...

Page 159: ..._____________________ INSTALLATION OF THE RADIATOR ON ENGINE Instructions See Figure Installation of the radiator on engine 1 Install radiator with pre mounted radiator bracket 3 on engine an tighten with Allen screw M8x75 2 and Lock washer A8 1 Tightening torque 24 Nm 18 ft lb Chapter 8 Page 8 November 01 2021 Effectivity 125 MAX evo Junior MAX evo Mini MAX evo Micro MAX evo ...

Page 160: ...of the radiator on engine 1 Lock washer A8 2 Allen screw M8x75 3 Radiator with radiator bracket ______________________________________________________ Effectivity 125 MAX evo Junior MAX evo Mini MAX evo Micro MAX evo Chapter 8 Page 9 November 01 2021 ...

Page 161: ...ount of coolant into the filling opening of the radiator 2 Close the radiator cap 3 Check that the cooling system is leak free by warming up the engine 4 Add some more coolant if necessary Chapter 8 Page 10 November 01 2021 Effectivity 125 MAX evo Junior MAX evo Mini MAX evo Micro MAX evo ...

Page 162: ...ne from the trestle mounting plate 7 Installation of the engine on kart chassis 7 Installation of the fuel line 7 Installation of the bowden cable 8 Installation of the ignition system 8 Installation of the exhaust system 9 Contents This chapter describes the removal and installation of the exhaust system module of the ROTAX 125 MAX evo incl Junior Mini Micro MAX evo engine The description is divi...

Page 163: ...w Position on the engine Figure 9 1 1 Exhaust muffler assy 2 Silencer assy 3 Exhaust socket assy ______________________________________________________ Chapter 9 Page 2 November 01 2021 Effectivity 125 MAX evo Junior MAX evo Mini MAX evo Micro MAX evo ...

Page 164: ... 8 Exhaust gasket 9 Spring stainless 10 Tension springs 11 Silencer assy MICRO 12 Isolating mat MICRO 13 Perforated tube assy MICRO 14 Washer 8 4 stain less MICRO 15 Lock nut M8 MICRO 16 Retaining plate 17 Rubber buffer 18 Spring stainless 19 Rubber buffer 20 Washer 8 4 stainless 21 Lock nut M8 Effectivity 125 MAX evo Junior MAX evo Mini MAX evo Micro MAX evo Chapter 9 Page 3 November 01 2021 ...

Page 165: ...eds follows to dismantle the exhaust system 1 Disconnect tension springs 3 with spring hooks from the exhaust socket 2 2 Loosen the nuts M8 with washer on the rubber buffer and remove the exhaust system 3 Take care about the exhaust gasket between exhaust socket and exhaust replace if worn out Figure 9 3 1 Exhaust muffler assy 2 Exhaust socket assy 3 Spring 4 Rubber buffer 30x30xM8 5 Washer 8 4 6 ...

Page 166: ...m noise increases then the silencer baffle mat should be replaced Instructions See Figure Exhaust system 1 Disassembly the exhaust muffler assy and the silencer assy Using the exhaust springs tool part no 251680 remove exhaust springs Remove the exhaust gasket 2 Remove hex collar screw M4x12 with lock nut from the silencer assy 3 Remove old isolating mat ASSEMBLING THE EXHAUST SYSTEM Instructions ...

Page 167: ...12 7 Exhaust gasket 8 Spring stainless 9 Tension spring ______________________________________________________ INSTALLATION OF THE EXHAUST SYSTEM Instructions For installation of the exhaust system see latest Installation Manual for the engine type 125 MAX evo Chapter 9 Page 6 November 01 2021 Effectivity 125 MAX evo Junior MAX evo Mini MAX evo Micro MAX evo ...

Page 168: ...s or death Before installing the engine on the chassis the Installation and Operators Manual for the engine and the installation instructions of the chassis manufacturer must be read and understood For the Installation of the engine on kart chassis see latest current Installation and Opera tors Manual of the engine type 125 MAX INSTALLATION OF THE FUEL LINE Safety instructions m WARNING Non compli...

Page 169: ...using with 2 M6x16 cyl screws On the die cast model the pick up for the ignition unit is fastened to the housing with 2 M6x16 TAPTITE screws self tapping screw NOTE If the two TAPTITE screws are installed in a previously used housing make sure that the screws are correctly positioned in the previously tapped threads in the housing Instructions Proceed as follows to install the ignition system 1 Po...

Page 170: ...lenoid connector 8 Allen screw M6x25 9 CPS connector 10 Starter connector 11 Cable tie ______________________________________________________ INSTALLATION OF THE EXHAUST SYSTEM Instructions For installation of the exhaust system see latest Installation Manual for the engine type 125 MAX evo Effectivity 125 MAX evo Junior MAX evo Mini MAX evo Micro MAX evo Chapter 9 Page 9 November 01 2021 ...

Page 171: ...Page 10 November 01 2021 Effectivity 125 MAX evo Junior MAX evo Mini MAX evo Micro MAX evo NOTES BRP Rotax REPAIR MANUAL ...

Page 172: ... with oil 25 Final tasks 10 G General note 2 I Inspection and adjustment of squish gap 31 Inspection of balance shaft 32 Inspection of balance shaft drive 31 Inspection of clutch and starter gear assy 11 Inspection of cooling system 6 Inspection of crankshaft 21 Inspection of cylinder components 11 Inspection of intake silencer 9 Inspection of piston and piston ring 12 Inspection of the carburetor...

Page 173: ... 15 Process advice 4 R Radiator inspection of components 6 Removal of main bearings and oil seals 11 Removal of radiator 4 Removal of radiator with cap assy 6 Removal of the Bowden cable 8 Removal of the carburetor and intake silencer 3 Removal of the centrifugal clutch assy 4 Removal of the clutch and starter gear assy 4 Removal of the clutch drum 5 Removal of the combustion chamber insert 6 Remo...

Page 174: ......
Reviews: