GAB/2
88 / 234
H172203_1_001
10.5.3
Measurements Provided for Diagnostic
Monitor Output
The monitor output reflects the Gradient current provided by the gradient current connector.
This output is intended for diagnostic purpose. It can be useful for debugging the hardware or
software (pulse programs). The relation is 1 Volt (monitor voltage) per 1 Amperes (gradient
current).
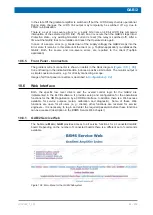
Logging of LVDS link
For diagnostic purpose, the GAB/2 hardware provides recording of the LVDS link data -
incoming requests for specific gradient currents are logged (aimed value and time stamp in a
raster of 10 ns). So, it can be checked if the real time gradient commands correspond exactly
with the gradient defined by the pulse program in TopSpin. This feature is accessible over the
Service Web - the logging buffer can be reset before running an experiment, and the resulting
information is displayed afterwards.
10.5.4
GAB/2 Control State Machine
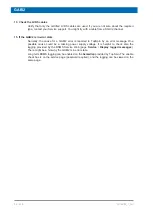
Figure 10.5: The GAB/2 Control State Machine
After Power Up of the BSMS, the GAB/2 Control State Machine steps through the necessary
steps for getting operational. First, the FPGA design is reloaded from the Flash, and after
correct setup of the hardware - if no error occurs - the final state
Operation
is reached. In this
state the GAB/2 is ready for handling the incoming requests over LVDS.
It is possible to switch off the GAB/2 or to start some specific operations (e. g. Firmware
Download or Automatic Offset Calibration) when the GAB/2 is in any state. After completion
of a specific operation, the GAB/2 is re-initialized. In the end - on successful Initialization - the
GAB/2 is ready/operational again.
Summary of Contents for NMR AV4 BSMS System
Page 1: ...BSMS System for AVANCE NEO User Manual Version 001 Innovation with Integrity NMR...
Page 10: ...Contents x H172203_1_001...
Page 22: ...Safety 22 234 H172203_1_001...
Page 26: ...Transport Packaging and Storage 26 234 H172203_1_001...
Page 42: ...Chassis Mainframe 42 234 H172203_1_001...
Page 46: ...Fan Tray 46 234 H172203_1_001...
Page 55: ...ELCB H172203_1_001 55 234 Figure 8 1 ELCB Front Panel with LED s and Connectors...
Page 69: ...ELCB H172203_1_001 69 234 Figure 8 13 Lock RF Boards Diagnostics...
Page 70: ...ELCB 70 234 H172203_1_001...
Page 120: ...L TRX L 19F 120 234 H172203_1_001...
Page 148: ...BSVT Concept 148 234 H172203_1_001...
Page 166: ...SPB 166 234 H172203_1_001...
Page 172: ...VPSB DC and VPSB DC E 172 234 H172203_1_001 Figure 15 3 Block Diagram of the VPSB DC E...
Page 180: ...VPSB DC and VPSB DC E 180 234 H172203_1_001...
Page 187: ...VTA H172203_1_001 187 234 Figure 16 1 VTA Cable Connectors...
Page 193: ...VTA H172203_1_001 193 234 16 7 Ordering Information See Basic BSVT Configuration 124...
Page 194: ...VTA 194 234 H172203_1_001...
Page 200: ...Nitrogen Level Sensor 200 234 H172203_1_001...
Page 204: ...Radiation Shield Temperature Monitoring MAG RS 204 234 H172203_1_001...
Page 208: ...Installation and Initial Commissioning 208 234 H172203_1_001...
Page 210: ...Operation 210 234 H172203_1_001...
Page 216: ...Replacement of Parts 216 234 H172203_1_001...
Page 222: ...Contact 222 234 H172203_1_001...
Page 226: ...List of Figures 226 234 H172203_1_001...
Page 229: ...Glossary H172203_1_001 229 234 Glossary...
Page 230: ...Glossary 230 234 H172203_1_001...
Page 232: ...Index 232 234 H172203_1_001...
Page 233: ...H172203_1_001 233 234...
Page 234: ...Bruker Corporation info bruker com www bruker com Order No H172203...


