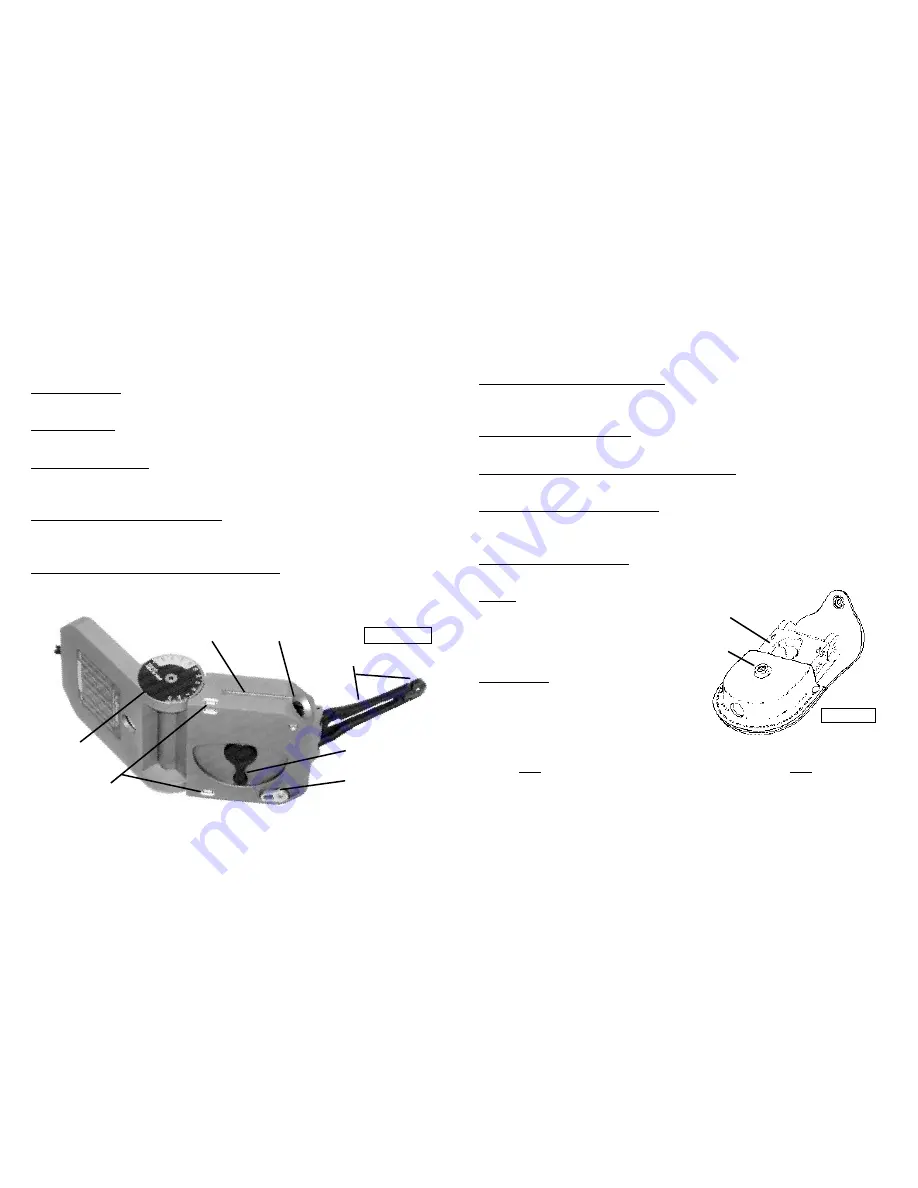
1.13 Large Sight w/ Peep Sight (Fig 3)
The large sight and the attached “buckhorn” style peep sight are used for precise azimuth and
inclination measurement.
1.14 Vernier Adjustment (Fig 3)
The vernier adjustment rotates the vernier and long level for inclination measurements.
1.15 Needle Locking Adjustment -- 2-Positions (Fig 3)
Adjust the needle locking lever to lock and unlock the needle.
1.16 Side/Bottom Long Levels (Fig 3)
When it is not possible to view the round level, use the side/bottom, long levels to level the
GEO transit for azimuth and inclination measurement .
1.17 Hinge Inclinometer (Fig 3)
Measure inclination using the lid and at least one of the bubble levels.
Storage
For storage, Brunton recommends locking the
needle adjustment lever (1.15) and placing the
GEO transit in its case, with the base against the
closing snap. (Fig 4)
Direct Reading
Why are EAST & WEST switched?
The GEO Transit is a
direct reading
compass.
Read azimuth
directly
where the needle points
on the graduated circle.
With the large sight toward the object, read azimuth directly where the north end of the nee-
dle points (“
N
” tip). (Fig 5)
1.8 Vernier (Fig 2)
The vernier is used for inclination measurements with an accuracy to 30 minutes.
1.9 Mirror (Fig 2)
The mirror and mirror center line are used for accurate azimuth and inclination measurements.
1.10 Small Sight (Fig 2)
Attached to the cover, the small “buckhorn” style sight is used for precise bearing and inclina-
tion sighting.
1.11 Ball & Socket Tripod Mount (Fig 3)
Use the slots on both sides of the body for mounting the GEO to the optional Brunton ball &
socket mount, which in turn attaches to an optional Brunton tripod, or monopod.
1.12 Magnetic Declination Adjustment Screw (Fig 3)
Adjust the GEO Transit for magnetic declination, by turning the declination adjustment screw
using a flat-head screw driver.
4
3
Figure 4
Base
Figure 3
1.11
1.13
1.12
1.15
1.16
1.14
1.17
Snap
Summary of Contents for GeoTransit
Page 15: ......


