background image

Manual Part No. 1742290

-A


Revision

: A


Rev. Date 

11

/200

Model 1695565

Operator’s Manual

Not 

for  

Reproduction

Summary of Contents for 1695565

Page 1: ...Manual Part No 1742290 A Revision A Rev Date 11 2009 Model 1695565 Operator s Manual N o t f o r R e p r o d u c t i o n...

Page 2: ...uctions in this manual are exactly followed Other units are purchased in an assembled condition On assembled units it is the responsibility of the owner to make sure the unit is correctly assembled Th...

Page 3: ...eanings These symbols are used on your equipment and defined in your operating manual Review and understand the meanings The use of one of these symbols combined with a signal word will alert you to p...

Page 4: ...with the rim of the fuel tank or container opening at all times until refueling is com plete Do not use a nozzle lock open device g Replace gasoline cap securely and wipe up spilled fuel h If fuel is...

Page 5: ...ds Service Maintenance And Storage 1 Check shear bolts and other bolts at frequent intervals for proper tightness to be sure the equipment is in safe work ing condition 2 Never store the machine with...

Page 6: ...TO MOVE FORWARD 14 BEFORE STARTING THE ENGINE 15 HOW TO STOP THE ENGINE 15 HOW TO START THE ENGINE 15 HOW TO START A COLD ENGINE 15 HOW TO START A WARM ENGINE 16 HOW TO START A WARM ENGINE WITH A FROZ...

Page 7: ...All WARNING CAUTION and instructional mes sages on your unit should be carefully read and obeyed Personal bodily injury can result when these instructions are not followed The information is for your...

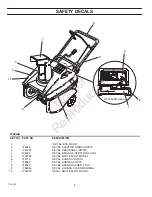
Page 8: ...DASH PANEL EN FR 4 276063 DECAL BRIGGS STRATTON LOGO 5 1742292 DECAL BRUTE 525 21 MODEL 6 723710 DECAL AUGER CONTROL 7 728042 DECAL DANGER CHUTE 8 728043 DECAL DANGER AUGER FOOT 9 1736564 DECAL ACCES...

Page 9: ...rial and or workmanship only To avoid misunderstanding which might occur between the customer and the Dealer listed below are some of the causes of product failure that the warranty does not cover N N...

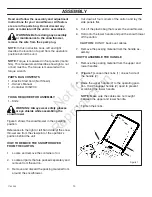
Page 10: ...andle 2 apart to prevent scratching the lower handle NOTE Make sure the cables are not caught between the upper and lower handle 4 Tighten the knobs 1 1 2 4 Cut down all four corners of the carton and...

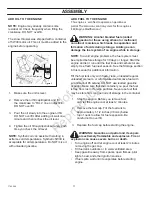
Page 11: ...ait until it evaporates before starting engine 1 Stop the engine Before you remove fuel cap let the engine cool at least 2 minutes 2 Remove the fuel cap Fill the fuel tank to approximately 1 1 2 inche...

Page 12: ...t the proper level For the type engine oil to use see the Engine Manufacturer s manual Make sure the fuel tank is filled with clean fresh unleaded gasoline or petrol with a minimum of 85 octane KNOW Y...

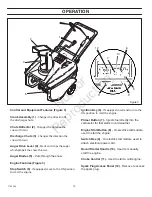
Page 13: ...es Figure 3 Stop Switch 6 If equipped move to the ON position to start the engine Ignition Key 6 If equipped insert and turn to the ON position to start the engine Primer Button 7 Injects fuel directl...

Page 14: ...safety glasses or use a wide vision safety mask over your glasses HOW TO STOP DISCHARGING SNOW 1 Figure 3 To stop discharging snow release the auger drive lever 4 2 To stop the engine turn the ignitio...

Page 15: ...with fresh clean fuel See Add Fuel To The Engine in the Assembly section 2 Move the choke control to FULL position 3 Figure 3 Make sure the auger drive lever 4 is in the disengaged released position 4...

Page 16: ...sh the primer button 7 If the engine fails to start follow the instructions How To Start A Cold Engine NOTE Do not use the primer button 7 to start a warm engine HOW TO START A WARM ENGINE WITH A FROZ...

Page 17: ...w the engine to run for a few minutes The snow and accumulated ice will melt off the engine 11 Clean the snowthrower after each use 12 Remove ice snow and debris from the entire snow thrower Flush wit...

Page 18: ...e or negligence To receive full value from the warranty the operator must maintain the snow thrower as instructed in this manual ENGINE POWER RATING INFORMATION The gross power rating for individual g...

Page 19: ...harge chute 1 2 Remove the fuel cap 3 Remove the two nuts and bolts 2 from the front of the top cover 3 4 Remove the two bolts 4 from the left and right of the top cover 3 5 Remove the eight screws 5...

Page 20: ...Pull the auger control cable 3 up through the cable adjustment bracket 2 6 Put the cable boot 1 over the cable adjustment bracket 2 2 1 7 Figure 6 Install the Z hook 1 to the auger drive lever 2 8 To...

Page 21: ...belt 1 4 To reduce pressure on the drive belt 1 move the idler pulley 2 away from the drive belt 1 Remove the drive belt 1 from between the brake pad 3 and the roller 5 5 Remove the old drive belt 1...

Page 22: ...auger 2 enough to allow the auger 2 to slide out of the auger housing 6 8 To install auger 2 reverse the above steps 1 5 4 3 2 6 Figure 11 HOW TO ADJUST THE BRAKE PAD IMPORTANT An adjustment is only...

Page 23: ...ect the cylinder c Install a new spark plug in the cylinder 4 Thorougly clean the snow thrower 5 Lubricate all lubrication points See the Mainten ance section Figure 14 HOW TO REPLACE THE SPARK PLUG N...

Page 24: ...utdoors block up the snow thrower to be sure the entire machine is off the ground 10 Cover the snow thrower with a suitable protective cover that does not retain moisture Do not use plastic HOW TO ORD...

Page 25: ...vibration Loose parts damaged impeller Stop engine immediately and disconnect spark plug wire Tighten all bolts and make all necessary repairs If vibration continues have the unit serviced by a compe...

Page 26: ...26 1742290 N o t f o r R e p r o d u c t i o n...

Page 27: ...N o t f o r R e p r o d u c t i o n...

Page 28: ...2008 Briggs Stratton Power Products Group L L C All rights reserved No part of this page can be reproduced or transmitted in any form by any means without the express written permission of Briggs Str...

Page 29: ...Model 1695565 Manuel d Utilisation N o t f o r R e p r o d u c t i o n...

Page 30: ...s assembl es le propri taire est responsable de s assurer que l unit est correctement assembl e Le propri taire doit soigneusement inspecter l unit conform ment aux instructions figurant dans ce manue...

Page 31: ...aux souffleuses neige et la fa on de les viter La souffleuse neige est configur e et pr vue pour le d gagement de la neige et ne doit pas tre utilis e toute autre fin Il est important pour l op rateur...

Page 32: ...ure avant de commencer d blayer la neige 9 Toujours porter des lunettes de s curit ou des protecteurs oculaires en utilisant la machine ou en effectuant un r glage ou une r paration et ce afin de prot...

Page 33: ...telles que chauffe eau radiateur ou s che linge Laisser le moteur refroidir avant de le remiser dans un endroit clos 3 Toujours consulter le manuel d utilisation quant aux instructions importantes de...

Page 34: ...CE DU CHASSE NEIGE 42 AVANT DE D MARRER LE MOTEUR 43 ARR T DU MOTEUR 43 D MARRAGE DU MOTEUR 43 D MARRAGE DU MOTEUR QUAND IL EST FROID 43 D MARRAGE DU MOTEUR QUAND IL EST CHAUD 44 D MARRAGE DU MOTEUR S...

Page 35: ...ISSEMENT d ALERTE de votre machine doivent tre lus et respect s Des blessures corporelles peuvent survenir s ils ne sont pas respect s Les informations sont l pour votre s curit et elles sont donc imp...

Page 36: ...IGGS STRATTON LOGO 5 1742292 D CALOMANIE BRUTE 525 21 MOD LE 6 723710 D CALOMANIE CONTROL DE LA FRAISE 7 728042 D CALOMANIE DANGER POUR DE LA CHUTE 8 728043 D CALOMANIE DANGER DE LA FRAISE PIED 9 1736...

Page 37: ...du susceptible entre le client et le concessionnaire une liste de certaines causes de d faillances de produit non couvertes par la garantie figure ci dessous U Usure normale Le petit mat riel motoris...

Page 38: ...a droite et la gauche de la souffleuse neige est faite de la position de l op rateur au guidon COMMENT SORTIR LA D NEIGEUSE DU CARTON 1 Trouver et enlever le bidon d huile 2 Localiser l ensemble de pi...

Page 39: ...e et le carburateur soient vides Utiliser de l essence fra che chaque saison Voir le chapitre intitul Entreposage dans ce manuel pour obtenir des informations compl mentaires Ne remplir le r servoir d...

Page 40: ...au d huile moteur est correct Pour le type d huile moteur utiliser voir le manuel du fabricant du moteur S assurer que le r servoir d essence est plein Apprendre l emplacement de toutes les commandes...

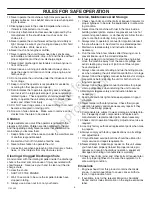
Page 41: ...act ristiques du moteur Figure 3 Interrupteur d arr t 6 S il existe le mettre en position marche pour d marrer le moteur Cl de contact 6 Si elle existe l ins rer et la tourner pour d marrer le moteur...

Page 42: ...tre la cl de contact 5 sur la position OFF JECTION DE LA NEIGE 1 Figure 3 Embrayer le levier de commande de la vis sans fin 4 2 Pour arr ter de rejeter de la neige d brayer le levier de commande de la...

Page 43: ...Voir Recom mandations concernant le carburant dans la rubrique Montage 2 Mettre le starter sur la position FULL 3 Figure 3 S assurer que le levier de commande de la vis sans fin 4 est en position d b...

Page 44: ...FF et ne pas appuyer sur la poire d amor apoire d amor a ge 7 Si le moteur ne d marre pas suivre les instructions de la rubrique D marrage du moteur quand il est froid REMARQUE ne pas utiliser la poir...

Page 45: ...ment laisser le moteur tourner quelques minutes pour faire fondre la neige et la glace accumul e sur le moteur 11 Nettoyer le chasse neige apr s chaque utilisation 12 Enlever la glace la neige et les...

Page 46: ...Society of Automotive Engineers et les performances th oriques ont t obtenues et corrig es selon SAE J1995 r vision 2002 05 Les valeurs de couple sont calcul es sur la base de 3060 tr min et celles d...

Page 47: ...D poser la goulotte d vacuation 1 2 D poser le bouchon du r servoir de carburant 3 Retirer les deux boulons et les deux crous 2 l avant du couvercle sup rieur 3 4 Retirer les deux boulon 4 gauche et...

Page 48: ...3 vers le haut dan le support de r glage 2 6 Remettre la gaine du c ble 1 sur le support de r glage 2 2 1 7 Figure 6 Raccrocher le crochet en Z 1 au levier de commande de la vis sans fin 2 8 Pour v r...

Page 49: ...tension de la courroie 1 loigner le tendeur 2 de la courroie 1 Sortir la courroie 1 d entre la garniture de frein 3 et le rouleau 5 5 D poser la courroie d entra nement 1 us e 6 Pour remonter la cour...

Page 50: ...ige 7 Tapoter la vis sans fin 2 jusqu ce qu elle 2 sorte en glissant du carter 6 8 Pour remonter la vis sans fin neuve 2 proc der l inverse du d montage 1 5 4 3 2 6 Figure 11 R GLAGE DU PATIN DE FREIN...

Page 51: ...Visser une bougie neuve dans la culasse 4 Nettoyer soigneusement le chasse neige 5 Lubrifier tous les points graisser Voir la rubrique Entretien Figure 14 REMPLACEMENT DE LA BOUGIE REMARQUE Ce syst m...

Page 52: ...le chasse neige sur cales pour s assurer qu il ne repo se plus sur le sol 10 Couvrir le chasse neige d une couverture de protection qui ne retienne pas l humidit Ne pas utiliser de plastique COMMANDE...

Page 53: ...mmag e Arr ter imm diatement le moteur et d brancher le fil de bougie Resserrer tous les boulons et effectuer toutes les r parations n cessaires Si les vibrations persistent faire v rifier l appareil...

Page 54: ...54 1742290 N o t f o r R e p r o d u c t i o n...
Page 55: ...N o t f o r R e p r o d u c t i o n...
Page 56: ...2009 Briggs Stratton Power Products Group L L C All rights reserved No part of this page can be reproduced or transmitted in any form by any means without the express written permission of Briggs Str...

Reviews: