


16/25
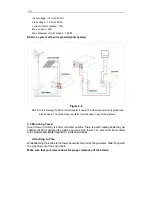
wind of the wire a shortcut between all three phases.
CAUTION: THE BLADES ARE SHARP. USE CAUTION WHILE HANDLING THE BLADES.
3.4 Step-By-Step Instructions
The following
Step-By-Step-Installation-Procedures
provide you with an
outline of the
BSG
installation process. This consolidated reference should
only be used as an outline during installation. Refer to the appropriate sections
for further details.
1) Run the wires from the battery (do not connect to the battery), through the pole to
the top of the tower.
Be sure not to connect the wires to the battery until
everything else has been completed.
2) Strip the insulation back from each set of wires.
3) Connect the wires from the
BSG
to the wires running to the battery.
4) Insulate the connections using either heat shrink tubing or a quality electrical tape.
CAUTION: IF THE WIRES ARE HOOKED-UP BACKWARDS YOU WILL DAMAGE THE
BSG ELECTRONICS. (IF YOU ARE UNCERTAIN OF THE POLARITY OF THE WIRES,
SPIN THE ROTOR SHAFT AND MEASURE THE VOLTAGE DIRECTION WITH A VOLT
METER).
5) Once the wires are attached to the
BSG,
Do not use plastic pipe.
6) Remove the nut on the rotor shaft, and carefully attach the assembled hub and blades to
the rotor shaft without pushing the rotor shaft into the turbine.
7) Run all wires from the turbine to the battery. Be sure to crimp and solder the connections
using the appropriate sized connectors. If you plan to connect an amp meter into your
system.
IMPORTANT: SEVERE UNIT DAMAGE MAY RESULT FROM IMPROPER
GROUNDING. FAILURE TO PROPERLY GROUND THE TURBINE WILL VOID YOUR
WARRANTY.
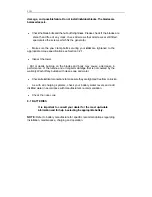
8) Before attaching the wiring to the battery, make sure that all circuit breakers are in the
off position.
9) Attach wires to the battery.
10) Turn on the circuit breakers. When the BSG is first connected to the battery bank, the