www.bssindustrial.co.uk
28
Knob setting position
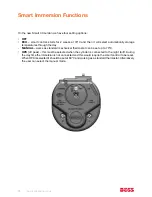
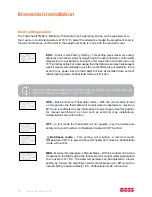
The Thermowatt TMEC-2 Electronic Thermostat has 5 operating modes, and is supplied set to
the maximum control temperature of 70°C. To select the alternative modes the adjustment knob is
turned anticlockwise, until the slot in the adjustment knob is in line with the required mode:
Website: www.thermowatt.com
Contact: thermowattservice@thermowatt.com
the most efficient use of electricity. In the event of any power loss the thermostat will lose all recorded
data, and will restart learning mode. Antibacterial mode will function. NOTE: Changing thermostat setting
from the factory pre-set position may impact upon the efficiency rating of the cylinder in which it is fitted.
OPK – Basic Electronic Thermostat mode – With the control knob turned on this
position the thermostat will control water temperature to maximum 60°C and is
unaffected by any interruption of power supply. Use this position for manual
switching or by timer such as economy type installations. Antibacterial mode will function.
OFF – In this mode the thermostat will not operate, only the double pole safety cut
out will function. Antibacterial mode will NOT function.
- Antifreeze mode – This setting will maintain a minimum water temperature of
20°C to prevent the water heater from freezing. Antibacterial mode will function.
MAX – Maximum temperature in Manual Mode – With the control knob turned
clockwise to the MAX setting the thermostat will control water temperature to a
maximum of 70°C. The water temperature can be adjusted to a lower setting by
turning the adjustment knob anticlockwise up to 80° where the lowest setting is
approximately 10°C. Antibacterial mode will function
ELECTRICAL CONNECTIONS
1.
This unit should be connected by a suitably qualified electrician in accordance with the latest I.E.E.
regulations.
2.
Ensure the electrical supply is switched off before making any connection to the unit.
3.
The immersion heater must be wired through a double pole isolating switch with contact separation
of at least 3mm in both poles.
4.
The immersion heater must be wired with a heat resistant flexible cord with a minimum T rating of
“T-80” and with a minimum cross-section area of 1.5mm
2
.
5.
Ensure that the terminal screws are not over tightened as this could result in the terminations being
broken off.
WARNING: THIS DEVICE MUST BE EARTHED
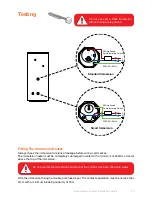
WIRING:
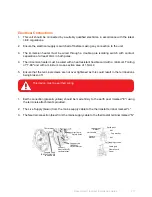
1.
Earth connection (green & yellow) should be made firmly to the earth post (marked “E”) using the
terminals attachments provided.
2.
The Live Supply (brown) from the mains supply cable to the thermostat terminal marked “L”
3.
The Neutral connection (blue) from the mains supply cable to the thermostat terminal marked “N”
Connect Live
(BROWN)
to thermostat
Connect
Neutral (BLUE)
to thermostat
Thermostat
Connect Earth
(GREEN/YELLOW)
to earth post
Over Temp.
Safety Reset
Cup washer
Nut
Earth post
Shake proof
washer
Earth cable
Square
washer
Self tapping screws
Screw
Cable grip
Clamp firmly
Nut
ECO – Smart mode Factory Setting – This setting gives maximum energy
efficiency and uses smart technology to learn the user’s habits to control water
temperature to suit demand. During the first week the thermostat will run at
70°C whilst recording hot water usage, then the following and each subsequent
week it adjusts automatically to give the most efficient use of electricity. In the
event of any power loss the thermostat will lose all recorded data, and will
restart learning mode. Antibacterial mode will function.
Changing thermostat setting from the factory pre-set position may impact upon the
efficiency rating of the cylinder in which it is fitted.
OPK – Basic Electronic Thermostat mode – With the control knob turned
on this position the thermostat will control water temperature to maximum
60°C and is unaffected by any interruption of power supply. Use this position
for manual switching or by timer such as economy type installations.
Antibacterial mode will function.
OFF – In this mode the thermostat will not operate, only the double pole
safety cut out will function. Antibacterial mode will NOT function.
Website: www.thermowatt.com
Contact: thermowattservice@thermowatt.com
the most efficient use of electricity. In the event of any power loss the thermostat will lose all recorded
data, and will restart learning mode. Antibacterial mode will function. NOTE: Changing thermostat setting
from the factory pre-set position may impact upon the efficiency rating of the cylinder in which it is fitted.
OPK – Basic Electronic Thermostat mode – With the control knob turned on this
position the thermostat will control water temperature to maximum 60°C and is
unaffected by any interruption of power supply. Use this position for manual
switching or by timer such as economy type installations. Antibacterial mode will function.
OFF – In this mode the thermostat will not operate, only the double pole safety cut
out will function. Antibacterial mode will NOT function.
- Antifreeze mode – This setting will maintain a minimum water temperature of
20°C to prevent the water heater from freezing. Antibacterial mode will function.
MAX – Maximum temperature in Manual Mode – With the control knob turned
clockwise to the MAX setting the thermostat will control water temperature to a
maximum of 70°C. The water temperature can be adjusted to a lower setting by
turning the adjustment knob anticlockwise up to 80° where the lowest setting is
approximately 10°C. Antibacterial mode will function
ELECTRICAL CONNECTIONS
1.
This unit should be connected by a suitably qualified electrician in accordance with the latest I.E.E.
regulations.
2.
Ensure the electrical supply is switched off before making any connection to the unit.
3.
The immersion heater must be wired through a double pole isolating switch with contact separation
of at least 3mm in both poles.
4.
The immersion heater must be wired with a heat resistant flexible cord with a minimum T rating of
“T-80” and with a minimum cross-section area of 1.5mm
2
.
5.
Ensure that the terminal screws are not over tightened as this could result in the terminations being
broken off.
WARNING: THIS DEVICE MUST BE EARTHED
WIRING:
1.
Earth connection (green & yellow) should be made firmly to the earth post (marked “E”) using the
terminals attachments provided.
2.
The Live Supply (brown) from the mains supply cable to the thermostat terminal marked “L”
3.
The Neutral connection (blue) from the mains supply cable to the thermostat terminal marked “N”
Connect Live
(BROWN)
to thermostat
Connect
Neutral (BLUE)
to thermostat
Thermostat
Connect Earth
(GREEN/YELLOW)
to earth post
Over Temp.
Safety Reset
Cup washer
Nut
Earth post
Shake proof
washer
Earth cable
Square
washer
Self tapping screws
Screw
Cable grip
Clamp firmly
Nut
Antifreeze mode – This setting will maintain a minimum water
temperature of 20°C to prevent the water heater from freezing. Antibacterial
mode will function.
MAX – Maximum temperature in Manual Mode – With the control knob turned
clockwise to the MAX setting the thermostat will control water temperature
to a maximum of 70°C. The water temperature can be adjusted to a lower
setting by turning the adjustment knob anticlockwise up to 80° where the
lowest setting is approximately 10°C. Antibacterial mode will function.
Immersion Heaters with Dual Safety Electronic Thermostat
Thank you for purchasing this immersion heater.
This immersion heater is approved to EN 60335-2-73.
WARNING – THIS UNIT MUST NOT BE MODIFIED IN ANY WAY. Thermowatt approval is dependent upon
the fitting of the appropriate Bipolar Dual Safety Thermostat.
INSTALLATION
1.
Check your mains power voltage matches the voltage rating indicated on the label of the plastic
terminal cover.
2.
The immersion heater must be fixed to the cylinder using the gasket provided. Please ensure that the
unit is not over tightened into the tank boss. Silicon sealant on the gasket is recommended.
WARNING – THIS HEATER SHOULD ONLY BE INSTALLED IN SYSTEMS WHERE THE ELEMENT IS ALWAYS
BELOW WATER LEVEL, SUCH AS A CISTERN FED TANK. CHECK THAT THERE IS WATER IN THE TANK
BEFORE THE IMMERSION HEATER IS FIRST SWITCH ON. If the heater is allowed to run when the water
level is not fully covering the heating element there may be serious damage incurred to the heater,
property or persons.
The appliance is not to be used by children or persons with reduced physical, sensory or mental
capabilities, or lack of experience and knowledge, unless they have been given supervision or instruction
concerning use of the appliance by a person responsible for their safety. Children should be supervised to
ensure that they do not play with the appliance.
THERMOSTAT INFORMATION
The immersion heater is supplied with a T-MEC 2 Electronic thermostat.
To maintain safety, any thermostat replacement must be of the same type.
RECOMMENDATION: low water temperature is recommended to reduce limestone deposit (Not lower
than 60°C).
The thermostat in this unit is able to disconnect both supply conductors (live and neutral) by a single
initiating action. It has a safety resettable cut out mechanism which prevents excessive temperatures. In
case the normal sensing device fail, the over temperature safety device will act to limit the water
overtemperature.
To reset the thermostat after an intervention of the safety device:
1.
Switch off the heater by isolating the power supply
2.
Allow the water in the cylinder to cool down sufficiently
3.
Remove the cover and press the button on the top of the thermostat.
NB: This cut out is a safety device, if this is found to be operating frequently then we recommend to consult
a qualified electrician to investigate the nature of the problem as the thermostat may need to be replaced.
It may be helpful to lower the thermostat setting to avoid unnecessary cut offs.
Knob setting position:
The Thermowatt TMEC-2 Electronic Thermostat has 5 operating modes, and is supplied set to the
maximum control temperature of 70°C. To select the alternative modes the adjustment knob is turned
anticlockwise, until the slot in the adjustment knob is in line with the required mode:
ECO – Smart mode Factory Setting – This setting gives maximum energy efficiency
and uses smart technology to learn the user’s habits to control water temperature
to suit demand. During the first week the thermostat will run at 70°C whilst
recording hot water usage, then the following and each subsequent week it adjusts automatically to give
Immersion Installation
Summary of Contents for BOSS 100
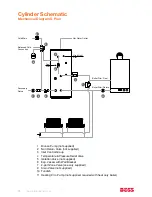
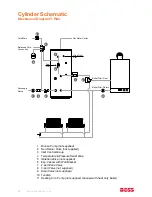
Page 4: ...www bssindustrial co uk 4 ...
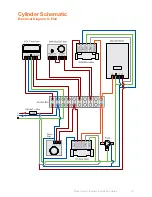
Page 31: ...Boss Direct Indirect Installation Guide 31 Cylinder Schematic Electrical Diagram S Plan ...
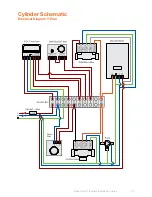
Page 33: ...Boss Direct Indirect Installation Guide 33 Cylinder Schematic Electrical Diagram Y Plan ...
Page 44: ...www bssindustrial co uk 44 48 Direct Indirect Mains Pressure Benchmark Checklist ...
Page 45: ...Boss Direct Indirect Installation Guide 45 49 Water Storage System Commisioning ...
Page 47: ...Boss Direct Indirect Installation Guide 47 Notes ...


