The remainder of this booklet is less like instructions and more like a show-and-tell. Even though you
may use a different turbine, radio, and accessories, you might find the descriptions here useful.
Fuel System Overview
- The manual supplied with your turbine most likely contains info on the recommended fuel
system arrangement. Be sure to follow their recommendations for fuel line sizes and sequence of tanks, solenoids,
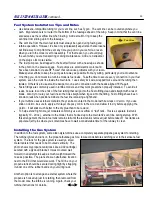
pump, and filter. For a jet, the Reaction 54 uses a very simple fuel system. The single main tank feeds a header tank
that feeds the fuel pump. The positions of the main tank and a UAT header tank are shown clearly on the plans. You
can position your other components as shown in these photos, or differently to suit your taste. BTE offers a Fuel
System Accessory Package that will come in handy for your installation (see Appendix B for more info).
Main Fuel Tank
-
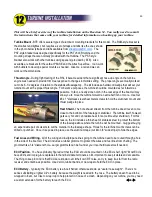
Assemble the 60 oz. Du-Bro Tank included with your kit, being sure to use the kerosene-friendly
brown rubber stopper with the molded "0". The tank needs only two lines - one is the feed line (with the clunk) and the
other is the vent line. The kit also includes a soft foam pad that goes at the top of the fuel tank compartment. It
doesn't have to be glued in, but you can epoxy it in place if you wish. The foam isn't there to absorb vibration; it's
meant to compress when the tank is mounted with the two 1/4" x 1" balsa sticks as shown on the plans. The balsa
sticks are wedged above the cutouts in the fuselage doublers, and can be left unglued. A neoprene rubber pad is also
provided in the kit to provide a small cushion at the front of the tank. In the event of a crash, the neoprene pad might
just be the difference between a ruptured fuel tank or not. Use epoxy to glue the pad to the back of F-5.
About the Main Fuel Tank Orientation
-
The plans show the main tank with the stopper aft and the clunk forward.
I've never had any trouble with it that way, but some builders prefer to switch it around so the clunk is at the rear.
Either way works fine, so if it seems more natural to have the clunk aft, go ahead and install it that way.
Header Tank
-
The UAT is my header of choice for this model. With a UAT, the total fuel capacity of the Reaction 54
is 64 oz. There is plenty of room for a larger header tank if you wish, but keep in mind that extra fuel not only adds to
your flight time, it increases the overall takeoff weight.
A larger header tank will also require extra nose
weight if its position is kept behind the CG. Whatever
you choose for a header tank, make sure it is
mounted securely. There are three lines attached to
the header tank - the first one is connected to the
feed line from the main tank, the second one goes to
the shutoff valve and on to the fuel pump, and the third
is for filling. Keep the fill line plugged at all times
except for when you are actually fueling (or de-fueling)
the model.
Fuel Shut-Off Valve
Fill Line - Coil
When Not In Use
UAT
Fuel Pump
28
Summary of Contents for Reaction 54
Page 1: ...INSTRUCTION BOOK...


