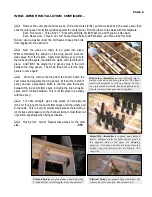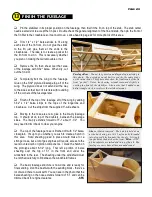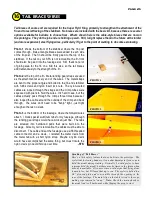
Above:
A laminated balsa block
trimmed to fit at the LE.
Below:
This is a view of the
center wing panel, upside-down,
with the top LE sheeting, shear
webs, and the two wing dowel
blocks in place.
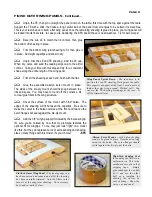
Center Wing Panel, Top View -
You can see the
bottom center TE sheeting has been beveled to
match the rib contour. When the top sheeting is
glued on, the glue joint formed between the two
sheets will help toughen the wing trailing edge.
FINISH CENTER WING PANEL, Continued...
Flip upside down, pin the top TE sheeting flat to your table, and support
the LE with wood.
Cut and fit two more chunks of balsa laminate to fit between the W-1 ribs
at the trailing edge spar. The blocks should fit firmly against the spars and the
wing bolt plate. Epoxy these blocks in place.
Add the bottom TE sheeting (3/32" x 2-1/2").
Add the bottom center TE sheeting (3/32" x 6"x 10-1/8") to W-1 ribs.
Notice that the rear edge of this sheet actually extends well beyond the ends of
the ribs. Use the plans as a guide for the proper placement.
Remove the wing from the table, flip it over, pin it down right-side up, and
remove the temporary stick from the top of the W-1 ribs.
The rear edge of the bottom center TE sheeting must be beveled to match
the slope of the top of the ribs. The best tool for this is to mask off most of your
sanding block, leaving a small strip of sandpaper exposed to sand the balsa.
Now you can add the top center TE sheeting (3/32" x 4-1/2" x 10-1/8").
When dry, flip the wing over upside-down and pin it down, this time with the top spar against the table. Support
the TE with a stick, then take a long careful look at the panel from all angles to be certain it is warp-free.
Bevel the sub LE to match the rib contour, then glue the
bottom LE sheeting in place.
Add the bottom wing joint sheeting, the center sheeting,
six capstrips, and allow to dry. Cut holes in the wing joint
sheeting for access to the setscrews in the channels. Some
builders may want to add guide tubes to help guide your
balldriver to the setscrews.
Unpin, trim the LE and TE sheeting. Add the LE cap.
When dry, carve and sand the LE cap to the airfoil contour.
Trim all sheeting and sticks at each end, flush with the ribs.
Glue the flap servo mounts in place and sheet them with balsa as you did for the aileron servo mounts. You will
also need to cut two holes in the bottom center sheeting for the servo leads to pass through.
Now is a good time to trial fit the wing panels together. Go ahead, stand back and marvel at all that wing area!
If you've been careful with your construction and sanding, you may have a nice, tight fit at the wing joints. If not, it's
time to reach for the filler of your choice. I'll leave the final sanding of the wing panels up to you. You might want to
build the ailerons and flaps first so you can take your time later and make everything fit as best you can. Eventually,
you will have to spend some quality time with your sanding blocks in preparation for covering. Try to avoid sanding
the big areas of sheeting any more than necessary.
-SFK
PAGE 1 1
Summary of Contents for SUPER FLYIN' KING
Page 2: ...TABLE OF CONTENTS 0 1 2 0 3 4 5 4 4 2 22 0 2 0 0 0 6 0 7 1 0 2 2 8 9 6 7 5 2 1...
Page 22: ...0 1 2 3 4 1 5 6 7 PHOTO 1 PHOTO 2 PHOTO 3 PHOTO 4...
Page 23: ...0 1 2 3 PHOTO 1 PHOTO 2 PHOTO 3 PHOTO 4...
Page 24: ...4 5 4 6 4 0 7 0 8 0 0 9 4 1 PHOTO 5 PHOTO 6 PHOTO 7 PHOTO 8 PHOTO 9...
Page 25: ...1 0 1 9 5 9 7 6 A PHOTO 10 PHOTO 11 PHOTO 12...
Page 28: ...0 12 3 4 5 6 7 6 8 3 9 7 9...
Page 31: ......


