background image

14 

English

Driver Installation

The 

Device Drivers & Uti User’s Manual 

disc contains the drivers and utilities

necessary for the proper operation of the computer. This setup will probably have al-
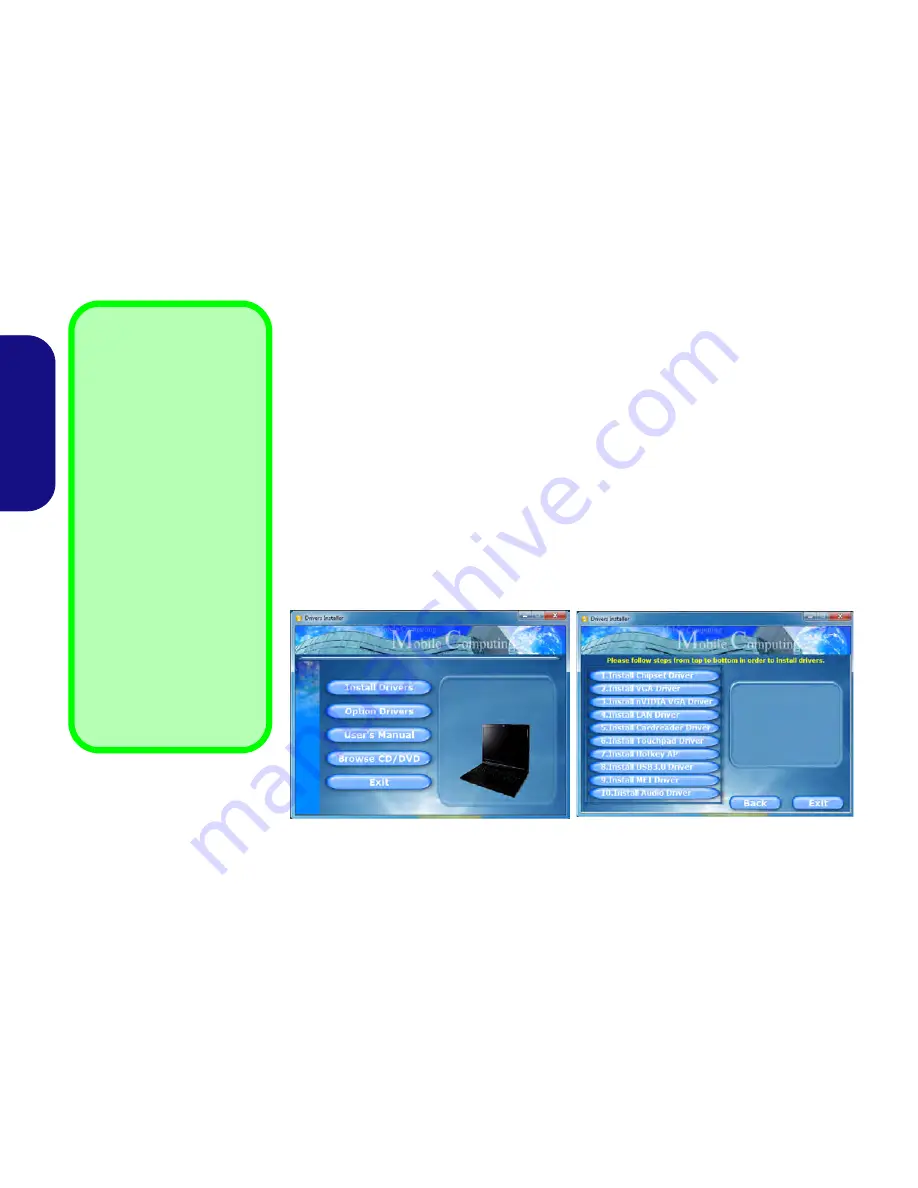
ready been done for you. If this is not the case, insert the disc and click 

Install Drivers

(button), or 

Option Drivers 

(button) to access the 

Optional

 driver menu. Install the

drivers


in the order indicated in 

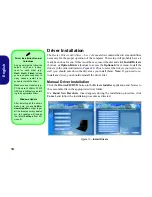
Figure 10

. Click to select the drivers you wish to in-

stall (you should note down the drivers as you install them). 

Note:

 If you need to re-

install any driver, you should uninstall the driver first.

Manual Driver Installation

Click the 

Browse CD/DVD

 button in the 

Drivers Installer

 application and browse to

the executable file in the appropriate driver folder.

If a 

Found New Hardware

 wizard appears

 during the installation procedure, click

Cancel

, and follow the installation procedure as directed.

Figure 10 - Install Drivers

Driver Installation General 

Guidelines

As a general guide follow the
default on

-

screen instruc-

tions for each driver (e.g.

Next 

>

 Next 

>

 Finish

) unless

you are an advanced user. In
many cases a restart is re-
quired to install the driver.

Make sure any modules (e.g.
PC Camera, WLAN or 3.75G/
HSPA) are 

ON

 before install-

ing the appropriate driver.

Windows Update

After installing all the drivers
make sure you enable 

Win-

dows Update 

in order to get

all the latest security updates
etc. (all updates will include
the latest 

hotfixes 

from Mi-

crosoft).

Summary of Contents for 15CL35

Page 1: ......

Page 2: ......

Page 3: ... version française de ce guide commence à la page 37 Le Manuel de l Utilisa teur étendu se trouve sur le disque de Pilotes Utili taires Manuel de l Utilisateur disque Device Drivers Utilities User s Manual Introducción Español Esta Guía del Usuario Concisa le presenta las caracterís ticas principales de su ordenador La versión española de esta guía comienza en la página 55 El Manual del usua rio c...

Page 4: ...hinten 26 Systemübersicht Ansicht von unten 27 Grafikfunktionen 28 Audiofunktionen 30 3 75G HSPA Modul 31 Installation der Treiber 32 Fehlerbehebung 33 Technische Daten 34 Sommaire A propos de ce Guide Utilisateur Concis 37 Guide de démarrage rapide 39 Carte du système Vue de face avec l écran LCD ouvert 40 lndicateurs LED 41 Boutons Hot Key Clavier 42 Carte du système Vues de face gauche droite a...

Page 5: ...iones 70 Sommario Informazioni su questa guida rapida 73 Guida di avvio rapido 75 Descrizione del sistema Vista anteriore con pannello LCD aperto 76 Indicatori LED 77 Pulsanti Hot Key Tastiera 78 Descrizione del sistema Vista anteriore sinistra destra e posteriore 80 Descrizione del sistema Vista inferiore 81 Funzioni video 82 Funzionalità audio 84 Modulo 3 75G HSPA 85 Installazione driver 86 Riso...

Page 6: ...IV ...

Page 7: ...en t or you are planning to re configure or re install portions of the system refer to the expanded User s Manual The Device Drivers Utilities User s Manual disc does not contain an operating system Regulatory and Safety Information Please pay careful attention to the full regulatory notices and safety information contained in the expanded User s Man ual on the Device Drivers Utilities User s Manu...

Page 8: ... a battery that has been dropped or that appears damaged e g bent or twisted in any way Even if the computer continues to work with a damaged battery in place it may cause circuit damage which may possibly result in fire Make sure that your computer is completely powered off before putting it into a travel bag or any such container Before cleaning the computer make sure it is disconnected from any...

Page 9: ... 7 Press the power button to turn the computer on System Software Your computer may already come with system software pre installed Where this is not the case or where you are re configuring your computer for a different system you will find this manual refers to Microsoft Windows 7 Models Differences This notebook series includes different models that vary slightly in design style color and gener...

Page 10: ...D Indicators 6 Hot Key Buttons 7 Keyboard 8 Built In Microphone 9 Touchpad Buttons 10 Fingerprint Reader Optional for Model A Only Wireless Device Operation Aboard Aircraft The use of any portable electronic transmission devices aboard aircraft is usu ally prohibited Make sure the wireless modules are OFF if you are using the computer aboard aircraft Use the key combinations to toggle power to the...

Page 11: ... Sleep Mode Orange The Battery is Charging Green The Battery is Fully Charged Blinking Orange The Battery Has Reached Criti cally Low Power Status Green Number Lock Activated Green Caps Lock Activated Green Scroll Lock Activated Icon Color Description Green UMA Mode Activated Orange Optimus Mode Activated Green Intel Integrated GPU iGPU Activated Orange NVIDIA Discrete GPU dGPU Activated Green The...

Page 12: ...tional features instantly Figure 3 Keyboard Icon Description WLAN Module Power Toggle Mute Toggle PC Camera Power Toggle Model A Model B Function Keys NumLk ScrLk Numeric Keypad Fn Key 3 75G HSPA Module Power Toggle Special Characters Some software applications allow the number keys to be used with Alt to produce special characters These special characters can only be produced by using the numeric...

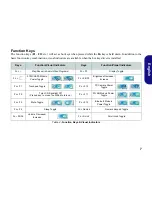
Page 13: ...l Indicators Keys Function Visual Indicators Fn Play Pause in Audio Video Programs Fn F7 Display Toggle Fn 3 75G HSPA Module Power Toggle Fn F8 F9 Brightness Decrease Increase Fn F1 Touchpad Toggle Fn F10 PC Camera Power Toggle Fn F2 Turn LCD Backlight Off Press a key to or use TouchPad to turn on Fn F11 WLAN Module Power Toggle Fn F3 Mute Toggle Fn F12 Bluetooth Module Power Toggle Fn F4 Sleep To...

Page 14: ...y Lock Slot 16 Battery 17 DC In Jack 1 2 5 4 6 3 9 7 8 Front Left 11 14 13 10 12 8 5 15 16 17 USB 3 0 Port The USB 3 0 port is denoted by its blue color USB 2 0 ports are colored black USB 3 0 will transfer data much faster than USB 2 0 and is backwards compatible with USB 2 0 Right Rear Disc Emergency Eject If you need to manually eject a disc e g due to an unexpected power interruption you may p...

Page 15: ...rd Disk Bay Cover 5 Speakers CPU The CPU is not a user ser viceable part Accessing the CPU in any way may violate your warranty Overheating To prevent your computer from overheating make sure nothing blocks any vent while the computer is in use 2 3 1 4 3 3 5 5 2 3 1 4 3 5 Model A Model B 3 3 3 3 5 ...

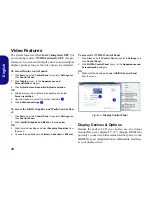
Page 16: ... and Media Control Pan el 1 Click Start and click Control Panel or point to Settings and click Control Panel 2 Click Intel R Graphics and Media in the icon view OR 3 Right click the desktop and select Graphics Properties from the menu 4 Choose the application mode Basic Advanced or Wizard To access the NVIDIA Control Panel 1 Click Start and click Control Panel or point to Settings and click Contro...

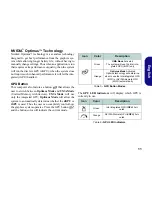
Page 17: ...ory Architecture UMA Mode will use only the integrated GPU Optimus Mode will allow the system to automatically determine whether the dGPU or iGPU is used Thus the user can completely control how the graphics system operates Press the GPU button and the button color will indicate the current mode Table 5 GPU Button Modes The GPU LED indicators will display which GPU is currently in use Table 6 GPU ...

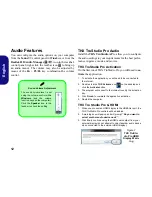
Page 18: ...the internet 2 Double click the THX Activate icon on the desktop and click the Activate button 3 The program will connect to the internet to verify the activation key 4 Click Finish to complete the application activation 5 Restart the computer THX Tru Studio Pro HDMI 1 When you connect an HDMI display to the HDMI Out port the THX TruStudio Pro controls will be disabled 2 A warning box will pop up ...

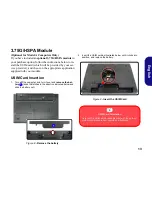
Page 19: ...ation supplied with your module USIM Card Insertion 1 Turn off the computer and turn it over and remove the bat tery slide the latches in the direction indicated below and slide the battery out Figure 8 Remove the battery 2 Insert the USIM card as illustrated below until it clicks into position and replace the battery Figure 9 Insert the USIM Card 1 1 USIM Card Orientation Note that the USIM card ...

Page 20: ...ck the Browse CD DVD button in the Drivers Installer application and browse to the executable file in the appropriate driver folder If a Found New Hardware wizard appears during the installation procedure click Cancel and follow the installation procedure as directed Figure 10 Install Drivers Driver Installation General Guidelines As a general guide follow the default on screen instruc tions for e...

Page 21: ...le 4 on page 7 The captured video files from the PC Camera are taking up too much disk space Note that capturing high resolution video files requires a substantial amount of disk space for each file Note that the Windows system requires a minimum of 15GB of free space on the C drive system partition It is recommended that you save the capture video file to a location other than the C drive limit t...

Page 22: ...el A 15 6 39 62cm HD HD FHD LCD Model B 17 3 43 94cm HD FHD LCD Memory Two 204 Pin SO DIMM Sockets Supporting DDR3 1333 1600MHz Memory Memory Expandable up to 8GB Video Adapter Intel GMA HD and NVIDIA GeForce N12P GS Supports NVIDIA Optimus Technology Intel Integrated GPU Intel GMA HD Microsoft DirectX 10 1 Compatible NVIDIA Discrete GPU NVIDIA GeForce N12P GS 1GB GDDR3 Video RAM Microsoft DirectX...

Page 23: ...Multi in 1 Card Reader MMC MultiMedia Card RS MMC SD Secure Digital Mini SD SDHC SDXC MS Memory Stick MS Pro MS Duo Mini Card Slots Model A Slot 1 for WLAN Module or WLAN and Blue tooth Combo Module Factory Option Slot 2 for 3 75G HSPA Module Model B Slot 1 for WLAN Module or WLAN and Blue tooth Combo Module Environmental Spec Temperature Operating 5 C 35 C Non Operating 20 C 60 C Relative Humidit...

Page 24: ...18 English ...

Page 25: ...ion ohne Vorankündigung zu überarbeiten und den Inhalt zu verändern Einige oder alle Funktionen des Computers sind bereits eingerichtet worden Falls das nicht der Fall ist oder wenn Sie ein zelne Teile des Systems neu konfigurieren oder neu installieren möchten finden Sie eine Anleitung im erweiterten Benut zerhandbuch Die Disc Device Drivers Utilities User s Manual enthält nicht das Betriebssyste...

Page 26: ...ch spezifiziert sind Entsorgen Sie die Akkus nicht in Feuer Sie können explodieren Richten Sie sich nach den regional gültigen Entsorgungsvorschriften Verwenden Sie den Akku nicht mehr wenn er heruntergefallen ist oder in ande rer Weise beschädigt z B verzogen ist Auch wenn der Computer mit dem beschädigten Akku zu funktionieren schein können dadurch Stromkreise beschädigt werden die schließlich e...

Page 27: ...D hoch 7 Drücken Sie auf den Netzschalter um den Computer einzuschalten Systemsoftware Möglicherweise wurde das Notebook bereits mit vorin stallierter Software ausgeliefert Ist das nicht der Fall oder wenn Sie das Notebook für ein anderes System neu konfigu rieren möchten finden Sie dazu eine Anleitung in diesem Handbuch zu Microsoft Windows 7 Modllunterschiede Diese Notebookserie umfasste verschi...

Page 28: ...t Key Tasten 7 Tastatur 8 Mikrofon 9 Touchpad mit Tasten 10 Fingerabdruckleser optio nal nur für Modell A Die Benutzung drahtlos angeschlossener Geräte in Flugzeugen In der Regel ist die Benutzung jeglicher tragbarer elektronischer Funkgeräte in Flug zeugen verboten Achten Sie darauf daß die Wireless Module AUSGESCHALTET sind wenn Sie den Computer im Flugzeug benutzen Drücken Sie die entsprechende...

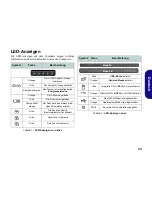
Page 29: ...ge Der Akku wird geladen Grün Der Akku ist voll geladen Lampe blinkt orange Der Akku hat einen kritisch nied rigen Stromstatus erreicht Grün Die Funktion NumLk Nummerntastatur ist aktiviert Grün Caps Lock ist aktiviert Grün Scroll Lock ist aktiviert Symbol Farbe Beschreibung Grün UMA Modus aktiviert Orange Optimus Modus aktiviert Grün Integrierte GPU iGPU von Intel aktiviert Orange Diskrete GPU dG...

Page 30: ... Tastatur Symbol Beschreibung Wireless LAN Modul aktivieren deaktivieren Stummschaltung Stummschaltung aufheben PC Kamera aktivieren deaktivieren Modell A Modell B Numeric Fn Taste Nummemtastatur Ein Ausschalten des 3 75G HSPA Moduls Funktionstasten Num Rollen Sonderzeichen Bei einigen Programmen können die Nummern Tasten zur Er zeugung von Sonderzeichen zusammen mit der Taste Alt gedrückt werden ...

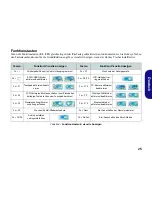
Page 31: ...Fn F7 Wechseln der Anzeigegerate Fn 3 75G HSPA Modul aktivieren deaktivieren Fn F8 F9 LCD Helligkeit ver ringern erhöhen Fn F1 Touchpad aktivieren deakti vieren Fn F10 PC Kamera aktivieren deaktivieren Fn F2 LCD Hintergrundlicht ausschalten zum Einschalten beliebige Taste drücken oder Touchpad berühren Fn F11 Wireless LAN Modul aktivieren deaktivieren Fn F3 Stummschaltung Stumm schaltung aufheben ...

Page 32: ...r optisches Laufwerk 14 Notauswurfloch 15 Sicherheitsschloß Buchse 16 Akku 17 DC Eingangsbuchse 1 2 5 4 6 3 9 7 8 11 14 13 10 12 8 5 15 16 17 USB 3 0 Anschluss Der USB 3 0 Anschluss ist blau co diert USB 2 0 Anschlüsse sind schwarz Die Datenübertragung ist bei USB 3 0 viel schneller als bei USB 2 0 und USB 3 0 ist rückwärts kompatibel mit USB 2 0 Linke Seite Vorderseite Hinterseite Rechte Seite Di...

Page 33: ... schachts 5 Lautsprecher CPU Die CPU darf nicht vom An wender repariert werden Jeglicher Zugriff auf die CPU führt zum Verlust der Garan tieansprüche Überhitzung Zum Schutz vor Überhitzung Ih res Computers dürfen die Luftungsoffnung en nicht wäh rend das Notebook in Betrieb ist verdeckt werden 2 3 1 4 3 3 5 5 2 3 1 4 3 5 Modell A Modell B 3 3 3 3 5 ...

Page 34: ...en auf 1 Die Intel Steuerung für Grafik und Medien kann aufgerufen werden indem Sie in der Taskleiste auf das Symbol klikken und dann aus dem Menü die Option Grafikeigenschaften wäh len sie können dorthin auch über Intel Grafik und Medien Symbol in der Windows Systemsteuerung gelangen Oder 2 Klicken Sie mit der rechten Maustaste auf den Desktop und dann aus dem Menü die Option Grafikeigenschaften ...

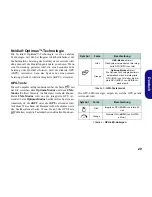
Page 35: ...eim UMA Modus wird nur die integrierte GPU ver wendet beim Optimus Modus bestimmt das System au tomatisch ob die dGPU oder die iGPU verwendet wird Auf diese Weise kann der Benutzer selbst bestimmen wie das Grafiksystem arbeitet Wenn Sie auf die GPU Taste drücken zeigt die Tastenfarbe den aktuellen Modus an Tabelle 5 GPU Tastenmodi Die GPU LED Anzeigen zeigen an welche GPU gerade verwendet wird Tab...

Page 36: ...en Sie doppelt auf das Symbol THX Aktivieren auf dem Desktop und klicken Sie auf Aktivieren Schaltfläche 3 Das Programm stellt eine Verbindung zum Internet her um den Aktivierungsschlüssel zu prüfen 4 Klicken Sie auf Finish Fertig stellen um die Aktivierung der Anwendung abzuschließen 5 Starten Sie den Computer neu THX Tru Studio Pro HDMI 1 Wenn Sie ein HDMI Anzeigegerät an den HDMI Ausgangsan sch...

Page 37: ...Schalten Sie den Computer aus drehen Sie es herum und nehmen Sie den Akku heraus schieben Sie die Riegel in die unten angezeigte Richtung und ziehen Sie den Akku heraus Abb 8 Abnehmen des Akkus 2 Schieben Sie die USIM Karte wie unten abgebildet hinein und lassen Sie sie einrasten Setzen Sie den Akku wieder ein Abb 9 Einsetzen der USIM Karte 1 1 Ausrichtung der USIM Karte Die lesbare Seite der USIM...

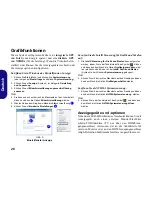
Page 38: ...ivers Installer auf die Schaltfläche Browse CD DVD und navigieren Sie zu der ausführbaren Datei in dem Ordner für Ihren Treiber Wenn während des Installationsvorgangs das Fenster Neue Hardware gefunden er scheint klikken Sie auf Abbrechen um das Fenster zu schließen Befolgen Sie dann die Installationsanweisungen Abb 10 Installation der Treiber Allgemeine Hinweise zur Treiberinstallation Wenn Sie k...

Page 39: ...t der PC Kamera aufgenommenen Dateien benötigen zu viel Speicherplatz Videodateien die mit hoher Auflösung aufgenommen werden erfordern sehr viel Speicherplatz Beachten Sie dass das Betriebssystem Windows mindestens 15GB freien Speicher im Laufwerk C der Systempartition benötigt Es wird empfohlen die aufgenommenen Videodateien in einem anderen Laufwerk als C zu speichern die Dateigröße der Aufnahm...

Page 40: ...psatz BIOS Phoenix BIOS 32Mb SPI Flash ROM LCD Modell A 15 6 39 62cm HD HD FHD LCD Modell B 17 3 43 94cm HD FHD LCD Videoadapter Intel GMA HD und NVIDIA GeForce N12P GS Unterstützt die Optimus Technologie von NVIDIA Integrierte GPU von Intel Intel GMA HD Shared Memory Architektur DVMT bis zu 1 7GB Kompatibel mit MS DirectX 10 1 Diskrete GPU von NVIDIA NVIDIA GeForce N12P GS 1GB GDDR3 Video RAM Kom...

Page 41: ...Anschluss Ein HDMI Ausgangsanschluss Eine Lautsprecher Kopfhörer Ausgangsbuchse Eine Mikrofon Eingangsbuchse Eine S PDIF Ausgangsbuchse Eine RJ 45 LAN Buchse Eine Schnittstelle für externen Monitor Eine DC Eingangsbuchse Mini Card Steckplätze Modell A Steckplatz 1 für Wireless LAN Modul Werkseitige Option Steckplatz 2 für 3 75G HSPA Modul Modell B Steckplatz 1 für Wireless LAN Modul Umgebungsbedin...

Page 42: ...36 Deutsch ...

Page 43: ...blication ou de modifier son conte nu sans préavis Certains ou tous les éléments de l ordinateur peuvent avoir été déjà installés Si ce n est pas le cas ou si vous avez l intention de reconfigurer ou réinstaller des portions du système reportez vous au Manuel de l Utilisateur complet Le disque Device Drivers Utilities User s Manual ne contient pas de système d exploitation Informations de réglemen...

Page 44: ...uez pas d utiliser une batterie qui est tombée ou qui paraît endom magée ex tordue ou vrillée d une manière quelconque Même si l ordinateur continue de fonctionner avec la batterie en place cela peut détériorer le circuit pouvant déclencher un incendie Assurez vous que votre ordinateur est complètement éteint avant de le mettre dans un sac de voyage ou tout autre bagage similaire Avant de nettoyer...

Page 45: ...Pressez le bouton de mise en marche pour allumer Logiciel système Votre ordinateur peut être livré avec un logiciel système pré installé Si ce n est pas le cas ou si vous re configurez votre ordinateur pour un système différent vous constaterez que ce manuel fait référence à Microsoft Windows 7 Différences de modèles Cette série d ordinateurs portables incluent différents mo dèles avec des légères...

Page 46: ...ED 6 Boutons Hot Key 7 Clavier 8 Microphone 9 Pavé tactile Touchpad et boutons 10 Lecteur d empreintes digitales optionnel pour Modèle A seulement Utilisation des appareils sans fil à bord d un avion L utilisation de tout appareil électronique de transmission est générale ment interdite à bord d un avion Assurez vous que les modules sans fil sont éteints si vous utilisez l ordinateur à bord d un a...

Page 47: ...e Veille configuré Orange La batterie est en charge Vert La batterie est complètement chargée Orange clignotant La batterie a atteint le niveau bas critique Vert Verrouillage numérique pavé numérique activé Vert Verrouillage majuscule activé Vert Verrouillage défilement activé Icône Couleur Description Vert Mode UMA activé Orange Mode Optimus activé Vert GPU intégré Intel iGPU activé Orange GPU di...

Page 48: ...nel Figure 3 Clavier Icône Description Activer Désactiver le module LAN sans fil Allume Éteind le son Activer Désactiver le module caméra PC Modèle A Modèle B Caractères Spéciaux Certaines applications permettent que les touches du pavé numérique soient utilisées avec Alt pour produire des carac tères spéciaux Ces caractères spéciaux peuvent être pro duits uniquement en utilisant le pavé numérique...

Page 49: ...nance d affichage Fn Activer Désactiver le module 3 75G HSPA Fn F8 F9 Diminution Augmentation de la luminosité de l écran LCD Fn F1 Activer Désactiver le Touchpad Fn F10 Activer Désactiver le module caméra PC Fn F2 Eteindre le rétroéclairage LCD Appuyez sur une touche ou utilisez le Touchpad pour allumer Fn F11 Activer Désactiver le module LAN sans fil Fn F3 Allume Éteind le son Fn F12 Activer Dés...

Page 50: ...lage de sécurité 16 Batterie 17 Prise d entrée DC 1 15 16 17 Port USB 3 0 Le port USB 3 0 est noté par sa couleur bleue les ports USB 2 0 sont colorés en noir USB 3 0 transfèrera des données bien plus rapidement que l USB 2 0 et il est compatible en amont avec USB 2 0 Face Gauche Arrière Droit 2 5 4 6 3 9 7 8 Left 11 14 13 10 12 8 5 Right Ejection d urgence du disque Si vous devez éjecter manuelle...

Page 51: ...urs CPU Veuillez ne pas essayer d ouvrir ou de forcer le processeur UC de votre ordinateur Le fait d accéder au CPU de quelque manière que ce soit risque de violer la garantie Surchauffe Afin de ne pas causer une sur chauffe de votre ordinateur veri fiez que rien ne bouche la les ventilation s quand le systeme est allumé 2 3 1 4 3 3 5 5 2 3 1 4 3 5 3 3 3 3 5 Modèle A Modèle B ...

Page 52: ...Intel 1 Cliquez sur le menu Démarrer et cliquez sur Panneau de configuration ou pointez sur Paramètres et cliquez sur Pan neau de configuration 2 Cliquez sur Graphiques et média Intel R en Affichage classique OU 3 Cliquez droit sur le bureau et sélectionnez Propriétés graphiques dans le menu 4 Sélectionnez le mode pour l application Mode de Base Mode Avancé ou Mode Assistant Pour accéder au Pannea...

Page 53: ...e Mode UMA Unified Memory Architecture Le Mode UMA uti lisera seulement le GPU intégré Le Mode Optimus permet tra au système de déterminer automatiquement si le dGPU ou le iGPU est utilisé L utilisateur peut ainsi contrôler tota lement la manière dont le système graphique fonctionne Ap puyez sur le bouton GPU et la couleur du bouton indiquera le mode en cours Tableau 5 Modes du bouton GPU Les indi...

Page 54: ...é à Internet 2 Double cliquez sur l icône THX Activer sur le bureau et cliquez sur le bouton Activer 3 Le programme va se connecter à Internet pour vérifier la clé d activation 4 Cliquez sur Terminer pour terminer l activation de l application 5 Redémarrez votre ordinateur THX Tru Studio Pro HDMI 1 Lorsque vous connectez un écran HDMI à la prise de sortie HDMI les commandes de THX TruStudio Pro so...

Page 55: ...sérer la carte USIM 1 Eteignez l ordinateur retournez le et retirez la batterie faites glisser le loquet dans la direction indiquée en dessous et sortez la batterie 2 Insérez la carte USIM comme illustré ci dessous jusqu à ce qu elle se clique en position et remettez la batterie Figure 9 Insérer la carte USIM 1 1 Figure 8 Retirer la batterie Orientation de la carte USIM Notez que le côté lisible d...

Page 56: ...ller et naviguer jus qu au fichier exécutable dans le dossier de pilote approprié Si l assistant Nouveau matériel détecté apparaît pendant la procédure d installation cli quez sur Annuler pour fermer l assistant et suivez la procédure d installation comme in diqué Figure 10 Installation du pilote Directives générales pour l installation du pilote D une manière générale sui vez les instructions par...

Page 57: ...SPA voir le Tableau 4 à la page 43 Les fichiers vidéo capturés depuis la caméra PC prennent trop de place sur le disque Notez que la capture de fichiers vidéo à haute résolution nécessite un espace substantiel sur le disque pour chaque fichier Notez que le système Windows nécessite un minimum de 15Go d espace libre sur la partition système du lecteur C Il vous est recommandé d enregistrer le fichi...

Page 58: ...5 BIOS Phoenix BIOS SPI Flash ROM de 32Mb Options d écrans LCD Modèle A 15 6 39 62cm HD HD FHD LCD Modèle B 17 3 43 94cm HD FHD LCD Mémoire Deux emplacements SODIMM 204 broches supportant la mémoire DDR3 1333MHz 1600MHz Mémoire extensible jusqu à 8Go Sécurité Mot de Passe du BIOS Fente de verrouillage de sécurité type Kensington Option d usine Lecteur d empreintes digitales Modèle A seulement Adap...

Page 59: ...ti en 1 MMC MultiMedia Card RS MMC SD Secure Digital Mini SD SDHC SDXC MS Memory Stick MS Pro MS Duo Logements Mini carte Modèle A Logement 1 pour module WLAN ou module Combo Bluetooth et LAN sans fil Option d usine Logement 2 pour module 3 75G HSPA Modèle B Logement 1 pour module WLAN ou module Combo Bluetooth et LAN sans fil Spécifications environnementales Température En fonction 5 C 35 C Etein...

Page 60: ...54 Français ...

Page 61: ... revisar esta publicación o cambiar su contenido sin previo aviso Algunas o todas las características del ordenador pueden haberse configurado de antemano Si no lo están o si desea reconfigurar o reinstalar partes del sistema consulte el Manual del usuario completo El disco Device Drivers Utilities User s Manual no contiene un sistema operativo Información de regulación y seguridad Por favor prest...

Page 62: ... para desechos especiales Nunca utilice una batería que se haya caído o que parezca dañada p ej doblada o retorcida Incluso si el ordenador sigue funcionando con una batería dañada puede provocar daños en el circuito que podrían causar fuego Compruebe que su ordenador esté completamente apagado antes de intro ducirlo en una bolsa de viaje o en cualquier funda Antes de limpiar el ordenador quite la...

Page 63: ...el ordenador por la tapa LCD 7 Presione el botón de encendido para encender Software de sistema Puede ser que su ordenador tenga instalado un software de sistema Si no es el caso o si desea reconfigurarlo con otro sistema este manual se refiere a Microsoft Windows 7 Diferencias de modelos Esta serie de portátiles incluye diferentes modelos que varían ligeramente en el estilo del diseño color y apa...

Page 64: ...s 10 Lector de huellas digitales opcional sólo para Modelo A 2 1 9 8 6 7 3 4 5 3 10 Model A 15 6 39 62cm Model B 17 3 43 94cm 9 8 6 7 4 5 3 2 1 Uso de dispositivos inalámbricos a bordo El uso de dispositivos electrónicos portátiles a bordo de un avión suele estar prohibido Compruebe que los módulos inalámbricos estén DESCONECTADOS si va a utilizar el ordenador en el avión Utilice las combinaciones...

Page 65: ... La batería se está cargando Verde La batería está completamente cargada Naranja parpadeante La batería ha alcanzado el estado crítico de poca energía Verde El teclado numérico NumLk está acti vado Verde El bloqueo de mayúsculas está activado Verde El bloqueo de desplazamiento está acti vado Icono Color Descripción Verde Modo UMA activado Naranja Modo Optimus activado Verde GPU integrada de Intel ...

Page 66: ...ante Figura 3 Teclado Icono Descripción Activar desactivar el módulo LAN Wireless Conmutación mudo Activar desactivar el módulo cámara PC Modelo A Modelo B Teclado Tecla Fn Teclas de función numérico Activar desactivar módulo 3 75G HSPA Bloq Num Bloq Despl Caracteres especiales Algunas aplicaciones de software le permiten usar las teclas numéricas con Alt para producir caracteres especiales Es tos...

Page 67: ...ídeo Fn F7 Conmutación pantalla Fn Activar desactivar el módulo 3 75G HSPA Fn F8 F9 Reducción Aumento brillo LCD Fn F1 Activar desactivar el Touchpad Fn F10 Activar desactivar el módulo cámara PC Fn F2 Apagar luz de fondo del LCD presione una tecla o utilice el Touchpad para encenderlo Fn F11 Activar desactivar el módulo LAN Wireless Fn F3 Conmutación mudo Fn F12 Activar desactivar el módulo Bluet...

Page 68: ...cia 15 Ranura del cierre de seguridad 16 Batería 17 Conector de entrada DC 1 2 5 4 6 3 9 7 8 11 14 13 10 12 8 5 15 16 17 Puerto USB 3 0 El puerto USB 3 0 se distingue por su color azul el color de los puertos USB 2 0 es negro USB 3 0 transfiere los datos mucho más rápido que USB 2 0 y es compatible con su an tecesor USB 2 0 Lateral derecho Parte frontal Lateral izquierdo Parte posterior Expulsión ...

Page 69: ...bahía para el disco duro 5 Altavoces incorporados CPU El usuario no debe manipular la CPU El acceso a la CPU de cualquier modo puede anular su garantía Recalentamiento Para evitar que su ordenador se recaliente compruebe que nada bloquea la s rejilla s con el equipo encendido 2 3 1 4 3 3 5 5 2 3 1 4 3 5 3 3 3 3 5 Modelo A Modelo B ...

Page 70: ...le clic en el icono THX Activar en el escritorio y haga clic en Activar botón 3 El programa se conectará a Internet para verificar la clave de activación 4 Haga clic en Finalizar para completar la activación de la aplicación 5 Reinicie el sistema THX Tru Studio Pro HDMI 1 Cuando conecte una pantalla HDMI al puerto HDMI Out los controles de THX Tru Studio Pro serán desactivados 2 Aparecerá un cuadr...

Page 71: ...ra acceder al Panel de control de gráficos y multimedia Intel 1 Puede acceder al Panel de control de graficos y multimedia Intel haciendo clic en el icono en la barra de tareas y seleccionando Propiedades de gráficos en el menú o en Gráficos y multimedia Intel R en el Panel de control de Windows O 2 Haga clic con el botón derecho en el escritorio y seleccione Propiedades de gráficos en el menú Par...

Page 72: ...Arquitectura de Memoria Unificada El Modo UMA sólo utilizará la GPU integrada el Modo Optimus permite al sistema determinar automáticamente si utilizar la dGPU o la iGPU Por lo tanto el usuario puede controlar por completo el funcionamiento del sistema gráfico Presione el botón de la GPU y el color del botón indicará el modo actual Tabla 5 Modos del botón GPU Los indicadores LED de la GPU mostrará...

Page 73: ...eta USIM 1 Apague el ordenador y gírelo para quitar la batería deslice los pestillos en la dirección indicada abajo y saque la batería Figura 8 Quitar la batería 2 Inserte la tarjeta USIM como se ilustra a continuación hasta que haga clic en su posición y vuelva a colocar la batería Figura 9 Insertar la tarjeta USIM 1 1 Orientación de la tarjeta USIM Tenga en cuenta que el lateral legible de la ta...

Page 74: ...cutable en la carpeta de controladores apropiada Si durante el procedimiento de instalación aparece una ventana Nuevo hardware encontrado haga clic en Cancelar para cerrar la ventana y siga con el procedimiento de instalación Figura 10 Instalación de controladores Directrices generales para la instalación del controlador Como guía general siga las instrucciones predeterminadas en pantalla para cad...

Page 75: ... 4 en la página 61 Los archivos de vídeo capturados de la cámara PC ocupan demasiado espacio en el disco Tenga en cuenta que capturar archivos de vídeo de alta resolución requiere una cantidad sustancial de espacio en el disco para cada archivo Tenga en cuenta que el sistema Windows requiere un mínimo de 15GB de espacio libre en la partición del sistema unidad C Se recomienda que guarde el archivo...

Page 76: ...iones del LCD Modelo A 15 6 39 62cm HD HD FHD LCD Modelo B 17 3 43 94cm HD FHD LCD Adaptador de vídeo Intel GMA HD y NVIDIA GeForce GT N12P GS Soporta la Tecnología NVIDIA Optimus GPU integrada de Intel Intel GMA HD Compatible con DirectX 10 GPU discreta NVIDIA NVIDIA GeForce N12P GS 1GB de RAM de vídeo GDDR3 Compatible con DirectX 11 Memoria Dos zócalos de 204 pins SODIMM para memoria DDR3 1600 1...

Page 77: ...or de salida de altavoces auriculares Un conector de entrada para micrófono Un conector de salida S PDIF Un puerto para monitor externo Un conector LAN RJ 45 Un conector de entrada DC Ranuras Mini Card Modelo A Ranura 1 para módulo WLAN Opción de fábrica Ranura 2 para módulo 3 75G HSPA Modelo B Ranura 1 para módulo WLAN Especificaciones del ambiente Temperatura En funcionamiento 5 C 35 C Apagado 2...

Page 78: ...72 Español ...

Page 79: ...are la presente pubblicazione o di modificarne il contenuto senza preavviso È possibile che alcune o tutte le funzionalità del computer siano già state configurate In caso contrario o se si sta pianificando di riconfigurare o reinstallare componenti del sistema fare riferimento al Manuale utente completo Il disco Device Drivers Utilities User s Manual non contiene il sistema operativo Informazioni...

Page 80: ...Non continuare a usare in alcun modo una batteria che sia caduta in terra o che sembri danneggiata es piegata o torta Anche se il computer continua a funzionare con una batteria danneggiata questa può provocare danni ai circuiti risultanti in pericolo di incendio Assicurarsi che il computer sia completamente spento prima di inserirlo in una borsa da viaggio o in un contenitore simile Prima di puli...

Page 81: ...7 Premere il pulsante di alimentazione per accendere Software del sistema È possibile che il software sia già pre installato sul computer In caso contrario oppure in casi di riconfigurazione del computer per un sistema diverso questo manuale si riferisce a Microsoft Windows 7 Differenze dei modelli Questa serie di notebook comprende diversi modelli che variano leggermente per stile di design color...

Page 82: ...ndicatori LED 6 Pulsanti Hot Key 7 Tastiera 8 Microfono incorporato 9 Touchpad e pulsanti 10 Lettore d impronte digitali opzionale solo per il Modello A Funzionamento del dispositivo senza fili a bordo di un aereo Solitamente l uso di qualsiasi dispositivo di trasmissione elettronica è proibito a bordo di un aereo Accertarsi che i moduli wireless siano spenti quando si utilizza il computer in aere...

Page 83: ... Arancione La batteria è in carica Verde Batteria completamente carica Arancione lam peggiante La batteria ha raggiunto lo stato critico di carica bassa Verde La funzione blocco numerico tastierino numerico è attivata Verde Bloc Maiusc è attivato Verde Bloc Scorr è attivato Icona Colore Descrizione Verde Modalità UMA attivata Arancione Modalità Optimus Attivata Verde GPU integrata Intel iGPU Attiv...

Page 84: ...nzionalità operative Figura 3 Tastiera Icona Descrizione Attiva disattiva il modulo LAN Wireless Commutazione Mute Attiva disattiva camera PC Modello A Modello B Attiva disattiva modulo 3 75G HSPA Tastierino Tasti funzione Bloc Num Tasto Fn Bloc Scorr numerico Caratteri speciali Alcune applicazioni software consentono di utilizzare i tasti numerici insieme al tasto Alt per produrre caratteri speci...

Page 85: ... disattiva il modulo 3 75G HSPA Fn F8 F9 Riduzione Aumento luminosità LCD Fn F1 Attiva disattiva Touchpad Fn F10 Attiva disattiva camera PC Fn F2 Spegne la retroilluminazione dello schermo LCD pre mere un tasto o utilizzare il Touchpad per ripristinare lo schermo Fn F11 Attiva disattiva il modulo LAN Wireless Fn F3 Commutazione Mute Fn F12 Attiva disattiva il modulo Bluetooth Fn F4 Commutazione So...

Page 86: ... di ingresso DC 1 2 5 4 6 3 9 7 8 5 15 16 17 11 14 13 10 12 5 Porta USB 3 0 La porta USB 3 0 è riconoscibile dal suo colore blu le porte USB 2 0 sono di colore nero USB 3 0 trasferisce i dati molto più velocemente di USB 2 0 ed è compatibile con i dispositivi USB 2 0 Lato destro Lato anteriore Lato sinistro Lato posteriore Espulsione di emergenza del disco Se si desidera estrarre manualmente un di...

Page 87: ...orati CPU La CPU non è un componente che necessita assistenza da parte dell utente Accedere alla CPU in qualsiasi modo implica una violazione della garanzia Surriscaldamento Per prevenire il surriscalda mento del computer accertarsi che non vi sia nulla che ostrui sca la le ventola ventole du rante l uso del computer 2 3 1 4 3 3 5 5 2 3 1 4 3 5 3 3 3 3 5 Modello A Modello B ...

Page 88: ...e fare clic su Pannello di controllo oppure scegliere Impostazioni e fare clic su Pannello di controllo 2 Fare clic sull icona Grafica e multimedia Intel R nella vista Classica O 3 Fare clic con il pulsante destro del mouse sul desktop e scegliere Proprietà grafiche dal menu 4 Scegliere la modalità dell applicazione Modalità di base Modalità avanzata o Modalità procedura guidata Per accedere al Pa...

Page 89: ...rchitecture La modalità UMA utilizza solo la GPU integrata mentre la modalità Optimus consente al sistema di determinare automaticamente se utilizzare la dGPU o la iGPU L utente può controllare in modo completo il funzionamento del sistema grafico Premere il pulsante GPU il colore del pulsante indicherà la modalità corrente Tabella 5 Modalità pulsanti GPU Gli indicatori LED GPU visualizzano quale ...

Page 90: ...sull icona THX Activate sul desktop e fare clic su Activate pulsante 3 Il programma si connetterà a Internet per verificare la chiave di attivazione 4 Fare clic su Finish fine per completare l attivazione dell applicazione 5 Riavviare il computer THX Tru Studio Pro HDMI 1 Quando si collega uno schermo HDMI alla porta di uscita HDMI i controlli di THX Tru Studio Pro vengono disabilitati 2 Verrà vis...

Page 91: ...egnere il computer girarlo e rimuovere la batteria rilasciare i fermi nella direzione indicata sotto e sganciare la batteria facendola scorrere Figura 8 Rimozione della batteria 2 Inserire la carta USIM come illustrato sotto finché non scatta in posizione e installare nuovamente la batteria Figura 9 Inserimento della carta USIM 1 1 Orientamento della scheda USIM Si noti che il lato leggibile della...

Page 92: ...del driver corrispondente Se compare l installazione guidata Trovato nuovo hardware durante la procedura di installazione fare clic su Annulla e seguire la procedura di installazione come descritto Figura 10 Installazione driver Linee guida generali per l installazione dei driver Come guida generale attener si alle istruzioni predefinite vi sualizzate sullo schermo per ogni driver ad esempio Avant...

Page 93: ...er accendere spegnere il modulo 3 75G HSPA vedere la Tabella 4 a pagina 79 I file video catturati dalla camera PC prendono troppo spazio sul disco Nota catturare file di video ad altra risoluzione molto spazio disco disponibile per ogni file Nota Windows richiede un minimo di 15GB di spazio disco libero sulla partizione del disco C Si consiglia di salvare la cattura del file video in un ubicazione...

Page 94: ...Phoenix BIOS SPI Flash ROM da 32Mb Opzioni di LCD Modello A 15 6 39 62cm HD HD FHD LCD Modello B 17 3 43 94cm HD FHD LCD Adattatore video Intel GMA HD e NVIDIA GeForce N12P GS Supporto per tecnologia NVIDIA Optimus GPU integrata Intel Intel GMA HD Compatibile con MS DirectX 10 1 GPU discreta NVIDIA NVIDIA GeForce N12P GS 1GB GDDR3 Video RAM On Board Compatibile con MS DirectX 11 Memoria Due prese ...

Page 95: ...MultiMedia Card RS MMC SD Secure Digital Mini SD SDHC SDXC MS Memory Stick MS Pro MS Duo Slot Mini Card Modello A Slot 1 per il modulo Wireless LAN o modulo Combo Bluetooth e Wireless LAN Opzione di fabbrica Slot 2 per il modulo 3 75G HSPA Modello B Slot 1 per il modulo Wireless LAN o modulo Combo Bluetooth e Wireless LAN Requisiti ambientali Temperatura In esercizio 5 C 35 C Non in esercizio 20 C...

Page 96: ...90 Italiano ...
Reviews: