Operating
- 3.6 -
SMART 3000TW
Installation of the IS3.. Sensors
The installation of IS3.. Sensors is an extremely simple operation thanks the use of
multi-connector cables, which allows the chained interconnection of all sensors,
and their connection to the
PSU 10A
power supplies. To install the sensors operate
as follows:
!
Prepare the adequate multi-connector cable.
"
Open the rear cover of the sensor.
#
Plug the male connector of the cable into the female connector of the sensor
(the reference key on the male connector must be positioned on the upper side
of the connector).
$
Close the rear cover and secure the sensor using a M3 screw.
%
Check that the yarn runs in the centre of the area
#
shown in the following
pictures.
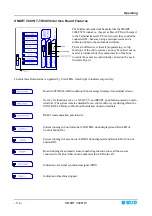
Interpretation of the signalling lights located on the sensors
Green LED ON
Normal operation, the yarn is running inside the sensor;
No technical fault detected by the sensor.
Red LED ON
Yarn stopped.
Green LED FLASHING
The system is in automatic numbering phase.
Red LED FLASHING
During machine operation the sensor has detected a
fault.
(BROKEN: broken yarn - UNCUT: uncutted yarn).
Green LED ON
Red LED ON
Stopped sensor. Switch off, then switch on the system.
If the condition is permanent, replace the sensor.
Green LED FLASHING
Red LED FLASHING
Indicates a technical fault in the sensor
(e.g. a loss of
stored data).
Try to reprogram the sensor. If the fault
remains, replace the sensor.
Summary of Contents for IS3
Page 1: ...SMART 3000TW IS3 YARN CONTROL SYSTEM Operating Manual ENGLISH ...
Page 14: ...Technical Data and Installation 2 6 SMART 3000TW Page intentionally left blank ...
Page 35: ...Operating SMART 3000TW 3 21 Summary Diagram of SMART 3000TW Programming Configuration Menu ...
Page 66: ...Appendix A Quick Reference A 2 SMART 3000TW Symbols Key ...
Page 67: ...Appendix A Quick Reference SMART 3000TW A 3 Symbols Key ...
Page 68: ...Appendix A Quick Reference A 4 SMART 3000TW Symbols Key ...
Page 69: ...Appendix A Quick Reference SMART 3000TW A 5 Symbols Key ...
Page 70: ...Appendix A Quick Reference A 6 SMART 3000TW Page intentionally left blank ...


