background image

SMART KTF 2000 – KTF/100HP Operation


SMART KTF 2000 

3A-21 -


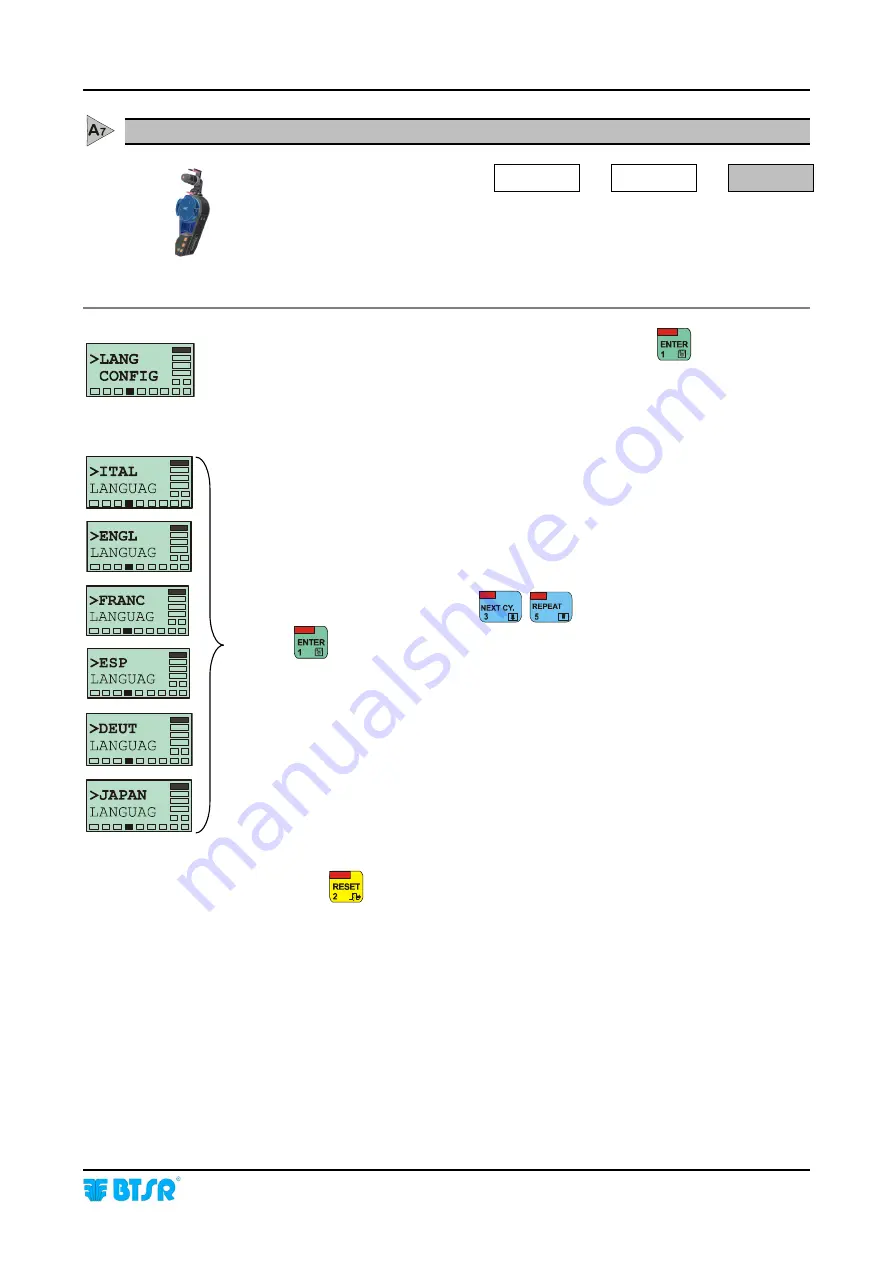
LANG – Language Selection 


SETUP 

CONFIG 


LANG 

 
This function allows you to select the language to be used for displaying messages 
on KTF/100HP screen. The selectable language are: Italian, English, French, 
Spanish, German and Japanese. 


Once you have selected the > LANG CONFIG screen, press 

 to access the 

function. 


Select the desired language using 


Press 

 to confirm the selection 


Press once 

 to exit the function, or twice to return to Main Menu. 


Summary of Contents for SMART KTF 2000

Page 1: ...SMART KTF 2000 YARN CONTROL SYSTEM Operating Manual ENGLISH Rev 2 0 June 2003 ...

Page 2: ...e the contents of this manual without notice For any technical or commercial problem please contact your local BTSR dealer or call directly BTSR customer service centre We will be glad to meet your needs Thank you for your trust and good job The product described herein is compliant with the requirements of 89 336 EEC EMC Directive and 73 23 EEC Low Voltage Directive All BTSR products are covered ...

Page 3: ...aster SMART KTF 2000 Slave Connection LINK Function 2 5 Chapter 3 SMART KTF 2000 OPERATION SMART KTF 2000 Terminal Features 3 1 3A SMART KTF 2000 KTF 100HP OPERATION Preliminary operation for using the SMART KTF 2000 terminal connected to KTF 100HP device 3A 3 How to check the software version and the application type 3A 3 Operating Sequences 3A 4 Functions Available within the SETUP Menu Configur...

Page 4: ...ected to KTF RW system 3B 3 How to check the software version and the application type 3B 3 Operating Sequences 3B 4 Functions Available within the SETUP Menu Configuration 3B 5 Functions Available within the SETUP Menu Article Creation Management 3B 6 Functions Available within the WORK Menu 3B 7 Functions Available within the MEASUR Menu 3B 8 Functions Available within the CONTROL Environment TA...

Page 5: ...TF RW 3B 44 SPEED Reading the yarn feeding Speed in m min of a KTF RW Device 3B 45 METER Measuring the amount of yarn fed by KTF RW Devices 3B 46 BAR RW Displaying the Average Tension and Peak Tension 3B 47 Chapter 4 TROUBLESHOOTING AND MAINTENANCE Troubleshooting on SMART KTF 2000 Terminal 4 1 Ordinary Maintenance 4 2 Repairs 4 2 Updating the Software Version on SMART Terminals 4 3 Appendix A QUI...

Page 6: ......

Page 7: ...apter 3 Operation gives a detailed description of the necessary operation to setup and program the SMART KTF 2000 terminal according to the application needs For your convenience this chapter has been subdivided into 2 parts 3A SMART KTF 2000 KTF 100HP operation and 3B SMART KTF 2000 KTF RW operation Chapter 4 Troubleshooting and Maintenance provides a quick guide to solving the main technical fau...

Page 8: ...d or KTF RW without distinctions MODE 04 This symbol indicates that if the KTF100HP is operating in Mode 04 the characteristics of the described function are different For further information please refer to paragraph Specific Operation Characteristics for Mode 04 page 3 21 of KTF 100HP manual These symbols indicate the typical applications currently implemented on SMART KTF 2000 terminal The pres...

Page 9: ...KTF devices BTSR patent Loading the tension control parameters to one or more KTF devices without the need to directly operate on each individual device Real time reading of Working Tension Speed and Amount of Yarn Fed by each device KTF100 HP comparing them with the parameters detected during the Learn phase Real time reading and comparison by means of bar charts of the amount of yarn fed LFA by ...

Page 10: ...F 2000 Terminal The SMART KTF 2000 system provides a set of unique features which make it a true micro computer dedicated to the control programming activities and statistical analysis of production The main advantages obtained when using the SMART KTF 2000 terminal connected to KTF devices are the following The identification of an impediment to the normal running of the yarns is detected prior t...

Page 11: ...0 mm Integrated Touch pad 5 membrane buttons with integrated red LED Protection 2 fuses 5 x 20 1A Installation The installation of SMART KTF 2000 terminal simply consists in connecting the terminal itself to the KTF devices using a communication cable through which the data exchange between terminal and devices will occur The following page show some connection examples of SMART KTF 2000 terminal ...

Page 12: ...ting Manual the installation of KTF devices mainly depends on the electrical supply of the devices themselves Electrical supply provided by BTSR KTF PW4 power supply Electrical supply provided by external power supply through a flat cable For further details please refer to KTF 100HP operating manual Concerning all electrical systems it is a suggested rule to ensure that the ground cable GND is co...

Page 13: ...ices external power supply flat cable KTF FLAT and SMART KTF 2000 terminal For further details please refer to KTF 100HP operating manual Concerning all electrical systems it is a suggested rule to ensure that the ground cable GND is connected to the device support Not Used Machine Interface Used for LINK function ...

Page 14: ...n Example of SMART KTF 2000 KTF RW SM DIN RW connection For further details please refer to KTF RW operating manual Concerning all electrical systems it is a suggested rule to ensure that the ground cable GND is connected to the device support Machine Interface Used for LINK function ...

Page 15: ...Data and Installation SMART KTF 2000 2 5 SMART KTF 2000 Master SMART KTF 2000 Slave Connection LINK Function The LINK function con be carried out also with the aid of a PC requesting the PC LINK software to BTSR ...

Page 16: ...Technical Data and Installation 2 6 SMART KTF 2000 Page intentionally left blank ...

Page 17: ...nistration phases of the system by means of straight forward messages which can be understood clearly and immediately On the top left side of each button there is a red LED which indicates that the button is pressed down The display screen includes two separate zones used respectively for displaying messages to the operator during the system programming and administration phases and for signaling ...

Page 18: ...haracters displayed where the cursor is located according to the following cyclic sequence When entering numeric data for example the number of devices it allows the increase of numeric value of the field If it is held down continuously the numeric field increments more rapidly 4 CONTROL Button During parameter programming it allows changing the position of the cursor 5 REPEAT button During naviga...

Page 19: ...ces 7 Operating Status Signaling Area To enable a more direct and evident interpretation of the operating context in which you are working on the right hand side and bottom side of the operator message area 16 rectangular boxes labels are implemented They display the operating status of the system and the hierarchic level of the menu at which you are operating More specifically the PROGRAM label i...

Page 20: ...SMART KTF 2000 OPERATION 3 4 SMART KTF 2000 Page intentionally left blank ...

Page 21: ...T KTF 2000 KTF 100HP Operation SMART KTF 2000 3A 1 3 3 3 3A A A A SMART KTF 2000 SMART KTF 2000 SMART KTF 2000 SMART KTF 2000 KTF KTF KTF KTF 100HP 100HP 100HP 100HP OPERATION OPERATION OPERATION OPERATION ...

Page 22: ...SMART KTF 2000 KTF 100HP Operation 3A 2 SMART KTF 2000 Page intentionally left blank ...

Page 23: ... the memory of the SMART KTF 2000 terminal In this case press to continue The system will erase all settings entered by the user and will reload the default values If the error persists refer to Chapter 4 Troubleshooting and Maintenance If the system displays one of the messages that you can see on the left side below it means that the terminal is working correctly and that it is possible to activ...

Page 24: ...For SOCKS F KNIT C KNIT e BODY S typically when the KTF 100HP devices are used the main menu of SMART KTF2000 terminal normally includes 3 items SETUP allows the completion of tasks e CONTR allows the completion of tasks MEASUR allows the completion of tasks During the application configuration step the user may optionally enable the WORK function too typically used only for REWIND application wit...

Page 25: ...rs if the currently configured application is C_KNIT or F KNIT Main Menu Configuration Programming Menu Numbering the KTF Setting the Device System Configuration Application Selection Configuration Setting the SETUP menu access Keycode Setting the TARGET menu access Keycode Language Selection KTF Device TEST KTF SMART KTF 2000 comm TEST Signal TEST ...

Page 26: ...n Menu Configuration Programming Menu Creating a new Modifying article parameters Reading the article s parameter from KTF devices Save them with a new name to the database Loading parameters on KTF 100HP Devices Erasing an article from Database Transferring memory contents between SMART KTF 2000 Master and SMART KTF 2000 Slave ...

Page 27: ...ue Reading the yarn feeding speed in m min of a KTF 100HP device Measuring the amount of yarn fed by KTF 100HP devices Graphic histogram of the Amount of Yarn Fed LFA for every machine s cylinder rev Graphic display of the Amount of Yarn Fed LFA during both carriage strokes of a flat bed machine Only the functions enabled in current application will appear in the Menu ...

Page 28: ...ete control when the learn function has been performed besides monitoring the correct operation of the connected KTF devices the system controls in real time the Amount of Yarn Absorbed LFA by the textile machine during the production process and compares it with the amount detected during the learn phase In this case the CONTROL word appears in capital letters Possible messages during the LEARN f...

Page 29: ...ual Chapter 4 for details ET Number of errors due to negative Tolerance limit exceeded ET Number of errors due to positive Tolerance limit exceeded The Counter Reading function can be activated only if it was enabled in the APPLIC menu item CNT Alm System Monitoring Main Menu Displaying the fault counters total Displaying the fault counters on individual Devices Clearing all counters Clearing coun...

Page 30: ...e configured machine stop mode either immediate stop or stop at the end of cycle controlled through specific interface signals PRX ZPX RESET EXT Application 1 Machine hardware setting in Immediate Stop mode PRX Proximity detecting a pulse at every cylinder revolution ZPX Start End Cycle Signal RESET EXT Reset of alarm condition without operating on terminal System software settings Menu CONTROL TO...

Page 31: ...e currently detected value 1 If the difference between the Learnt LFA value and the detected LFA value exceeds the tolerance the machine will be stopped Application Machine hardware setting PRX Proximity detecting the number of revolutions You will have to install a number of magnets PRX equivalent to the number of controls revolution you want to carry out ZPX Not necessary RESET EXT Reset of alar...

Page 32: ...previously Learnt value with the currently detected value 1 If the difference between the Learnt LFA value and the detected LFA value exceeds the tolerance the machine will be stopped Application Machine hardware setting PRX Proximity detecting the passage of thread guide carriage You must install a magnet allowing to count up a pulse for each carriage stroke ZPX Not necessary RESET EXT Reset of a...

Page 33: ...ONTROL TOLL Set the Control Tolerances Operating Procedures in case of Immediate Stop mode 1 From CONTROL environment perform the LEARN function Length of Absorbed Yarn LFA 2 At the end of the Learn phase the system switches to CONTROL mode and upon each PRX pulse it will compare the previously Learnt value with the currently detected value Through an external disabling signal STC it is possible t...

Page 34: ...have setup the number of devices to be configured NNN shows the amount of devices setup in the previous step XXX shows the number of the first and subsequently the next one device to be numbered On connected KTF 100HP the front red LED starts flashing and the LCD shows the message IDENTIFY 100HP Press the button on KTF 100HP device to which you wish assign the number indicated by XXX Check that a ...

Page 35: ...you may choose to do it directly on the device itself see P3 Programming Level on KTF 100HP Manual page 3 12 Once you have selected the OFFSET CONFIG screen press to access the function AAA Number of first device set up during the initial numbering BBB Number of last device set up during the initial numbering Increases the device number either AAA or BBB Decreases the device number either AAA or B...

Page 36: ...on see the Operating Notes about the LEARN function that can be activated from the Control Environment on page 3A 10 The SYSTEM function is available only if the selected application is C KNIT or F KNIT Once you have selected the SYSTEM CONFIG screen press to access the function NNN A Increases the parameter value either NNN or A Decreases the parameter value either NNN or A Alternatively selects ...

Page 37: ... application The enabled functions are underlined This will make easier the SMART KTF 2000 terminal operation as all the functions not relevant for a given application or in any case not selected by the user will not appear within the various Menus The following table shows the Applications Functions matrix and outlines the default configuration provided by BTSR for each individual Application How...

Page 38: ...ding to the flashing number E g 0 LEARN 1 TARGET etc The underlined numbers indicate Function Enabled to toggle between Enabled and Disabled Once you have configured your application with the desired functions press to confirm Or press to exit the function without changing the current configuration The symbol indicates that the currently selected application is now the AAAAAA Application Press onc...

Page 39: ...the function Enter the code of your choice 1 to 7 alphanumeric characters using the following buttons Increases the character pointed by the cursor Decreases the character pointed by the cursor Moves the cursor one position right Confirms and saves the code which has been set If no code is entered the function is disabled and you will not be asked for an access code when entering the SETUP menus P...

Page 40: ... the function Enter the code of your choice 1 to 7 alphanumeric characters using the following buttons Increases the character pointed by the cursor Decreases the character pointed by the cursor Moves the cursor one position right Confirms and saves the code which has been set If no code is entered the function is disabled and you will not be asked for an access code when entering the LEARN functi...

Page 41: ...uage to be used for displaying messages on KTF 100HP screen The selectable language are Italian English French Spanish German and Japanese Once you have selected the LANG CONFIG screen press to access the function Select the desired language using Press to confirm the selection Press once to exit the function or twice to return to Main Menu ...

Page 42: ... to access the function This screen indicates that the device test is going to start Press to continue DEV XXX indicates the device which is being tested initially device no 1 Check that the OK and COM labels on device XXX are flashing and that there are no other device with such labels flashing If the OK and COM labels on KTF 100HP device that should respond to the number XXX are not flashing it ...

Page 43: ...o access the function Press to select the Communication test This screen indicates that the Communication Test is going to start Press to begin the test From this moment on the system communicates repeatedly with all connected KTF devices The running test status is signalled by the flashing red LED inside the ENTER button and by the flashing of OK e COM labels on KTF 100HP devices If there are no ...

Page 44: ...n SMART KTF 2000 terminal and Textile Machine Once you have selected the TEST CONFIG screen press to access the function Press to select the Signal Test then press to start the test The screen indicates the values detected during the PRX ZPX and STC signal test The field may assume the following values H High Logical Level L Low Logical Level Press once to leave the function or press it several ti...

Page 45: ...h the tension may run out of tolerance Tension of INC DEC graduation P1 5 EXIT TENSION 6 RELAX TENSION 7 RELAX SPEED EXIT TENSION RELAX TENSION RELAX SPEED Device tension with machine standstill Yarn relaxation tension Activation speed of yarn relaxation P2 8 MODE MODE Operating modes of INC DEC commands P3 The new article with the associated control parameters will be saved to the SMART KTF 2000 ...

Page 46: ... in sequence all the parameters 1 MAIN TENSION MAIN TENSION Press to enable the parameter programming VV V Value of MAIN TENSION parameter to be associated to the article setup Choose the desired value using allowed values from 0 1 to 99 9 grams Press to move to the next parameter 2 ERR TENSION ERROR TENSION MODE 04 MODE 04 MODE 04 MODE 04 Press to enable the parameter programming VV V Value of ER...

Page 47: ...ociated to the article setup It indicates the increment decrement resolution of the Tension graduated by the external INC DEC command pulses Choose the desired value using allowed values 0 1 to 25 grams Press to move to the next parameter 5 EXIT TENSION EXIT TENSION Press to enable the parameter programming VV V Value of EXIT TENSION parameter i e the tension value of the device when the machine i...

Page 48: ...e 04 on KTF 100HP Manual page 3 21 This function is particularly useful when it is necessary to use a yarn feed operating tension 1 MAIN TENSION different from machine stop tension 5 EXIT TENSION which in turn is different from the yarn relaxation tension 6 RELAX TENSION For more details and application examples please refer to KTF 100HP Operating Manual Chapter 3 Press to move to the next paramet...

Page 49: ... setting this parameter you enable the saving procedure of the article with all the setup values Press to save the article with the same values for all devices Press to save the article and associate it to a selectable range of devices from AAA to BBB This screen shown for a few seconds indicates that the article is being saved with the same values for all devices This screen gives you the possibi...

Page 50: ...ce Tension of INC DEC graduation P1 5 EXIT TENSION 6 RELAX TENSION 7 RELAX SPEED EXIT TENSION RELAX TENSION RELAX SPEED Device tension with machine standstill Yarn relaxation tension Activation speed of yarn relaxation P2 8 MODE MODE Operating modes of INC DEC commands P3 The modified article with the associated control parameters will be saved to the SMART KTF 2000 Data Base Using the LOAD functi...

Page 51: ...to enable the parameter programming VV V Value of MAIN TENSION parameter to be associated to the article setup Choose the desired value using allowed values from 0 1 to 99 9 grams Press to move to the next parameter 2 ERR TENSION ERROR TENSION MODE 04 MODE 04 MODE 04 MODE 04 Press to enable the parameter programming VV V Value of ERROR TENSION parameter to be associated to the article setup It ind...

Page 52: ...ociated to the article setup It indicates the increment decrement resolution of the Tension graduated by the external INC DEC command pulses Choose the desired value using allowed values 0 1 to 25 grams Press to move to the next parameter 5 EXIT TENSION EXIT TENSION Press to enable the parameter programming VV V Value of EXIT TENSION parameter i e the tension value of the device when the machine i...

Page 53: ...e 04 on KTF 100HP Manual page 3 21 This function is particularly useful when it is necessary to use a yarn feed operating tension 1 MAIN TENSION different from machine stop tension 5 EXIT TENSION which in turn is different from the yarn relaxation tension 6 RELAX TENSION For more details and application examples please refer to KTF 100HP Operating Manual Chapter 3 Press to move to the next paramet...

Page 54: ...e article and associate it to a selectable range of devices from AAA to BBB This screen shown for a few seconds indicates that the article is being saved with the same values for all devices This screen gives you the possibility to redefine new parameters associated to the article being programmed AAAAAAA starting from device nn Choose the device starting from witch you wish to redefine the parame...

Page 55: ...ng Press to move from aaa field to bbb field and vice versa Press to start the reading operation This screen displayed for a few seconds indicates that the reading operation is in progress At the end of operation a new screen will appear allowing you to save the article into the database with a new name Enter the new name using This screen displayed for a few second indicates that the saving to da...

Page 56: ...the function This screen allows you to select from Database the article AAAAAAA of which you want to load the variables into the involved KTF devices Select the desired article AAAAAAA pressing When you select the last Database article the display shows AAAAAAA END Once you have selected the desired article press to start the load process The AAAAAAA UPLOAD message will briefly appear on SMART dis...

Page 57: ... from the Data Base of SMART KTF 2000 terminal the article you want to erase Select the desired article AAAAAAA pressing Press to activate the erasing function Press to confirm the erasing of AAAAAAA article or press to leave the function without erasing This screen displayed for a few seconds indicates that the erasing operation is in progress At the end of the operation the AAAAAAA ERASE screen ...

Page 58: ...press to access the function On the Slave terminal select the SLAVE LINK item using and press to confirm The Slave terminal shows SLAVE WaitLnk On the Master terminal select the MASTER LINK item using and press to confirm The Master terminal shows MASTER WaitLnk and turns on the red Led inside the button then the Slave terminal will shows CONNECT RX to indicate the ready to receive conditions The ...

Page 59: ...curs this condition is signaled by the flashing of OK and COM labels on the relevant device From the MEASUR menu press until the TENS menu option is selected At this point press to access the function NN indicates the number of KTF device selectable using PPP indicates the Tension Value programmed on the device MAIN TENSION P1 MMM indicates the Tension actually Measured mean value of selected KTF ...

Page 60: ...a exchange with the selected KTF device occurs this condition is signalled by the flashing of OK and COM labels on the relevant device From the MEASUR menu press until the SPEED menu option is selected At this point press to access the function NN Number of KTF device selectable using VVVV Real time speed of device NN If the motor of device NN does not turn after a few seconds the STOP condition i...

Page 61: ...gnalled by the flashing of OK and COM labels on the relevant device From the MEASUR menu press until the METER menu option is selected At this point press to access the function NN Number of KTF device selectable using nnnnn n Amount of yarn feed by device NN Press if you want to clear the counters or press to leave the function without clearing the counters Press if you want to clear the counters...

Page 62: ...ovided by this graphic you will have the possibility to adjust the various machine drops so that they show the same feeding value this is the condition needed to obtain a perfect fabric In particular once you have adjusted the cam of KTF01 so as to obtain the desired feeding value LFA m min you will check that all the other KTF devices feed the same amount of yarn and if necessary you will provide...

Page 63: ...12 16 Press to continue Press to select the source of synchronization signal Proximity XXXX EXT External Signal or AUTO Signal Automatically Generated by the Terminal selectable using Press to activate the visualization of IstLFA histogram Press to leave the function Example of IstLFA histogram with BAR 8 Example of IstLFA histogram with BAR 12 Example of IstLFA histogram with BAR 16 ...

Page 64: ...y this bar graphic you will have the possibility to adjust the yarn consumption in order to make it identical in both directions The carriage movement direction is indicated by the PRX signal level Display Example In the above example the movement of carriage to direction B consumes 4 more than the movement to direction A From the MEASUR menu press until the BarLFA menu option is selected At this ...

Page 65: ...o directions besides the yarn used for the actual manufacturing process an extra amount of yarn is consumed as the carriage moves away from the position where the KTF device is mounted in the other direction i e during the carriage approach movement the machine uses the amount of yarn already drawn in the previous movement Press to activate the display of BarLFA graphic Press to leave the function...

Page 66: ... for the explanation of TOLL and REPEAT parameters please refer to descriptions on pages 3A 10 3A 14 Control The LEARN phase has not yet been carried out CONTROL The LEARN phase has already been carried out to continue to select TOLL to continue to select the Tolerance field to set the Tolerance value to select the Tolerance field to set the Tolerance value to continue to set the same values for a...

Page 67: ...temporarily deactivate or reactivate the LEARN function LEARN LRN off to confirm the learning operation to leave the function without confirming AAAAAAA P_LEARN Learning reservation AAAAAAA LEARN Learning in progress At the end of learning phase the display will show CONTROL in CAPITAL LETTERS Now the system will perform a continuous comparison between the amount of yarn consumed during the produc...

Page 68: ...SMART KTF 2000 KTF 100HP Operation 3A 48 SMART KTF 2000 Page left intentionally blank ...

Page 69: ...SMART KTF 2000 KTF RW Operation SMART KTF 2000 3B 1 3B 3B 3B 3B SMART KTF 2000 SMART KTF 2000 SMART KTF 2000 SMART KTF 2000 KTF RW KTF RW KTF RW KTF RW OPERATION OPERATION OPERATION OPERATION ...

Page 70: ...Operatività SMART KTF 2000 KTF RW 3B 2 SMART KTF 2000 Page left intentionally blank ...

Page 71: ...T KTF 2000 terminal In this case press to continue The system will erase all settings entered by the user and will reload the default values If the error persists refer to Chapter 4 Troubleshooting and Maintenance If the system displays one of the messages that you can see on the left side below it means that the terminal is working correctly and that it is possible to activate one of the four fea...

Page 72: ...or more connected KTF devices and displaying statistical graphics Setting reading and clearing the amount of yarn to be used on winding machines Target For REWIND typically when the KTF RW systems are used the main menu of SMART KTF2000 terminal normally includes 4 items SETUP allows the completion of tasks and WORK allows the completion of tasks CONTR allows the completion of tasks and MEASUR all...

Page 73: ...Configuration Main Menu Configuration Programming Menu Numbering the KTF Devices Setting the Device OFFSET Application Selection Configuration Setting the SETUP menu access Keycode Setting the TARGET menu access Keycode Language Selection KTF Device TEST KTF SMART KTF 2000 comm TEST Signal TEST ...

Page 74: ...Menu Article Creation Management Menu Configuration Programming Menu Creating a new Article Modifying article parameters Reading the article s parameter from KTF devices Save them with a new name to the database Erasing an article from Database Transferring memory contents between SMART KTF 2000 Master and SMART KTF 2000 Slave ...

Page 75: ...2000 3B 7 Functions Available within the WORK Menu Main Menu Load Unload Scan Menu Scanning the articles currently loaded Loading an Article into all or part off the connected device Unloading an article previously loaded with the LOAD function ...

Page 76: ...ns Available within the MEASUR Menu Main Menu Measur Reading the programmed measured yarn tension value Reading the yarn feeding speed in m min of a KTF RW system Measuring the amount of yarn fed by KTF RW system Displaying the average Tension and Peak Tension ...

Page 77: ...hed on KTF nn STOP TARGET shown on display of KTF nn This message disappears as soon as you press the Reset key on SM DIN RW unit Communication error with KTF nn see Chapter 4 Troubleshooting Maintenance KTF nn locked Control key pressed on KTF nn This message disappears when you press again the Control key Main Menu Visualization of meters fed Target visualization ...

Page 78: ...r of E3 errors detected see KTF RW Manual Chapter 4 for details ETg Number of Target errors detected The Counter Reading function can be activated only if it was enabled in the APPLIC menu item CNT Alm Main Menu System Monitoring Increase the device number DDD Decrease the device number DDD Displaying the fault counters total Displaying the fault counters on individual Devices Clearing all counter...

Page 79: ...bin and then to transmit the programmed value to the KTF RW devices When reaching the TARGET the relevant device will display a STOP TARGET message and will light up the Front Red LED On SMART KTF 2000 terminal you will see in real time the quantity of yarn fed by the selected KTF When reaching the TARGET the display of SMART KTF 2000 terminal will show the message TARGET KTF NN where NN is the nu...

Page 80: ...ce you have setup the number of devices to be configured NNN shows the amount of devices setup in the previous step XXX shows the number of the first and subsequently the next one device to be numbered On connected KTF RW the front red LED of STOP RW starts flashing and the LCD shows the message Press the button on KTF RW device to which you wish assign the number indicated by XXX Check that a the...

Page 81: ...ou may choose to do it directly on the device itself see P3 Programming Level on KTF RW Manual page 3 13 Once you have selected the OFFSET CONFIG screen press to access the function AAA Number of first device set up during the initial numbering BBB Number of last device set up during the initial numbering Increases the device number either AAA or BBB Decreases the device number either AAA or BBB A...

Page 82: ...plication The enabled functions are underlined This will make easier the SMART KTF 2000 terminal operation as all the functions not relevant for a given application or in any case not selected by the user will not appear within the various Menus The following table shows the Applications Functions matrix and outlines the default configuration provided by BTSR for each individual Application Howeve...

Page 83: ...ng to the flashing number E g 0 LEARN 1 TARGET etc The underlined numbers indicate Function Enabled to toggle between Enabled and Disabled Once you have configured your application with the desired functions press to confirm Or press to exit the function without changing the current configuration The symbol indicates that the currently selected application is now the AAAAAA Application Press once ...

Page 84: ... function Enter the code of your choice 1 to 7 alphanumeric characters using the following buttons Increases the character pointed by the cursor Decreases the character pointed by the cursor Moves the cursor one position right Confirms and saves the code which has been set If no code is entered the function is disabled and you will not be asked for an access code when entering the SETUP menus Pres...

Page 85: ...er the code of your choice 1 to 7 alphanumeric characters using the following buttons Increases the character pointed by the cursor Decreases the character pointed by the cursor Moves the cursor one position right Confirms and saves the code which has been set If no code is entered the function is disabled and you will not be asked for an access code when entering the TARGET function Press once to...

Page 86: ...to select the language to be used for displaying messages on KTF 100HP screen On KTF RW this function is not effective Once you have selected the LANG CONFIG screen press to access the function Select the desired language using Press to confirm the selection Press once to exit the function or twice to return to Main Menu ...

Page 87: ...G screen press to access the function This screen indicates that the device test is going to start Press to continue DEV XXX indicates the device which is being tested initially device no 1 Check that the COM led on device XXX are flashing and that there are no other device with such led flashing If the COM led on KTF RW device that should respond to the number XXX are not flashing it means that t...

Page 88: ...ess to access the function Press to select the Communication test This screen indicates that the Communication Test is going to start Press to begin the test From this moment on the system communicates repeatedly with all connected KTF devices The running test status is signalled by the flashing red LED inside the ENTER button and by the flashing COM led on KTF RW devices If there are no communica...

Page 89: ...SMART KTF 2000 terminal and Textile Machine Once you have selected the TEST CONFIG screen press to access the function Press to select the Signal Test then press to start the test The screen indicates the values detected during the PRX ZPX and STC signal test The field may assume the following values H High Logical Level L Low Logical Level Press once to leave the function or press it several time...

Page 90: ...ime period for which the tension may run out of tolerance Tension of INC DEC graduation Meters for Automatic Graduation Target Setting P1 2 1 EXIT TENSION 2 2 RAMP UP 2 3 RAMP DOWN 2 4 K REACT P2 1 P2 2 P2 3 P2 4 Device tension with machine standstill Motor acceleration ramp Motor deceleration ramp Reactivity Constant P2 3 2 MODE P3 2 Operating modes of INC DEC commands and Alarm Reset P3 4 1 MOT ...

Page 91: ...upper row of display will always indicate the progressive parameter number N followed by the name of that parameter Using you can directly select the desired parameter Using you can select and confirm in sequence all the parameters Press to select the type grams of the tension sensor either 100g or 1000g Press to confirm 1 1 MAIN TENSION P1 1 Press to enable the parameter programming VV V Value of...

Page 92: ...s to enable the parameter programming VV V Value of P1 3 TIME ALARM parameter to be associated to the article setup It indicates the maximum time in seconds during which the tension value may exit from the tolerance range set by the 1 2 ERR TENSION parameter You can disable OFF or re enable this feature by pressing Choose the desired value using allowed values 0 1 to 10 sec Press to move to the ne...

Page 93: ... 1 6 METR TARGET the automatic graduation is reset This feature allows you to change the softness of the bobbins during the rewinding process to make the dye works easier and it may help to obtain perfectly shaped bobbins Example 1 1 MAIN TENSION 10g 1 2 TENS INC DEC 0 1g 1 3 METR INC DEC 000100 m 1 4 METR TARGET 10000 m The initial tension 10g is increased by 0 1g every 100 metres when reaching t...

Page 94: ...disabled to enable it press and hold down for 3 seconds Set the desired target meters increases the value by 1 decreases the value by 1 increases the value by 1000 decreases the value by 1 2 1 EXIT TENSION P2 1 Press to enable the parameter programming VV V Value of P2 1 EXIT TENSION parameter i e the tension value of the device when the machine is stationary or out of the yarn working zone with I...

Page 95: ...s allowed values 1 100 For more details and application examples please refer to KTF RW Operating Manual Choose the desired value using After having set the desired value press to continue 2 3 RAMP DOWN P2 3 Press to enable the parameter programming This parameter allows you to control the speed with which the system will change from a given working tension to a lower tension in such a way as to a...

Page 96: ...ose the desired value using After having set the desired value press to continue 3 2 MODE P3 2 Press to enable the parameter programming nn Value of MODE parameter that defines the possible working modes of KTF RW devices as for as the INC DEC programmable commands and Tension Error Alarm Reset are concerned Allowed values 00 01 02 and 03 For a detailed description of the KTF RW device working mod...

Page 97: ...f motor used on KTF xxx RW yarn feeding device allowed values F01 F02 01 25 mN m 02 100 mN m Choose the desired direction using Press to continue MOT TYPE is the last programmable parameter of the list concerning the relevant article Pressing you will have the possibility to save the article with the values setup Pressing on this screen completes the creation phase of the new article This screen d...

Page 98: ... Tension of INC DEC graduation Meters for Automatic Graduation Target Setting P1 2 1 EXIT TENSION 2 2 RAMP UP 2 3 RAMP DOWN 2 4 K REACT P2 1 P2 2 P2 3 P2 4 Device tension with machine standstill Motor acceleration ramp Motor deceleration ramp Reactivity Constant P2 3 2 MODE P3 2 Operating modes of INC DEC commands and Alarm Reset P3 4 1 MOT DIRECT 4 4 MOT TYPE P4 1 P4 1 Motor rotation Direction Mo...

Page 99: ...he parameter programming VV V Value of MAIN TENSION parameter to be associated to the article setup Choose the desired value using allowed values from 0 1 to 99 9 grams from 5 to 995 grams depending on RW TYPE parameter Press to move to the next parameter 1 2 ERR TENSION P1 2 Press to enable the parameter programming VV V Value of ERROR TENSION parameter to be associated to the article setup It in...

Page 100: ...rement decrement resolution of the Tension graduated by the external INC DEC command pulses Choose the desired value using allowed values 0 1 to 10 grams Press to move to the next parameter 1 5 METR INC DEC Available on SMART KTF 2000 only This parameter allows you to automatically graduate the yarn winding tension on the bobbin at predefined intervals of meters rather than using external INC DEC ...

Page 101: ... RW Operating Manual Press to enable the parameter programming OFF Function disabled to enable it press and hold down for 3 seconds Increment Decrement Press and hold down for 3 seconds to switch from to or for to OFF Set the desired value every how many meters the MAIN TENSION P1 1 value must be increased decreased by the amount specified by METR INC DEC P1 5 parameter increases the value by 1 de...

Page 102: ... enable the parameter programming VV V Value of P2 1 EXIT TENSION parameter i e the tension value of the device when the machine is stationary or out of the yarn working zone with INC DEC de activated If you set a value greater than or lower than the value set with MAIN TENSION parameter you may control the deceleration phase of KTF device This parameter can be enabled setting a value ranging from...

Page 103: ...es please refer to KTF RW Operating Manual Choose the desired value using After having set the desired value press to continue 2 3 RAMP DOWN P2 3 Press to enable the parameter programming This parameter allows you to control the speed with which the system will change from a given working tension to a lower tension in such a way as to avoid undesired yarn breakages allowed values 1 100 For more de...

Page 104: ...ose the desired value using After having set the desired value press to continue 3 2 MODE P3 2 Press to enable the parameter programming nn Value of MODE parameter that defines the possible working modes of KTF RW devices as for as the INC DEC programmable commands and Tension Error Alarm Reset are concerned Allowed values 00 01 02 and 03 For a detailed description of the KTF RW device working mod...

Page 105: ...OT TYPE is the last programmable parameter of the list concerning the relevant article Pressing you will have the possibility to save the article with the values setup Pressing with this screen completes the article modification phase and the MODIFY menu item will re appear This screen display for a few seconds indent that the parameters are going to be saved into the database of SMART KTF 2000 te...

Page 106: ...the reading operation This screen displayed for a few seconds indicates that the reading operation is in progress At the end of operation a new screen will appear allowing you to save the article into the database with a new name Enter the new name using This screen displayed for a few second indicates that the saving to database operation is in progress then the READ menu will re appear NOTE If t...

Page 107: ...en allows you to select from the Data Base of SMART KTF 2000 terminal the article you want to erase Select the desired article AAAAAAA pressing Press to activate the erasing function Press to confirm the erasing of AAAAAAA article or press to leave the function without erasing This screen displayed for a few seconds indicates that the erasing operation is in progress At the end of the operation th...

Page 108: ...ress to access the function On the Slave terminal select the SLAVE LINK item using and press to confirm The Slave terminal shows SLAVE WaitLnk On the Master terminal select the MASTER LINK item using and press to confirm The Master terminal shows MASTER WaitLnk and turns on the red Led inside the button then the Slave terminal will shows CONNECT RX to indicate the ready to receive conditions The M...

Page 109: ...ces on which the XXXXXXX article is loaded in particular YYY shows the first device on which the article has been loaded KKK shows the last device on which the article has been loaded Press to go to the next article Press to leave the function When the scanning of all the articles currently loaded has finished the END SCAN message appears to indicate that there are no other articles beyond those d...

Page 110: ...cursor is positioned Decreases the number where the cursor is positioned Moves the cursor between XXX and YYY fields Press to confirm the setting and go to the next screen Press to load the parameters of the article in the selected range of devices During the loading phase the message OK WAIT is shown for a few seconds If you try to load an article into a range of devices in which another article ...

Page 111: ... of devices on which the article itself was loaded Press to have access to the function Press once or several times until the name of the required article that you wish to unload from the devices appears At this point press to have access to the function Press to unload the settings of the article from the devices which were previously detecting that article When finished press to leave the functi...

Page 112: ...occurs this condition is signalled by the flashing COM led on the relevant device From the MEASUR menu press until the TENS menu option is selected At this point press to access the function NN indicates the number of KTF device selectable using PPP indicates the Tension Value programmed on the device MAIN TENSION P1 MMM indicates the Tension actually Measured mean value of selected KTF 100HP disp...

Page 113: ...ta exchange with the selected KTF device occurs this condition is signaled by the flashing of COM led on the relevant device From the MEASUR menu press until the SPEED menu option is selected At this point press to access the function NN Number of KTF device selectable using VVVV Real time speed of device NN If the motor of device NN does not turn after a few seconds the STOP condition is indicate...

Page 114: ...signaled by the flashing of COM led on the relevant device From the MEASUR menu press until the METER menu option is selected At this point press to access the function NN Number of KTF device selectable using nnnnn n Amount of yarn feed by device NN Press if you want to clear the counters or press to leave the function without clearing the counters Press if you want to clear the counters of all c...

Page 115: ...ng phase of the devices in order to check the correct positioning and operation of the devices themselves The optimum operation occurs when only the central notch is displayed without positive and or negative shifts and peaks Furthermore it is possible to minitor both the working temperature and current of each individual device From the MEASUR menu press until the Bar RW menu option is selected A...

Page 116: ...T and current C of the selected devices As soon as you release the graphical visualisation is resumed Press once to leave the function and return to the MEASUR Menu or twice to return to Main Menu Example of optimum operation no shift no peak with respect to MAIN TENSION Example of operation with limited positive shift and peak Example of operation with high negative shift and peak ...

Page 117: ...orrectly connected Check for locked devices red LED ON Power off and on the system If the problem persists replace the device If the problem persists connect one KTF device at a time trying to isolate the problem The display shows the E_SPEED message The system is receiving a number of PRX pulses higher than its processing capability The display shows the ERR_TL KTF nn message The amount of yarn f...

Page 118: ...al cleaning depending on the environment conditions For cleaning purposes do not use solvent but rather a soft cloth dampened with neutral detergent or alcohol Repairs Any repair intervention on the SMART KTF 2000 terminal or KTF devices must be carried out by specialized personnel from BTSR Any intervention attempt by non authorized personnel voids the warranty terms ...

Page 119: ...ew the 4 locking screws and remove the rear cover Fig 1 6 Using the IC extractor remove with care the Integrated Circuit from the socket located on the right top corner of PCB Fig 2 7 Place the Integrated Circuit containing the new software version over the socket paying attention to its correct orientation Fig 3 8 Applying a moderate and progressive pressure with both thumbs push the integrated c...

Page 120: ...Troubleshooting and Maintenance 4 4 SMART KTF 2000 Page left intentionally blank ...

Page 121: ...has already acquired a certain ability in handling the system therefore there are no detailed explanations of each screen shot there is only a global overview of sequences of the required steps for each function For an explanation of the symbols used in the quick reference guide please refer to Symbols key shown at the bottom of each page Symbols Key DEVICE CONFIG Numbering the KTF 100HP devices O...

Page 122: ...y SYSTEM CONFIG System Configuration NNN No dropouts A No Controls Rev APPLIC CONFIG Application Selection Configuration XXXXXXX Application XXXXXXX Currently Selected Application Function Enabled Function Disabled Functions Currently not Implementated APPLICATIONS Function Function ...

Page 123: ...haracter is entered the KEY_ST function is disabled KEY_ST HAS BEEN SAVED From now on access to SETUP menu requires that you enter the KEY_ST Change character Moving the cursor KEY_ST setting 1 7 crt If no character is entered the KEY_LR function is disabled KEY_LR HAS BEEN SAVED From now on access to LEARN TARGET menu requires that you enter the KEY_ST Change character Moving the cursor KEY_LR se...

Page 124: ... SENSOR TEST KTF 100HP Device Test COM TEST KTF 100HP SMART KTF 2000 Communication Test XXX Device under test OK and COM labels blink on device XXX Communications Error XXX Total No of failed attempts YYY Total No of sensor where some problems occurred Inefficient Communications Line ...

Page 125: ...Appendix A Quick Reference SMART KTF 2000 KTF 100HP SMART KTF 2000 A 5 Symbols Key SIGNAL TEST Test of signals between SMART KTF 2000 and Textile Machine ...

Page 126: ...ols Key NEW Creating a New Article Enter the Article name Change character Moving the cursor Article Saving MAIN TENSION ERROR TENSION TIME ALARM INC DEC TENSION EXIT TENSION RELAX TENSION RELAX SPEED MODE Article Saving Last YES Device NO grams grams grams or grams or second ...

Page 127: ...ls Key MODIFY Modifying Article Parameters MAIN TENSION ERROR TENSION TIME ALARM INC DEC TENSION EXIT TENSION RELAX TENSION RELAX SPEED MODE grams grams grams or grams or second Article Saving Article Saving Last YES Device NO Select the article to be modified from the Database ...

Page 128: ...s ERASE Erasing an Article from Database LOAD Loading Parameters on KTF 100HP Devices Select the Article Parameters related to AAAAAAA article loaded on relevant KTFs Select the Article Parameter saving with a new name article Select Article to be erased from database AAAAAAA not erased AAAAAAA erased Only on the last article ...

Page 129: ...Appendix A Quick Reference SMART KTF 2000 KTF 100HP SMART KTF 2000 A 9 Symbols Key LINK Transferring memory contents between SMART KTF 2000 Master and SMART KTF 2000 Slave ...

Page 130: ...00HP Device METER Measuring the amount of yarn fed by KTF 100HP Devices Select the desired KTF NN PPP Programmed Tension MAIN TENSION parameter MMM Measured Tension on device NN Select the desired KTF NN VVV Speed of Device NN in Mt min Device NN not connected or motor steady Select the desired KTF NN MMM Meters of yarn fed by device NN Total counter clear on all KTF devices Total counter clear on...

Page 131: ...f Yarn Fed LFA during both carriage strokes of a flat bed machine NN N Graphic Resolution nn Number of bars XXX EXT or AUTO nnn Average number of readings 10 or 100 To switch between AUTO and EXT NN N Graphic Resolution nnn Number of KTF Device X Direction A or B To switch between NN N and X a aa and b bb Amount of yarn absorbed in both direction A and B with correction factor K To switch between ...

Page 132: ...Appendix A Quick Reference SMART KTF 2000 KTF 100HP A 12 SMART KTF 2000 Page left intentionally blank ...

Page 133: ...eady acquired a certain ability in handling the system therefore there are no detailed explanations of each screen shot there is only a global overview of sequences of the required steps for each function For an explanation of the symbols used in the quick reference guide please refer to Symbols key shown at the bottom of each page Symbols Key Automatic return to end configuration Set the Number o...

Page 134: ...ected Application Function Enabled Function Disabled Functions Currently not Implementated APPLICATIONS Function KEY_ST Setting the SETUP menu access Keycode If no character is entered the KEY_ST function is disabled KEY_ST HAS BEEN SAVED From now on access to SETUP menu requires that you enter the KEY_ST Change character Moving the cursor KEY_ST setting 1 7 crt Function ...

Page 135: ...ey If no character is entered the KEY_TG function is disabled KEY_TG HAS BEEN SAVED From now on access to SETUP menu requires that you enter the KEY_TG Change character Moving the cursor KEY_ST setting 1 7 crt KEY_TG Setting TARGET function access Keycode LANG Language Selection ...

Page 136: ...ls Key SENSOR TEST KTF RW Device Test XXX Device under test COM led blink on device XXX COM TEST KTF RW SMART KTF 2000 Communication Test Communications Error XXX Total No of failed attempts YYY Total No of sensor where some problems occurred Inefficient Communications Line ...

Page 137: ...Appendix B Quick Reference SMART KTF 2000 KTF RW SMART KTF 2000 B 5 Symbols Key SIGNAL TEST Test of signals between SMART KTF 2000 and Textile Machine ...

Page 138: ...Enter the Article name Change character Moving the cursor MAIN TENSION ERROR TENSION TIME ALARM INC DEC TENSION AUTOMATIC GRADUATION TARGET SETTING ACCELERATION RAMP MODE DEVICE TENSION DECELERATION RAMP MOTOR TYPE REACTIVITY CONSTANT MOTOR ROTATION DIRECTION Article Saving Article Saving Last YES Device NO ...

Page 139: ...IME ALARM INC DEC TENSION AUTOMATIC GRADUATION TARGET SETTING ACCELERATION RAMP MODE DEVICE TENSION DECELERATION RAMP MOTOR TYPE REACTIVITY CONSTANT MOTOR ROTATION DIRECTION MODIFY Modifying Article Parameters Select the article to be modified from the database Article Saving Article Saving Last YES Device NO ...

Page 140: ... Devices Parameter saving with a new name article Select the Article from device aaa ERASE Erasing an Article from Database Select Article to be erased from database AAAAAAA not erased AAAAAAA erased Only on the last article LINK Transferring memory contents between SMART KTF 2000 Master and SMART KTF 2000 Slave ...

Page 141: ...Appendix B Quick Reference SMART KTF 2000 KTF RW SMART KTF 2000 B 9 Symbols Key ...

Page 142: ...NSION parameter MMM Measured Tension on device NN SPEED Reading the yarn feeding Speed in m min of a KTF RW Device Select the desired KTF NN VVV Speed of Device NN in Mt min Device NN not connected or motor steady METER Measuring the amount of yarn fed by KTF RW Devices Select the desired KTF NN MMM Meters of yarn fed by device NN Total counter clear on all KTF devices Total counter clear on devic...

Page 143: ...Appendix B Quick Reference SMART KTF 2000 KTF RW SMART KTF 2000 B 11 Symbols Key BAR RW Displaying the Average Tension and Peak Tension NN N Graphic Resolution nn Number of bars ...

Page 144: ...Appendix B Quick Reference SMART KTF 2000 KTF RW B 12 SMART KTF 2000 Page left intentionally blank ...

Page 145: ...BTSR International S p A Via S Rita 21057 OLGIATE OLONA VA Tel 0331 323202 Fax 0331 323282 Internet www btsr com REV 2 0 06 03 DISTRIBUTOR ...

Reviews: