15
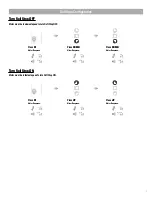
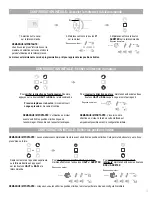
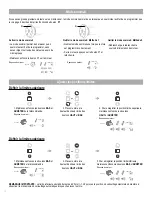
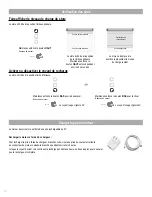
Utiliser le bouton P2 sur une télécommande existante pour ajouter une télécommande ou un canal
A
= Télécommande ou canal (à garder)
B
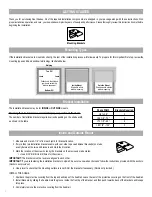
= Télécommande ou canal à ajouter ou à supprimer
REMARQUE IMPORTANTE :
Prenez le temps de lire le guide d’utilisation de votre télécommande ou le capteur de votre produit.
Utiliser une télécommande existante, ou bien ajouter ou supprimer une télécommande ou un canal
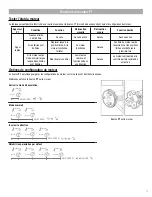
Placez le store à la hauteur désirée à
l’aide des boutons
HAUT
et
BAS
A
= Télécommande ou canal (à garder)
B
= Télécommande ou canal à ajouter ou à supprimer
REMARQUE IMPORTANTE :
Prenez le temps de lire le guide d’utilisation pour votre télécommande ou le capteur de votre produit.
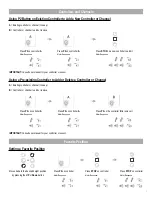
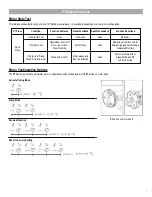
Using P2 Button on existing controller to add a new controller or channel
Using a pre-existing controller to add or delete a controller or channel
A
= Existing controller or channel (to keep)
B
= Controller or channel to add or remove
A
= Existing controller or channel (to keep)
B
= Controller or channel to add or remove
Press
P2
on
controller
A
.
Press
P2
on
controller
A
.
Press
P2
on
controller
A
.
Press
P2
on
controller
A
.
Press
P2
on the
controller
B
to remove
it.
Press
STOP
on an new
controller to add it.
Motor Response
Motor Response
Motor Response
Motor Response
Motor Response
Motor Response
7
CONTROLLERS AND CHANNELS
Consult user manual for your controller or sensor
Consult user manual for your controller or sensor
IMPORTANT
IMPORTANT
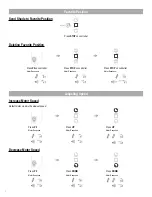
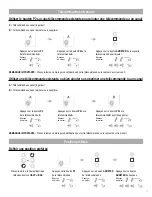
Définir une position préférée
Appuyez sur le bouton
P2
de la télécommande
Réponse
du moteur :
Appuyez sur le bouton
ARRÊTER
de la télécommande
Réponse
du moteur :
Appuyez sur le bouton
ARRÊTER
de nouveau
Réponse
du moteur :
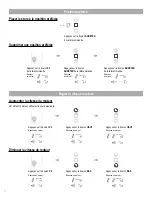
Appuyez sur le bouton
P2
de la
télécommande
B
pour la supprimer
Réponse
du moteur :
Appuyez sur le bouton
P2
de la
télécommande
A
Réponse
du moteur :
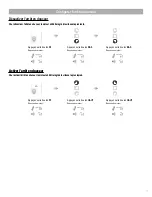
Appuyez sur le bouton
P2
de la télécommande
A
Réponse
du moteur :
Appuyez sur le bouton
P2
de la
télécommande
A
Réponse
du moteur :
Appuyez sur le bouton
P2
de la télécommande
A
Réponse
du moteur :
Appuyez sur le bouton
ARRÊTER
de la nouvelle
télécommande pour l’ajouter
Réponse
du moteur :
.
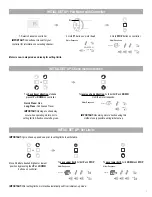
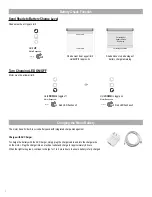
Pair motor with controller
Check motor direction
Consult user manual for your
controller for information on
selecting channel.
Damage to shade may occur when operating motor prior to
setting limits. Attention should be given.
Reversing motor direction using this method is only possible
during initial set-up
Hold
P1
button on
motor head.
To check travel direction of shade, press
UP
or
DOWN
on controller.
Quick Press
= Step
Long Press
= Continuous Travel
To reverse shade direction, hold both
UP
and
DOWN
.
Until the motor responds.
Select channel on
controller.
Hold
STOP
on
controller.
Approx.
Approx.
Motor Response
Motor Response
Motor Response
Motor is now in step mode and ready for setting limits
IMPORTANT
IMPORTANT
IMPORTANT
5
INITIAL SET UP
OR
VIBRATION
BIP
Using P2 Button on existing controller to add a new controller or channel
Using a pre-existing controller to add or delete a controller or channel
A
= Existing controller or channel (to keep)
B
= Controller or channel to add or remove
A
= Existing controller or channel (to keep)
B
= Controller or channel to add or remove
Press
P2
on
controller
A
.
Press
P2
on
controller
A
.
Press
P2
on
controller
A
.
Press
P2
on
controller
A
.
Press
P2
on the
controller
B
to remove
it.
Press
STOP
on an new
controller to add it.
Motor Response
Motor Response
Motor Response
Motor Response
Motor Response
Motor Response
7
CONTROLLERS AND CHANNELS
Consult user manual for your controller or sensor
Consult user manual for your controller or sensor
IMPORTANT
IMPORTANT
.
Pair motor with controller
Check motor direction
Consult user manual for your
controller for information on
selecting channel.
Damage to shade may occur when operating motor prior to
setting limits. Attention should be given.
Reversing motor direction using this method is only possible
during initial set-up
Hold
P1
button on
motor head.
To check travel direction of shade, press
UP
or
DOWN
on controller.
Quick Press
= Step
Long Press
= Continuous Travel
To reverse shade direction, hold both
UP
and
DOWN
.
Until the motor responds.
Select channel on
controller.
Hold
STOP
on
controller.
Approx.
Approx.
Motor Response
Motor Response
Motor Response
Motor is now in step mode and ready for setting limits
IMPORTANT
IMPORTANT
IMPORTANT
5
INITIAL SET UP
OR
VIBRATION
BIP
.
Pair motor with controller
Check motor direction
Consult user manual for your
controller for information on
selecting channel.
Damage to shade may occur when operating motor prior to
setting limits. Attention should be given.
Reversing motor direction using this method is only possible
during initial set-up
Hold
P1
button on
motor head.
To check travel direction of shade, press
UP
or
DOWN
on controller.
Quick Press
= Step
Long Press
= Continuous Travel
To reverse shade direction, hold both
UP
and
DOWN
.
Until the motor responds.
Select channel on
controller.
Hold
STOP
on
controller.
Approx.
Approx.
Motor Response
Motor Response
Motor Response
Motor is now in step mode and ready for setting limits
IMPORTANT
IMPORTANT
IMPORTANT
5
INITIAL SET UP
OR
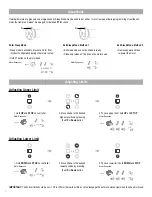
Set Limits
To save upper limit, hold
UP
and
STOP
.
Cycle shade up and down prior to setting limits to settle fabric
Move shade to the desired highest or lowest position by
pressing the
UP
or
DOWN
buttons on controller.
Motor Response
OR
Approx.
Move shade to the desired highest or lowest position
by pressing the
UP
or
DOWN
buttons
on controller.
OR
After setting limits, motor will automatically exit from initial set-up mode.
To save lower limit, hold
DOWN
and
STOP
.
Motor Response
Approx
.
IMPORTANT
IMPORTANT
VIBRATION
BIP
Using P2 Button on existing controller to add a new controller or channel
Using a pre-existing controller to add or delete a controller or channel
A
= Existing controller or channel (to keep)
B
= Controller or channel to add or remove
A
= Existing controller or channel (to keep)
B
= Controller or channel to add or remove
Press
P2
on
controller
A
.
Press
P2
on
controller
A
.
Press
P2
on
controller
A
.
Press
P2
on
controller
A
.
Press
P2
on the
controller
B
to remove
it.
Press
STOP
on an new
controller to add it.
Motor Response
Motor Response
Motor Response
Motor Response
Motor Response
Motor Response
7
CONTROLLERS AND CHANNELS
Consult user manual for your controller or sensor
Consult user manual for your controller or sensor
IMPORTANT
IMPORTANT
.
Pair motor with controller
Check motor direction
Consult user manual for your
controller for information on
selecting channel.
Damage to shade may occur when operating motor prior to
setting limits. Attention should be given.
Reversing motor direction using this method is only possible
during initial set-up
Hold
P1
button on
motor head.
To check travel direction of shade, press
UP
or
DOWN
on controller.
Quick Press
= Step
Long Press
= Continuous Travel
To reverse shade direction, hold both
UP
and
DOWN
.
Until the motor responds.
Select channel on
controller.
Hold
STOP
on
controller.
Approx.
Approx.
Motor Response
Motor Response
Motor Response
Motor is now in step mode and ready for setting limits
IMPORTANT
IMPORTANT
IMPORTANT
5
INITIAL SET UP
OR
VIBRATION
BIP
.
Pair motor with controller
Check motor direction
Consult user manual for your
controller for information on
selecting channel.
Damage to shade may occur when operating motor prior to
setting limits. Attention should be given.
Reversing motor direction using this method is only possible
during initial set-up
Hold
P1
button on
motor head.
To check travel direction of shade, press
UP
or
DOWN
on controller.
Quick Press
= Step
Long Press
= Continuous Travel
To reverse shade direction, hold both
UP
and
DOWN
.
Until the motor responds.
Select channel on
controller.
Hold
STOP
on
controller.
Approx.
Approx.
Motor Response
Motor Response
Motor Response
Motor is now in step mode and ready for setting limits
IMPORTANT
IMPORTANT
IMPORTANT
5
INITIAL SET UP
OR
.
Pair motor with controller
Check motor direction
Consult user manual for your
controller for information on
selecting channel.
Damage to shade may occur when operating motor prior to
setting limits. Attention should be given.
Reversing motor direction using this method is only possible
during initial set-up
Hold
P1
button on
motor head.
To check travel direction of shade, press
UP
or
DOWN
on controller.
Quick Press
= Step
Long Press
= Continuous Travel
To reverse shade direction, hold both
UP
and
DOWN
.
Until the motor responds.
Select channel on
controller.
Hold
STOP
on
controller.
Approx.
Approx.
Motor Response
Motor Response
Motor Response
Motor is now in step mode and ready for setting limits
IMPORTANT
IMPORTANT
IMPORTANT
5
INITIAL SET UP
OR
VIBRATION
BIP
.
Pair motor with controller
Check motor direction
Consult user manual for your
controller for information on
selecting channel.
Damage to shade may occur when operating motor prior to
setting limits. Attention should be given.
Reversing motor direction using this method is only possible
during initial set-up
Hold
P1
button on
motor head.
To check travel direction of shade, press
UP
or
DOWN
on controller.
Quick Press
= Step
Long Press
= Continuous Travel
To reverse shade direction, hold both
UP
and
DOWN
.
Until the motor responds.
Select channel on
controller.
Hold
STOP
on
controller.
Approx.
Approx.
Motor Response
Motor Response
Motor Response
Motor is now in step mode and ready for setting limits
IMPORTANT
IMPORTANT
IMPORTANT
5
INITIAL SET UP
OR
Using P2 Button on existing controller to add a new controller or channel
Using a pre-existing controller to add or delete a controller or channel
A
= Existing controller or channel (to keep)
B
= Controller or channel to add or remove
A
= Existing controller or channel (to keep)
B
= Controller or channel to add or remove
Press
P2
on
controller
A
.
Press
P2
on
controller
A
.
Press
P2
on
controller
A
.
Press
P2
on
controller
A
.
Press
P2
on the
controller
B
to remove
it.
Press
STOP
on an new
controller to add it.
Motor Response
Motor Response
Motor Response
Motor Response
Motor Response
Motor Response
7
CONTROLLERS AND CHANNELS
Consult user manual for your controller or sensor
Consult user manual for your controller or sensor
IMPORTANT
IMPORTANT
Set Limits
To save upper limit, hold
UP
and
STOP
.
Cycle shade up and down prior to setting limits to settle fabric
Move shade to the desired highest or lowest position by
pressing the
UP
or
DOWN
buttons on controller.
Motor Response
OR
Approx.
Move shade to the desired highest or lowest position
by pressing the
UP
or
DOWN
buttons
on controller.
OR
After setting limits, motor will automatically exit from initial set-up mode.
To save lower limit, hold
DOWN
and
STOP
.
Motor Response
Approx
.
IMPORTANT
IMPORTANT
VIBRATION
BIP
.
Pair motor with controller
Check motor direction
Consult user manual for your
controller for information on
selecting channel.
Damage to shade may occur when operating motor prior to
setting limits. Attention should be given.
Reversing motor direction using this method is only possible
during initial set-up
Hold
P1
button on
motor head.
To check travel direction of shade, press
UP
or
DOWN
on controller.
Quick Press
= Step
Long Press
= Continuous Travel
To reverse shade direction, hold both
UP
and
DOWN
.
Until the motor responds.
Select channel on
controller.
Hold
STOP
on
controller.
Approx.
Approx.
Motor Response
Motor Response
Motor Response
Motor is now in step mode and ready for setting limits
IMPORTANT
IMPORTANT
IMPORTANT
5
INITIAL SET UP
OR
BIP
Set Limits
To save upper limit, hold
UP
and
STOP
.
Cycle shade up and down prior to setting limits to settle fabric
Move shade to the desired highest or lowest position by
pressing the
UP
or
DOWN
buttons on controller.
Motor Response
OR
Approx.
Move shade to the desired highest or lowest position
by pressing the
UP
or
DOWN
buttons
on controller.
OR
After setting limits, motor will automatically exit from initial set-up mode.
To save lower limit, hold
DOWN
and
STOP
.
Motor Response
Approx
.
IMPORTANT
IMPORTANT
VIBRATION
BIP
.
Pair motor with controller
Check motor direction
Consult user manual for your
controller for information on
selecting channel.
Damage to shade may occur when operating motor prior to
setting limits. Attention should be given.
Reversing motor direction using this method is only possible
during initial set-up
Hold
P1
button on
motor head.
To check travel direction of shade, press
UP
or
DOWN
on controller.
Quick Press
= Step
Long Press
= Continuous Travel
To reverse shade direction, hold both
UP
and
DOWN
.
Until the motor responds.
Select channel on
controller.
Hold
STOP
on
controller.
Approx.
Approx.
Motor Response
Motor Response
Motor Response
Motor is now in step mode and ready for setting limits
IMPORTANT
IMPORTANT
IMPORTANT
5
INITIAL SET UP
OR
VIBRATION
BIP
Using P2 Button on existing controller to add a new controller or channel
Using a pre-existing controller to add or delete a controller or channel
A
= Existing controller or channel (to keep)
B
= Controller or channel to add or remove
A
= Existing controller or channel (to keep)
B
= Controller or channel to add or remove
Press
P2
on
controller
A
.
Press
P2
on
controller
A
.
Press
P2
on
controller
A
.
Press
P2
on
controller
A
.
Press
P2
on the
controller
B
to remove
it.
Press
STOP
on an new
controller to add it.
Motor Response
Motor Response
Motor Response
Motor Response
Motor Response
Motor Response
7
CONTROLLERS AND CHANNELS
Consult user manual for your controller or sensor
Consult user manual for your controller or sensor
IMPORTANT
IMPORTANT
OU
Télécommandes et canaux
Position préférée


