3-22
2002 Buell P3: Engine
HOME
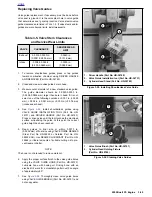
27. See
Figure 3-41.
Install front isolator mounting bolt,
spacer snubber and
new
nut.
28. Tighten front isolator mounting bolt to 63-70 ft-lbs (86-95
Nm).
29. See
Figure 3-42.
Install crankcase breather hose and
crankcase breather into rocker box grommet.
30. Install horn. See
7.22 HORN
.
31. Remove jack from under the motor.
32. Install muffler. See
2.20 EXHAUST SYSTEM
.
33. Install fuel tank. See
4.2 FUEL TANK COVER/FUEL
TANK
.
34. Install new oil filter, engine oil and primary chaincase
fluid as necessary.
35. See
Figure 3-33.
Install right side rider footpeg bracket
assembly. See
2.21 FOOTPEGS AND FOOTPEG SUP-
PORT BRACKETS
.
1
1
WARNING
1
WARNING
Always connect positive battery cable first. If the positive
cable should contact ground with the negative cable
installed, the resulting sparks may cause a battery explo-
sion which could result in death or serious injury.
36. Connect
both
battery cables, positive cable first. See
7.16 BATTERY
.
37. Install seat. See
2.28 SEAT
.
Figure 3-41. Front Isolator Mount
Figure 3-42. Install Crankcase Breather Hose
1.
Frame
2.
Locknut
3.
Snubber
4.
Bolt
5.
Spacer
6.
Front Isolator
7.
Standoff
1
a0162x6x
2
3
4
5
6
7
7629
Summary of Contents for 2002 P3
Page 2: ......
Page 17: ...A 15 Appendix A Tools HOME ...
Page 32: ...C 3 Appendix C Metric Conversions HOME ...
Page 41: ...1 8 2002 Buell P3 Maintenance HOME NOTES ...
Page 75: ......
Page 111: ...2 36 2002 Buell P3 Chassis HOME NOTES ...
Page 143: ...2 68 2002 Buell P3 Chassis HOME NOTES ...
Page 144: ...2002 Buell P3 Chassis 2 69 HOME ...
Page 146: ......
Page 147: ......
Page 223: ...3 76 2002 Buell P3 Engine HOME NOTES ...
Page 225: ......
Page 256: ...2002 Buell P3 Fuel System 4 31 HOME ...
Page 258: ......
Page 259: ......
Page 279: ...5 20 2002 Buell P3 Electric Starter HOME NOTES ...
Page 281: ......
Page 327: ......
Page 398: ...2002 Buell P3 Electrical 7 71 HOME ...
Page 400: ...Product 1 2 ...

