2002 Buell P3: Drive/Transmission
6-9
HOME
REMOVAL
NOTE
Usually the rear sprocket is replaced whenever the drive belt
is replaced. This procedure covers drive belt replacement
only. For instructions on replacing both drive belt and rear
sprocket, see
1.11 DRIVE BELT AND REAR SPROCKET.
1.
Secure motorcycle on suitable lift that secures the front
wheel.
2.
Remove seat. See
2.28 SEAT
.
1
1
WARNING
1
WARNING
To protect against shock and accidental start-up of vehi-
cle, disconnect the negative battery cable before pro-
ceeding. Inadequate safety precautions could result in
death or serious injury.
3.
Disconnect the negative battery cable from the battery.
4.
Raise rear wheel off floor using REAR WHEEL SUP-
PORT STAND (Part No. B-41174).
5.
See
Figure 6-10.
Place rod or screwdriver through axle
hole. Loosen rear axle nut (metric).
6.
Remove nut, lockwasher, and flat washer.
7.
Pull axle out. Remove right side spacer.
8.
Slide carrier with caliper off rotor.
9.
Remove left side spacer.
10. Move wheel forward, disengage drive belt and remove
rear wheel from motorcycle.
11. Remove rear brake master cylinder from right side foot-
rest support. See
2.13 REAR BRAKE MASTER CYLIN-
DER
.
12. Remove right footrest support. See
2.21 FOOTPEGS
AND FOOTPEG SUPPORT BRACKETS
.
13. Remove three TORX bolts, washers and front sprocket
cover from right side of motorcycle.
14. Remove two TORX screws and washers from right side
of rear inner fender.
15. Carefully bend rear inner fender upwards and remove
drive belt. Discard drive belt.
INSTALLATION
1.
Install a
new
drive
belt over transmission drive sprocket.
2.
Install rear inner fender with two TORX screws and
washers. See
2.23 FENDERS.
3.
Install front sprocket cover with three TORX screws and
washers.
4.
Install right footrest support. See
2.21 FOOTPEGS AND
FOOTPEG SUPPORT BRACKETS
.
5.
Install rear master cylinder. See
2.13 REAR BRAKE
MASTER CYLINDER
.
6.
Position wheel in mounting position. Slide axle through
washer, swing arm, carrier, left side spacer and wheel
assembly. Position drive belt inboard of sprocket.
a.
Hold right side spacer in place.
b.
Insert axle through right side spacer and swingarm.
c.
Install flat washer, lockwasher and axle nut.
7.
Place screwdriver or rod through axle hole and tighten
rear axle nut to 48-52 ft-lbs (65-71 Nm).
8.
Slide belt on sprocket teeth by rotating rear wheel to
“walk” belt onto teeth.
9.
Lower motorcycle rear wheel.
10. Connect battery negative cable to battery terminal.
Tighten fastener to 60-96
in-lbs
(7-11 Nm).
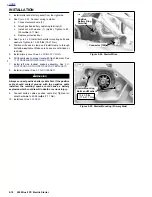
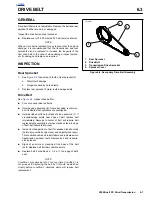
Figure 6-10. Secondary Drive Belt Assembly
a0136x6x
1.
Sprocket
2.
Drive Belt
3.
Transmission Sprocket
4.
Sprocket Cover
2
1
3
4
Summary of Contents for 2002 P3
Page 2: ......
Page 17: ...A 15 Appendix A Tools HOME ...
Page 32: ...C 3 Appendix C Metric Conversions HOME ...
Page 41: ...1 8 2002 Buell P3 Maintenance HOME NOTES ...
Page 75: ......
Page 111: ...2 36 2002 Buell P3 Chassis HOME NOTES ...
Page 143: ...2 68 2002 Buell P3 Chassis HOME NOTES ...
Page 144: ...2002 Buell P3 Chassis 2 69 HOME ...
Page 146: ......
Page 147: ......
Page 223: ...3 76 2002 Buell P3 Engine HOME NOTES ...
Page 225: ......
Page 256: ...2002 Buell P3 Fuel System 4 31 HOME ...
Page 258: ......
Page 259: ......
Page 279: ...5 20 2002 Buell P3 Electric Starter HOME NOTES ...
Page 281: ......
Page 327: ......
Page 398: ...2002 Buell P3 Electrical 7 71 HOME ...
Page 400: ...Product 1 2 ...


