6-24
2002 Buell P3: Drive/Transmission
HOME
TRANSMISSION DISASSEMBLY
6.9
CASE REMOVAL
NOTES
●
If transmission only is being serviced, do not remove fly-
wheel assembly.
●
For crankcase, flywheel or other major servicing, the fly-
wheel assembly can be removed at any time. The same
specialty tools are used.
1.
See
Figure 6-36.
Remove transmission case. See
6.8
TRANSMISSION CASE
2.
See
Figure 6-36.
Split crankcases in half. See
6.8
TRANSMISSION CASE
.
3.
Remove crankcase and transmission assembly from
engine stand.
4.
See
Figure 6-37.
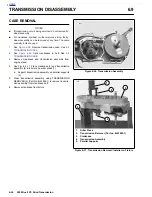
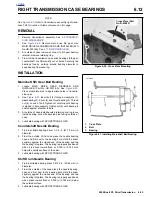
Place crankcase (3) and transmission
assembly (4) into fixture on arbor press (1).
a.
Support transmission assembly on parallel supports
(5).
5.
Press transmission assembly using TRANSMISSION
REMOVER (2) (Part No. B-43895-1) to remove transmis-
sion assembly from crankcase half.
6.
Remove crankcase from fixture.
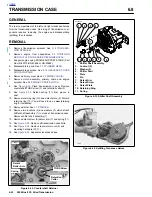
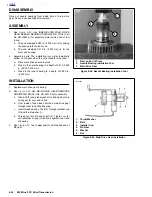
Figure 6-36. Transmission Assembly
Figure 6-37. Transmission Remover/Installer on Fixture
7693
7737
1.
Arbor Press
2.
Transmission Remover (Part no. B-43985-1)
3.
Crankcase
4.
Transmission Assembly
5.
Parallel Supports
1
4
5
2
3
Summary of Contents for 2002 P3
Page 2: ......
Page 17: ...A 15 Appendix A Tools HOME ...
Page 32: ...C 3 Appendix C Metric Conversions HOME ...
Page 41: ...1 8 2002 Buell P3 Maintenance HOME NOTES ...
Page 75: ......
Page 111: ...2 36 2002 Buell P3 Chassis HOME NOTES ...
Page 143: ...2 68 2002 Buell P3 Chassis HOME NOTES ...
Page 144: ...2002 Buell P3 Chassis 2 69 HOME ...
Page 146: ......
Page 147: ......
Page 223: ...3 76 2002 Buell P3 Engine HOME NOTES ...
Page 225: ......
Page 256: ...2002 Buell P3 Fuel System 4 31 HOME ...
Page 258: ......
Page 259: ......
Page 279: ...5 20 2002 Buell P3 Electric Starter HOME NOTES ...
Page 281: ......
Page 327: ......
Page 398: ...2002 Buell P3 Electrical 7 71 HOME ...
Page 400: ...Product 1 2 ...

