2004 Buell Lightning: Chassis
2-47
HOME
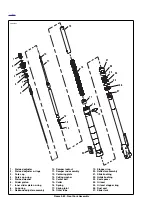
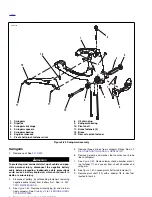
10. See
Figure 2-69.
Over drain pan, spring collar (15),
remove spring (16) and drain fork oil.
11. Drain remaining fork oil by pumping the damping rod (11)
approximately 8 to 10 times or until damping rod moves
freely.
12. Clamp fork upside down in the FORK TUBE HOLDER
TOOL (Part No. HD-41177) over drain pan allowing fork
oil to drain.
NOTE
Be careful not to drop damping rod assembly into oil pan
when removing center bolt.
13. Remove center bolt (14) to release damping rod assem-
bly (11).
14. Remove centering plate (12) from dampening rod (11).
1
1
WARNING
1
WARNING
Be careful not to scratch the slider fork or the outer tube.
Improperly operating forks may lead to a loss of control
which could result in death or serious injury.
15. Remove dust seal (26) to access oil seal stopper
ring (25).
16. Release the oil seal stopper ring (25) out from the outer
tube with a small pry tool.
17. Using a slide hammer action, remove the slider fork (27)
from the outer tube (18).
18. Remove the slide bushing (21) from slider fork by prying
the slide bushing at the split.
NOTE
Careful not to over expand slide bushing.
19. Remove guide bushing (22), seal spacer (23), oil seal
(24), stopper ring (25) and dust seal (26).
Damper Rod Disassembly
IMPORTANT NOTES
●
See
Figure 2-69.
Disassembly of damper rod is not
required unless damper locknut (10) has been
moved. If damper rod needs servicing refer to the
Parts Catalog for kit information.
●
If damper locknut has been moved, proceed with the
following disassembly and assembly procedures for
setting the correct range of motion.
1.
See
Figure 2-69.
Lightly turn the rebound adjuster screw
on top of the rebound adjuster assembly (9) counter
clockwise till it stops.
2.
Holding the damper locknut (10), unscrew the rebound
adjuster assembly (9) and remove from damper rod
assembly (11).
3.
Remove damper locknut (10) from damper rod assembly
(11).
CLEANING AND INSPECTION
1.
Thoroughly clean and inspect all parts. Replace any
parts that are bent, broken or damaged.
2.
See
Figure 2-69.
Check the slider fork (27) and outer
tube (18) for score marks, scratches and excessive or
abnormal wear. Replace if worn or damaged.
3.
Check the slide bushing (21) and the guide bushing (22)
for excessive wear or scratches. Replace if damaged or
worn.
4.
Replace the stopper ring (19) if distorted.
5.
Measure spring (16) free length. Replace springs shorter
than service wear limit of 9.13 in. (232 mm).
6.
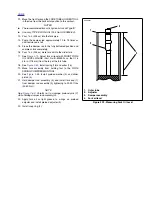
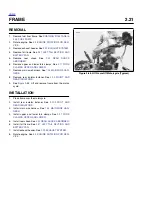
See
Figure 2-70.
Measure slider fork runout. Replace
pipe if runout exceeds the service wear limit of 0.008 in.
(0.2 mm).
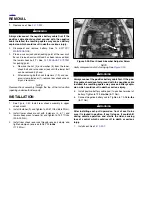
Figure 2-70. Slider fork Runout
b0776x2x
Summary of Contents for 2004 XB9S
Page 2: ......
Page 35: ...D 2 2004 Buell Lightning Appendix D HOME Rear Brake Systems Top View b1115xbsx ...
Page 36: ...2004 Buell Lightning Appendix D D 3 HOME Rear Brake Systems Left Side View b1116xcsx ...
Page 44: ...2004 Buell Lightning Appendix D D 11 HOME Clutch Cable Right Side View b1124xasx ...
Page 47: ...HOME NOTES ...
Page 49: ......
Page 103: ......
Page 201: ...HOME NOTES ...
Page 203: ......
Page 275: ...HOME NOTES ...
Page 307: ...HOME NOTES ...
Page 311: ...HOME NOTES ...
Page 351: ...HOME NOTES ...
Page 441: ......
Page 463: ...HOME NOTES ...
Page 465: ......
Page 517: ...HOME NOTES ...
Page 519: ......
Page 595: ...HOME NOTES ...
Page 597: ......


