2004 Buell Lightning: Drive/Transmission
6-5
HOME
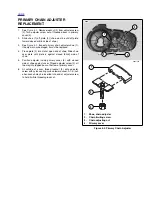
PRIMARY CHAIN ADJUSTER
REPLACEMENT
1.
See
Figure 6-2.
Remove locknut (3) from adjuster screw
(2). Turn adjuster screw out of threaded boss in primary
cover (4).
2.
Slide shoe (1) off plate (2) (shoe must be slid off plate
toward closed or blind side of shoe).
3.
See
Figure 6-2.
Inspect primary chain adjuster shoe (1).
If badly worn or damaged, it must be replaced.
4.
Place plate (2) into slot at open end of shoe. Slide shoe
over plate until plate is against closed (blind) side of
shoe.
5.
Position adjuster inside primary cover (4) with closed
side of shoe against cover. Thread adjuster screw (2) all
the way into tapped boss at bottom of primary cover.
6.
At outside of cover, thread locknut (3) onto adjuster
screw with nylon sealing surface toward cover. A 1/4-inch
allen wrench may be inserted into end of adjuster screw
to hold it while threading lock nut.
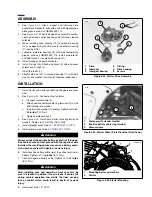
Figure 6-2. Primary Chain Adjuster
b1051x6x
1.
Shoe, chain adjuster
2.
Chain limiting screw
3.
Chain adjusting nut
4.
Primary cover
1
2
3
1
2
8800
3
4
Summary of Contents for 2004 XB9S
Page 2: ......
Page 35: ...D 2 2004 Buell Lightning Appendix D HOME Rear Brake Systems Top View b1115xbsx ...
Page 36: ...2004 Buell Lightning Appendix D D 3 HOME Rear Brake Systems Left Side View b1116xcsx ...
Page 44: ...2004 Buell Lightning Appendix D D 11 HOME Clutch Cable Right Side View b1124xasx ...
Page 47: ...HOME NOTES ...
Page 49: ......
Page 103: ......
Page 201: ...HOME NOTES ...
Page 203: ......
Page 275: ...HOME NOTES ...
Page 307: ...HOME NOTES ...
Page 311: ...HOME NOTES ...
Page 351: ...HOME NOTES ...
Page 441: ......
Page 463: ...HOME NOTES ...
Page 465: ......
Page 517: ...HOME NOTES ...
Page 519: ......
Page 595: ...HOME NOTES ...
Page 597: ......

