2007 Buell Ulysses: Chassis
2-79
HOME
HANDLEBARS
2.30
REMOVAL
1.
Remove seat. See
2.45 SEAT
.
1
1
WARNING
1
WARNING
To prevent accidental vehicle start-up, which could
cause death or serious injury, disconnect negative (-)
battery cable before proceeding. (00048a)
2.
Disconnect battery negative cable.
3.
Remove deflectors. See
2.25 DEFLECTORS/HANDLE-
BARS
.
4.
Remove left handlebar switch housing. See
7.17 HAN-
DLEBAR SWITCHES
. Cut left handlebar grip and
remove.
5.
Detach clutch hand control from handlebars. See
2.26
CLUTCH CONTROL/CABLE
.
6.
Remove front brake master cylinder. See
2.10 FRONT
BRAKE MASTER CYLINDER AND HAND LEVER
.
7.
Loosen screws on right handlebar switch housing, but do
not detach throttle grip assembly from handlebar. See
2.24 THROTTLE CONTROL
.
8.
Remove four harness retainers securing switch housing
harnesses to handlebars.
9.
See
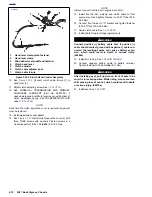
Figure 2-112.
Remove the four screws holding
upper handlebar clamp.
NOTE
Right hand control assembly may now be removed from
detached handlebar.
10. Remove handlebars without stretching throttle cables.
11. See
Figure 2-112.
Remove endcaps.
INSTALLATION
1.
Slide handlebars into throttle grip assembly. Fasten right
handlebar switch housing to handlebar. See
2.24
THROTTLE CONTROL
.
2.
See
Figure 2-112.
Attach handlebars.
a.
Position handlebar on lower clamp.
b. Place the upper handlebar clamp in position and
thread the four screws in place after applying LOC-
TITE 271 (red).
c.
Tighten both front screws to 10-12 ft-lbs (14-16 Nm).
d.
Then tighten both rear screws (2) 10-12 ft-lbs (14-16
Nm).
3.
Install clutch hand control. Tighten but do not torque. See
2.26 CLUTCH CONTROL/CABLE
.
4.
Install left switch housing. See
7.17 HANDLEBAR
SWITCHES
.
5.
Check control wire routing. See
D.1 HOSE AND WIRE
ROUTING.
a. Route right hand control wires between the lower
clamp and fork tube and on the outside of the clutch
cable.
b. Route left hand control wires between the lower
clamp and fork tube.
c.
Install harness retainers.
6.
Install a new left hand grip.
7.
Position clutch hand lever to rider preferences and
tighten fastener (1) to 60-84 in-lbs (6.8-9.5 Nm).
See
2.26 CLUTCH CONTROL/CABLE.
8.
Install front brake master cylinder. See
2.10 FRONT
BRAKE MASTER CYLINDER AND HAND LEVER.
9.
Install deflectors. See
2.25 DEFLECTORS/HANDLE-
BARS
.
10. Check steering motion range to both fork stops.
1
1
WARNING
1
WARNING
Connect positive (+) battery cable first. If positive (+)
cable should contact ground with negative (-) cable con-
nected, the resulting sparks can cause a battery explo-
sion, which could result in death or serious injury.
(00068a)
11. Install battery by threading positive cable (red) into
threaded hole first tightening to 72-96 in-lbs (8-11 Nm).
See
1.4 BATTERY MAINTENANCE
.
1
1
WARNING
1
WARNING
After installing seat, pull upward on front of seat to be
sure it is in locked position. While riding, a loose seat can
shift causing loss of control, which could result in death
or serious injury. (00070a)
12. Install seat. See
2.45 SEAT
.
Summary of Contents for 2007 ULYSSES
Page 17: ...A 16 2007 Buell Ulysses Appendix A HOME NOTES ...
Page 51: ...D 2 2007 Buell Ulysses Appendix D HOME Figure D 2 Rear Brake Systems Top View b1115acsxu ...
Page 63: ...D 14 2007 Buell Ulysses Appendix D HOME NOTES ...
Page 73: ......
Page 103: ...1 30 2007 Buell Ulysses Maintenance HOME NOTES ...
Page 129: ......
Page 237: ...2 108 2007 Buell Ulysses Chassis HOME NOTES ...
Page 239: ......
Page 309: ...3 70 2007 Buell Ulysses Engine HOME NOTES ...
Page 347: ...3 108 2007 Buell Ulysses Engine HOME NOTES ...
Page 391: ...4 42 2007 Buell Ulysses Fuel System HOME NOTES ...
Page 481: ......
Page 505: ......
Page 561: ...6 56 2007 Buell Ulysses Drive Transmission HOME NOTES ...
Page 563: ......
Page 587: ...7 24 2007 Buell Ulysses Electrical HOME NOTES ...
Page 645: ...7 82 2007 Buell Ulysses Electrical HOME NOTES ...
Page 647: ......

