2003 Buell XB9R: Chassis
2-51
HOME
CLEANING AND INSPECTION
1
1
WARNING
1
WARNING
Compressed air can pierce the skin and cause injury.
Never use your hand to check for leaks or to determine
air flow rates. Wear safety glasses to shield your eyes
from flying dirt and debris. Failure to comply could result
in death or serious injury.
1.
Thoroughly clean all components in solvent. Blow dry
with compressed air.
2.
Carefully inspect all bearing components for wear and/or
corrosion. Replace complete bearing assembly if any
component is damaged.
3.
Check that swingarm is not bent or twisted. Replace if
damaged.
ASSEMBLY
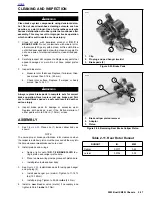
Brace
See
Figure 2-75.
Install upper belt guard (1) onto swingarm
brace. See
2.32 BELT GUARDS.
Swingarm
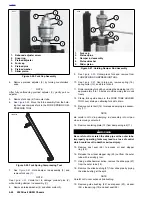
1.
See
Figure 2-78.
Install
new
shock mount bushings (3)
and sleeve (4).
2.
Install
new
bearings (5, 9) and spacer (4) with BEARING
INSTALLER (Part No. HD44060) by lightly seating
spacer.
NOTE
Swingarm bearings should be replaced as a unit. Do not
intermix components. Mark all components so they may be
correctly installed.
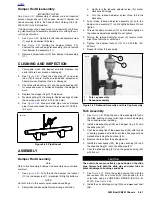
3.
See
Figure 2-77.
Install oil line fittings on swingarm.
Tighten to 29-31 ft-lbs (39-42 Nm). See
3.9 OIL HOSE
ROUTING AND OIL RESERVOIR
.
4.
See
Figure 2-78.
Install drain plug (9). Tighten to 29-
31 ft-lbs (39-42 Nm).
INSTALLATION
Swingarm
1.
See
Figure 2-78.
Align swingarm (1) in pivot of engine
crankcase (6).
2.
Install pivot shaft (10) with a special 7/8 in. hex tool
located in tool kit, ANTI-SIEZE and tighten to 24-26 ft-lbs
(32-35 Nm).
3.
Tighten pivot shaft pinch fastener (7) to 17-19 ft-lbs (23-
26 Nm).
4.
See
Figure 2-85.
Install lower shock absorber mounting
fastener (9) and spacer from shock absorber and swing-
arm and tighten to 17-19 ft-lbs (23-26 Nm).
5.
Install p-clamp and washer that secures rear brake line
to swingarm and tighten to 36-60
in-lbs
(4-7 Nm).
6.
Install three oil lines from swingarm fittings. See
3.9 OIL
HOSE ROUTING AND OIL RESERVOIR.
7.
Install rear wheel. See
2.6 REAR WHEEL
.
NOTE
Installing the rear wheel will include installation of the belt
drive system. See
1.9 DRIVE BELT SYSTEM
.
8.
Fill motorcycle with recommended oil. See
1.5 ENGINE
LUBRICATION SYSTEM.
1
1
WARNING
1
WARNING
Always connect the positive battery cable first. If the pos-
itive cable should contact ground with the negative cable
installed, the resulting sparks may cause a battery explo-
sion which could result in death or serious injury.
9.
Install battery by threading positive cable (red) into
threaded hole first tightening to 72-96
in-lbs
(8-11 Nm).
See
1.4 BATTERY MAINTENANCE.
1
1
WARNING
1
WARNING
After completing repairs or bleeding the system, always
test motorcycle brakes at low speed. If brakes are not
operating properly or braking efficiency is poor, testing
at high speeds could result in death or serious injury.
Brace
1.
See
Figure 2-75.
Position upper belt guard (1) and
spacer (3).
2.
See
Figure 2-78.
Install swingarm brace (13) with swing-
arm brace mounting fasteners (12) loosely. Do not
tighten.
3.
See
Figure 2-75.
Tighten upper belt guard (2) fasteners
to 12-36
in-lbs
(1-4 Nm).
4.
See
Figure 2-78.
Tighten swingarm brace fasteners (12)
to 25-27 ft-lbs (34-37 Nm).
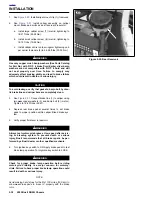
5.
See
Figure 2-76.
Tighten rear axle (1) to 48-52 ft-lbs (65-
70 Nm).
6.
Tighten rear axle pinch fastener (2) to 40-45 ft-lbs (54-
61 Nm).
7.
Install right side passenger footpeg mount tightening fas-
teners to 15-18 ft-lbs (20-24 Nm). See
2.29 FOOTPEG,
HEEL GUARD AND MOUNT
.
8.
Install right side rider footpeg mount tightening fasteners
to 108-132
in-lbs
(12-15 Nm). See
2.29 FOOTPEG,
HEEL GUARD AND MOUNT
.
9.
Install heel guard. See
2.29 FOOTPEG, HEEL GUARD
AND MOUNT
.
10. Remove rear wheel support stand.
Final Swingarm Inspection
1.
Check oil level after starting motorcycle and allowing it to
reach operating temperature.
2.
Check rear brake operation.
Summary of Contents for XB9R 2003
Page 2: ...1 2 Edit Me Printed June 5 2002 12 26 pm ...
Page 35: ...D 2 2003 Buell XB9R Appendix D HOME Figure D 2 Rear Brake Systems Top View b1115xbx ...
Page 36: ...2003 Buell XB9R Appendix D D 3 HOME Figure D 3 Rear Brake Systems Left Side View b1116xcx ...
Page 47: ...D 14 2003 Buell XB9R Appendix D HOME NOTES ...
Page 49: ......
Page 77: ...1 28 2003 Buell XB9R Maintenance HOME NOTES ...
Page 103: ...1 54 2003 Buell XB9R Maintenance HOME NOTES ...
Page 105: ... 2 ...
Page 191: ......
Page 263: ...3 72 2003 Buell XB9R Engine HOME NOTES ...
Page 299: ...4 2 2003 Buell XB9R Fuel System HOME NOTES ...
Page 385: ...4 88 2003 Buell XB9R Fuel System HOME NOTES ...
Page 421: ...4 124 2003 Buell XB9R Fuel System HOME NOTES ...
Page 423: ......
Page 445: ...5 22 2003 Buell XB9R Starter HOME NOTES ...
Page 447: ......
Page 469: ...6 22 2003 Buell XB9R Drive Transmission HOME NOTES ...
Page 497: ...6 50 2003 Buell XB9R Drive Transmission HOME NOTES ...
Page 499: ......

