2-58
2003 Buell XB9R: Chassis
HOME
CLUTCH HAND LEVER
2.24
REMOVAL/DISASSEMBLY
NOTE
For clutch adjustment, see
1.8 CLUTCH
.
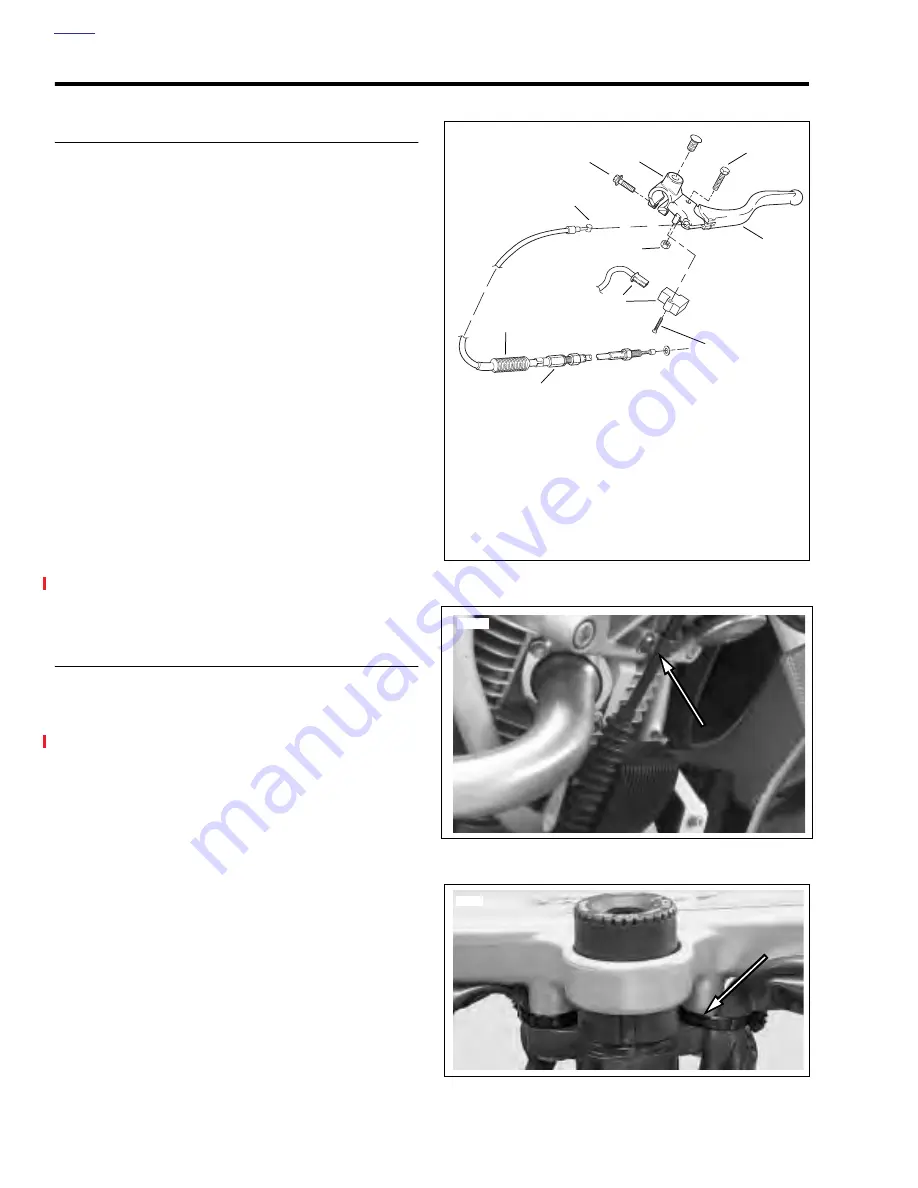
1.
See
Figure 2-89.
Remove p-clamp from front isolator.
2.
See
Figure 2-88.
Slide clutch cable adjuster boot (8) up
to access clutch adjuster (7).
3.
Loosen clutch adjuster (7) to release tension from hand
lever (4).
4.
Remove clutch cable ferrule (9) from hand lever (4).
5.
Remove hand lever pinch bolt (3).
6.
Remove hand lever (4) from hand lever clamp (2).
7.
Remove safety interlock switch (5).
a. Remove hand lever clamp fastener (1) and spin
clamp (2) to access safety interlock switch (5).
b.
Disconnect safety interlock switch connector (5) and
remove switch fastener (6) and switch (5).
NOTE
The individual parts of the clutch switch are not serviceable.
Replace switch upon failure.
8.
See
Figure 2-90.
Cut cable strap from left upper fork
clamp.
9.
Remove left clip-on. See
2.27 HANDLEBARS
.
10. Remove clutch assembly from clip-on.
ASSEMBLY/INSTALLATION
1.
See
Figure 2-88.
Slide hand lever clutch clamp (2) over
left clip-on. Loosely tighten hand lever pinch fastener and
nut (3).
2.
Install left clip-on. See
2.27 HANDLEBARS.
3.
Connect safety interlock connector and switch (5).
4.
Install safety interlock switch (5) with fastener (6) tighten-
ing to 7-10 in-lbs (0.8-1.0 Nm).
NOTE
Apply small amount of LOCTITE ANTI-SEIZE LUBRICANT to
bolt (3).
5.
Install clutch hand lever (4) in hand lever clamp (2) and
tighten hand lever pinch fastener (3) to 39-48 in-lbs (4-
5 Nm).
6.
Position hand lever (4) to rider preference and tighten
hand lever clamp pivot fastener (1) to 36-60 in-lbs (4-
7 Nm).
7.
Connect clutch cable ferrule (9) to hand lever clamp (2).
8.
See
Figure 2-90.
Install cable strap holding safety inter-
lock switch and left switch housing on left upper fork. Do
not over tighten cable strap.
9.
If not yet performed, route clutch cable to primary cover.
D.1 HOSE AND WIRE ROUTING
for clutch cable routing.
10. With clutch cable lower section connected to primary
cover, adjust clutch. See
1.8 CLUTCH
.
Figure 2-88. Clutch Hand Control Assembly
Figure 2-89. Clutch Cable P-clamp
Figure 2-90. Cable Straps On Upper Fork Clamp
1.
Hand lever clamp pinch fastener
2.
Hand lever clamp
3.
Hand lever pinch fastener and nut
4.
Clutch hand lever
5.
Safety interlock connector and switch
6.
Safety interlock switch fastener
7.
Clutch adjuster
8.
Clutch cable adjuster boot
9.
Clutch cable ferrule
b0939x2x
3
6
1
9
4
3
7
2
5
8
8740
8454
Summary of Contents for XB9R 2003
Page 2: ...1 2 Edit Me Printed June 5 2002 12 26 pm ...
Page 35: ...D 2 2003 Buell XB9R Appendix D HOME Figure D 2 Rear Brake Systems Top View b1115xbx ...
Page 36: ...2003 Buell XB9R Appendix D D 3 HOME Figure D 3 Rear Brake Systems Left Side View b1116xcx ...
Page 47: ...D 14 2003 Buell XB9R Appendix D HOME NOTES ...
Page 49: ......
Page 77: ...1 28 2003 Buell XB9R Maintenance HOME NOTES ...
Page 103: ...1 54 2003 Buell XB9R Maintenance HOME NOTES ...
Page 105: ... 2 ...
Page 191: ......
Page 263: ...3 72 2003 Buell XB9R Engine HOME NOTES ...
Page 299: ...4 2 2003 Buell XB9R Fuel System HOME NOTES ...
Page 385: ...4 88 2003 Buell XB9R Fuel System HOME NOTES ...
Page 421: ...4 124 2003 Buell XB9R Fuel System HOME NOTES ...
Page 423: ......
Page 445: ...5 22 2003 Buell XB9R Starter HOME NOTES ...
Page 447: ......
Page 469: ...6 22 2003 Buell XB9R Drive Transmission HOME NOTES ...
Page 497: ...6 50 2003 Buell XB9R Drive Transmission HOME NOTES ...
Page 499: ......

