2-62
2003 Buell XB9R: Chassis
HOME
FAIRING SUPPORT BRACKET
2.26
REMOVAL
1.
Remove seat. See
2.38 SEAT
.
1
1
WARNING
1
WARNING
To protect against accidental start-up of vehicle and pos-
sible personal injury, disconnect the negative battery
cable before proceeding. Inadequate safety precautions
could cause a battery explosion, which could result in
death or serious injury.
2.
Disconnect battery by unthreading fastener removing
negative cable (black) from battery first. See
1.4 BAT-
TERY MAINTENANCE.
3.
Remove front fairing. See
2.37 FRONT FAIRING, WIND-
SHIELD, AND MIRRORS
.
4.
Remove headlight support bracket. See
2.25 HEAD-
LIGHT SUPPORT BRACKET.
5.
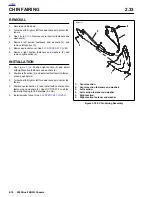
Remove fuse block (1) and relay block (4) and p-clamp.
See
7.22 MAIN FUSE AND FUSES.
6.
Disconnect and remove horn (5). See
7.20 HORN.
7.
Disconnect and remove instrument cluster (2, 3). See
7.17 INSTRUMENT MODULE.
8.
See
Figure 2-95.
Remove fairing support bracket fasten-
ers and washers (4), p-clamp (7) to remove fairing sup-
port bracket (5).
INSTALLATION
1.
Route the wire harness. See
D.1 HOSE AND WIRE
ROUTING
for wire harness routing.
2.
See
Figure 2-95.
Install fairing support bracket with fas-
teners and washers (4). Tightening to 16-18 ft-lbs (22-
26 Nm).
3.
Install p-clamp (7) with p-clamp fasteners and washers
(8).
4.
Connect instrument cluster connector and install instru-
ment cluster. Tightening to 36-48 in-lbs (4-5 Nm). See
7.17 INSTRUMENT MODULE
.
5.
Install horn and tighten fasteners to 72-96 in-lbs
(8-10 Nm). See
7.20 HORN
.
6.
Install fuse block, relay and p-clamp tightening fasteners
to 72-96 in-lbs (8-11 Nm). See
7.22 MAIN FUSE AND
FUSES
.
7.
Install lower headlight support bracket. See
2.25 HEAD-
LIGHT SUPPORT BRACKET.
8.
Install front fairing. See
2.37 FRONT FAIRING, WIND-
SHIELD, AND MIRRORS
.
1
1
WARNING
1
WARNING
Always connect the positive battery cable first. If the pos-
itive cable should contact ground with the negative cable
installed, the resulting sparks may cause a battery explo-
sion which could result in death or serious injury.
9.
Install battery by threading positive cable (red) into
threaded hole first tightening to 72-96 in-lbs (8-11 Nm).
See
1.4 BATTERY MAINTENANCE
.
10. Install seat. See
2.38 SEAT
.
Summary of Contents for XB9R 2003
Page 2: ...1 2 Edit Me Printed June 5 2002 12 26 pm ...
Page 35: ...D 2 2003 Buell XB9R Appendix D HOME Figure D 2 Rear Brake Systems Top View b1115xbx ...
Page 36: ...2003 Buell XB9R Appendix D D 3 HOME Figure D 3 Rear Brake Systems Left Side View b1116xcx ...
Page 47: ...D 14 2003 Buell XB9R Appendix D HOME NOTES ...
Page 49: ......
Page 77: ...1 28 2003 Buell XB9R Maintenance HOME NOTES ...
Page 103: ...1 54 2003 Buell XB9R Maintenance HOME NOTES ...
Page 105: ... 2 ...
Page 191: ......
Page 263: ...3 72 2003 Buell XB9R Engine HOME NOTES ...
Page 299: ...4 2 2003 Buell XB9R Fuel System HOME NOTES ...
Page 385: ...4 88 2003 Buell XB9R Fuel System HOME NOTES ...
Page 421: ...4 124 2003 Buell XB9R Fuel System HOME NOTES ...
Page 423: ......
Page 445: ...5 22 2003 Buell XB9R Starter HOME NOTES ...
Page 447: ......
Page 469: ...6 22 2003 Buell XB9R Drive Transmission HOME NOTES ...
Page 497: ...6 50 2003 Buell XB9R Drive Transmission HOME NOTES ...
Page 499: ......


