2003 Buell XB9R: Electrical
7-61
HOME
INSTALLATION
NOTE
For more information on wire harness and hose routing, see
D.1 HOSE AND WIRE ROUTING
.
1.
Feed rear portion of new harness between left front fork
and frame.
2.
Continue to feed rear and center portion of harness
between left side of engine and frame.
3.
Place connectors in general location of installation.
4.
Secure plastic harness holder to left inside portion of
frame using plastic tree fasteners.
NOTE
Fuel line is installed under engine connector portion of wire
harness.
5.
See
Figure 7-75.
Install clamp over portion of harness
that leads to engine connectors. Install clamp as shown
using new plastic tree fastener.
6.
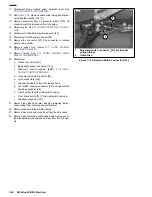
See
Figure 7-76.
Route portion of main wire harness that
contains the positive battery cable (3), sprocket cover
wiring (4) and transmission vent hose (2) through corner
mounting tab (1) at rear of frame. Install new plastic tree
fasteners.
7.
Connect fan connector [97].
8.
Connect throttle position sensor [88].
9.
Rotate motor into position. See
REASSEMBLY
under
3.3 ENGINE ROTATION FOR SERVICE
.
10. Install sprocket cover wiring. See
7.24 SPROCKET
COVER WIRING
.
11. See
Figure 7-74.
Connect sidestand switch connector
[133] (1). Install heat shrink tubing. Install cable strap (2)
securing sidestand switch wiring to sidestand switch
bracket.
12. Install oil pressure switch connector to oil pressure
switch.
13. See
Figure 7-77.
Install cable straps:
a. Front cable strap (3) secures voltage regulator and
oil pressure switch wiring.
b.
Middle cable strap (2) secures voltage regulator, oil
pressure switch and cam position sensor wiring.
c.
Rear cable strap (1) secures conduit to voltage reg-
ulator wiring.
NOTE
Snap fuse and relay blocks into mounting brackets before
installing blocks to fairing mounting bracket.
14. Place clamp (2) around fuse block wiring. Mount fuse
block (1) and clamp to fairing support bracket using top
fastener (4) and bottom fastener (3). Tighten fasteners to
72-96 in-lbs (8.1-10.8 Nm).
15. Repeat previous steps for relay block.
16. Install steering head clamp around wire harness and
secure clamp to fairing support bracket with loop facing
vehicle. Tighten fastener to 16-18 ft-lbs (21.7-24.4 Nm).
Figure 7-75. Wire Harness Clip
Figure 7-76. Corner Mounting Tab
8837
8838
4
2
1
3
1.
Mounting tab
2.
Transmission vent hose
3.
Positive battery cable
4.
Sprocket cover wiring
Summary of Contents for XB9R 2003
Page 2: ...1 2 Edit Me Printed June 5 2002 12 26 pm ...
Page 35: ...D 2 2003 Buell XB9R Appendix D HOME Figure D 2 Rear Brake Systems Top View b1115xbx ...
Page 36: ...2003 Buell XB9R Appendix D D 3 HOME Figure D 3 Rear Brake Systems Left Side View b1116xcx ...
Page 47: ...D 14 2003 Buell XB9R Appendix D HOME NOTES ...
Page 49: ......
Page 77: ...1 28 2003 Buell XB9R Maintenance HOME NOTES ...
Page 103: ...1 54 2003 Buell XB9R Maintenance HOME NOTES ...
Page 105: ... 2 ...
Page 191: ......
Page 263: ...3 72 2003 Buell XB9R Engine HOME NOTES ...
Page 299: ...4 2 2003 Buell XB9R Fuel System HOME NOTES ...
Page 385: ...4 88 2003 Buell XB9R Fuel System HOME NOTES ...
Page 421: ...4 124 2003 Buell XB9R Fuel System HOME NOTES ...
Page 423: ......
Page 445: ...5 22 2003 Buell XB9R Starter HOME NOTES ...
Page 447: ......
Page 469: ...6 22 2003 Buell XB9R Drive Transmission HOME NOTES ...
Page 497: ...6 50 2003 Buell XB9R Drive Transmission HOME NOTES ...
Page 499: ......

