background image

6

UK

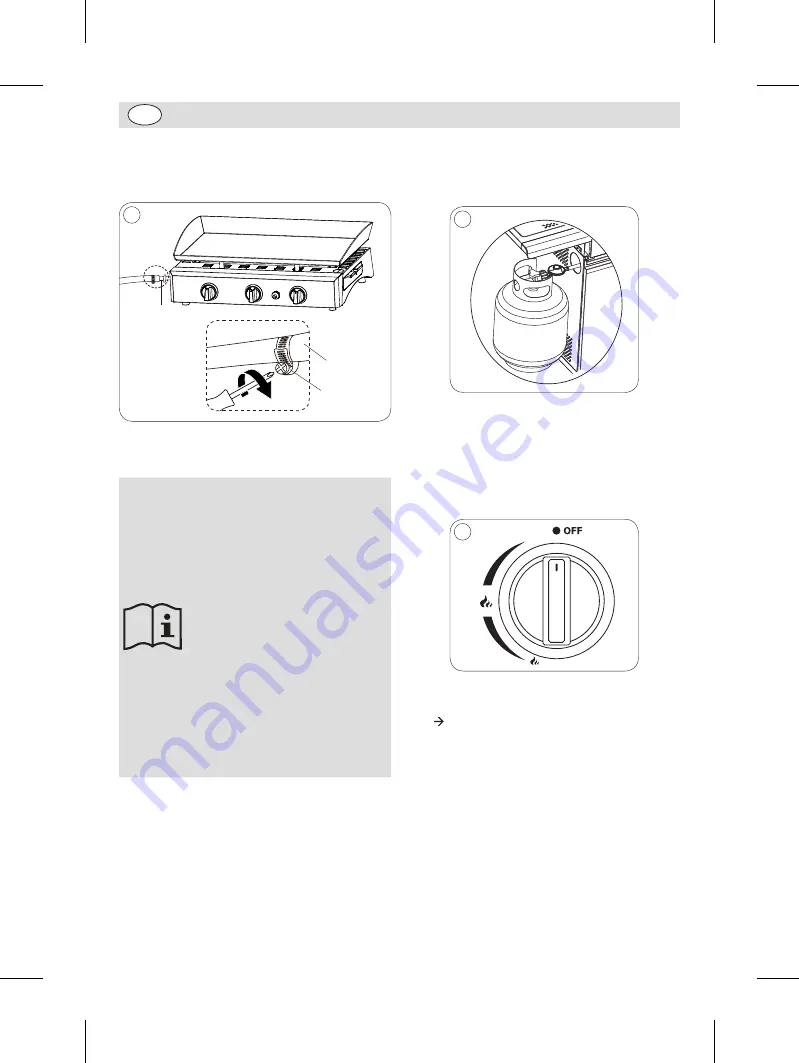
1.  Plug the hose head to the connector (if you have 

trouble to connect the hose, soak the hose head 

into water for 5 minutes). Tighten the metal clip 

on the hose with a screwdriver (Fig. 1). 

1

Connector

Metal clip

Hose

2.  Connect the hose from the griddle to the 

regulator. Secure the connection with the metal 

clip on the hose.

Note: 

•  The date on the gas 

hose (if supplied) is the 

manufacturing date, not the 

expiration date.

•  When replacing with a 

new hose, turn off the 

gas cylinder first. Then 

disconnect the hose from 

the gas bottle and gas hose 

inlet on the griddle.

•  The height of the gas 

cylinder is below 80cm, and 

the width is within 35cm.

•  The regulator needs to 

meet the standard of 

EN16129:2013.

•  The regulator hose needs 

to meet the standard of 

EN16436-1:2014, and the 

length is less than 1.5 meters.

Connecting the regulator to the gas 

cylinder

1.  Position the gas cylinder at the left side of your 

griddle, away from heat and obstructions.

2.  Turn the orange cap on the gas cylinder so that 

the arrow is pointing to the gap in the shroud.

3.  Remove the orange safety cap by pulling the 

lanyard out. Do not use any tools. Leave the 

cap hanging. 

4.  Ensure the black sealing washer is fitted inside 

the cylinder valve.

5.  Mount the regulator on the gas cylinder valve 

and tighten firmly (Fig. 2).

2

6.  Now the griddle is done with all connections 

and ready for use.

Gas leak testing

Always perform a leak test in a well-ventilated area.
1.  Confirm all control knobs are at the 

OFF


position (Fig. 3).

3

2.  Turn on the gas supply at the gas cylinder or 

regulator. Turn on the gas griddle as instructed  

(  Operation). 

3.  Check for leaks by brushing a solution of ½ 

water and ½ soap over all the gas system 

joints, including all valve connections, hose 

connections, and regulator connections.

4.  If bubbles form over any of the joints, there is 

a leak. 


- Turn off the gas supply at the gas cylinder


- Re-tighten all joints


- Repeat test


- If bubbles form again, stop using the griddle 

and contact your local distributor for assistance. 

5.  Wipe the mixed solution from all joints and 

connections after leak test.

CR886_UK_A5_v2_20190515.indb   6

2019/5/15   17:27

Summary of Contents for CR886

Page 1: ...Model CR886 Buffalo Gas Griddle Instruction manual CR886_UK_A5_v2_20190515 indb 1 2019 5 15 17 27...

Page 2: ...Do not move the appliance after lit during use or immediately after use before it completely cools down Do not leave the appliance unattended during use Turn off the gas supply at the gas cylinder or...

Page 3: ...er with food Pressure may build up and cause the container to burst possibly resulting in personal injury or damage to the griddle Do not attempt any unauthorized interference of the main controls on...

Page 4: ...ing or excessive wear before use Apart from the connection point no part of the hose should touch any hot barbecue parts If the hose shows any sign of damage replace it immediately with one suitable f...

Page 5: ...restrict the heat output available from the burners particularly once the gas temperature starts to fall below 10 C You will need LPG gas bottle and proper regulators under the gas pressure to operat...

Page 6: ...e cap on the gas cylinder so that the arrow is pointing to the gap in the shroud 3 Remove the orange safety cap by pulling the lanyard out Do not use any tools Leave the cap hanging 4 Ensure the black...

Page 7: ...gulator 3 Press down one control switch and hold for 3 5 seconds to allow gas flow then turn anticlockwise to the high position Fig 4 During this period press the Ignitor button repeatedly to light th...

Page 8: ...r barbecue we strongly recommend that the unit be covered when left outside for any length of time especially during the winter months Heavy duty barbecue covers and other accessories are available fr...

Page 9: ...ow the cleaning procedures to ensure the gas griddle is safe Troubleshooting Fault Probable Cause Solution Gas leaking from cracked cut burned hose Damaged hose Turn off gas at LP bottle If hose is cu...

Page 10: ...wire and or electrode with rubbing alcohol and clean swab Wires are loose or disconnected Reconnect wires or replace electrode wire assembly Wires are short circuited sparking between ignitor and elec...

Page 11: ...further information on how to dispose of this product correctly contact the product supplier or the local authority responsible for waste disposal in your area BUFFALO parts have undergone strict pro...

Page 12: ...care is taken in the manufacture of this product care must be taken during assembly in case sharp edges are present Parts list 4 3 2 1 1 Griddle 3 Oil cup 2 Main body 4 Foot x 4 Note Specifications s...

Page 13: ...Insert the 4 pins on the griddle bottom into the top holes on the body When installing this part two people are recommended Put the oil cup 3 in place Note If the griddle is uneven on the body please...

Page 14: ...UK 0845 146 2887 NL 0800 29 1 29 040 2628080 FR 0800 29 2 29 01 60 34 28 80 DE 0800 1860806 IT N A ES 901 100 133 PT vendas nisbets pt CR886_UK_A5_v2_20190515 indb 14 2019 5 15 17 27...

Page 15: ...CR886_UK_A5_v2_20190515 indb 15 2019 5 15 17 27...

Page 16: ...CR886_UK_A5_v2_20190515 http www buffalo appliances com CR886_UK_A5_v2_20190515 indb 16 2019 5 15 17 27...

Reviews:

Related manuals for CR886