background image

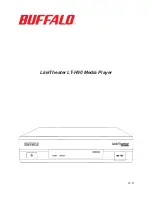
LinkTheater LT-H90 Media Player

v1.0

Summary of Contents for LinkTheater LT-H90

Page 1: ...LinkTheater LT H90 Media Player v1 0 ...

Page 2: ...agram 4 Connect Your Cables 6 Remote Control 8 Getting Started 11 Install PC Software 12 Using the LinkTheater 20 Settings 24 Display Modes 28 Using Windows Media Player 30 Transcoder 34 Specifications 36 Warranty 37 Contact 38 ...

Page 3: ...heater has a wide variety of AV connections on the back including High Definition compatible video connectors as well as digital Dolby 5 1 and DTS compatible audio connectors LinkTheater also supports Universal Plug Play for easy installation LinkTheater plays back most popular video image and audio formats See the Specifications page for a list of supported file types Prepare to experience one of...

Page 4: ...ay be used with USB memory sticks camcorders or FAT32 USB hard drives 120V AC D4 Component HD video out 720p USB port for use with USB memory sticks or FAT32 USB hard drives Composite Video out RCA stereo audio out Toslink digital audio out 5 1 10 100 Ethernet HDMI 720p ...

Page 5: ...roduct from Preparation The LinkTheater connects to a TV or video monitor with composite RCA HDMI D4 or component style video connectors Find an appropriate place to install the LinkTheater We recommend that the install place is within visible site of the primary seating area This device uses an IR remote control and requires line of sight conveniently located near your TV and Hi Fi on a flat surf...

Page 6: ...t any TV will have This cable is included in your LinkTheater package and will work with most TVs Here s a simple way to connect your LinkTheater directly to a TV 1 Hook up the included analog video cable to your TV or monitor Most TVs will have the connections color coded Yellow for video red for right audio and white for left audio 2 Connect the other end of the analog video cable to the associa...

Page 7: ... the video to your monitor with a D4 to component or HDMI cable If the toslink 5 1 digital audio output is used you ll need to enable it in Settings before using it Additional cables not included with the LinkTheater will be necessary for any of these alternate configurations 4 Plug the power cable into an AC power outlet Buffalo recommends connecting the AC adapter to a power strip with a surge p...

Page 8: ...that is currently being played back This includes file name info format info and in the case of movies and music how long the file has been playing Setup The setup button will instantly take you to the System Settings area Refresh The refresh button will automatically refresh what is on the screen For example if recent files have been added to a media server pressing the refresh button may display...

Page 9: ...II begins and pauses playback stops playback is fast forward I goes to the next song etc Video Music Photo The three video music and photo buttons can be used while navigating a media source Pressing one of these buttons will instantly change your viewing to the file types that correspond with the button pushed For example if you re browsing video and press the music button you ll instantly be bro...

Page 10: ... The LinkTheater has its own independent volume control that can be used along with or as an alternative to your TV or sound system s remote control This allows you to quickly mute or raise lower the volume without having to necessarily use the TV or sound system s remote control Stop The stop key will temporarily pause a slideshow that s in progress Track The track button will skip forward or bac...

Page 11: ...s Where do you keep your movies music and pictures If they re on Windows PCs then turn to the next page and begin installing software on your PC If your media files are stored on a NAS device like the TeraStation Live or the LinkStation Live then you may not need to install software at all Turn to page 20 to start using your LinkTheater immediately ...

Page 12: ...w the install steps below if you wish to use the LinkTheater to access media files on a Windows PC 1 Insert the LinkTheater CD ROM into your PC s CD ROM drive The program will run automatically 2 Press the Start button 3 Agree to the End User License ...

Page 13: ...13 4 Press Start 5 Click Reboot to finish the installation and restart your PC ...

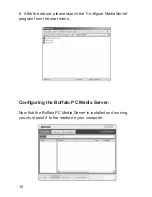
Page 14: ...ot please launch the Configure MediaServer program from the start menu Configuring the Buffalo PC Media Server Now that the Buffalo PC Media Server is installed and running you must point it to the media on your computer ...

Page 15: ...ly pick a directory on your computer to share with the LinkTheater If you wish to add multiple directories then you can add them one at a time by repeating the process Auto Search Auto search launches a wizard that will help you automatically find your media Press the Next button to continue ...

Page 16: ...s are available We recommend that you keep the options as is Click on Next when ready After the search completes you will be asked to confirm which folders you d like to add to the media server Checked folders will be shared unchecked folders will not Once you have analyzed the list click on Confirm ...

Page 17: ...e Turn OFF File Sharing button You may want to turn on Access Control to prevent certain devices from accessing your media content This is especially important if there are multiple LinkTheaters or other DLNA playback devices on your network If you d like to prevent some devices from accessing your date while permitting others press the Turn ON Access Control button Press Add to bring up the acces...

Page 18: ...18 Press Next And then press Next again ...

Page 19: ...s Once complete press Next You can continue to add more access grants by pressing the Add button again The access rules will appear in the main application console Congratulations you ve completed the installation and configuration of the Buffalo PC Media Server ...

Page 20: ...ter Use the remote to choose and play your media files When the LinkTheater first turns on it shows the Home screen Use the up and down arrows on your remote control to highlight your choice and then press enter to open it ...

Page 21: ...ation Home Server and TeraStation Home Server 3rd party DLNA servers like TwonkyVision www twonkyvision com Microsoft Windows Media Connect Microsoft Windows Media Player 11 3rd party UPnP A V Servers Highlight one and click the right arrow to browse content Network Shared Folder shows NAS devices on the local network Highlight one and click the right arrow to browse content ...

Page 22: ...the remote As it plays you can use the fast forward and rewind buttons on the remote to navigate through the file Browse USB shows FAT32 formatted USB storage devices connected directly to the LinkTheater Highlight one and click the right arrow to browse content ...

Page 23: ...ard drive to the rear panel of the LinkTheater and your camcorder or digital camera to the front panel USB port When you see the Complete screen your files are backed up to the hard drive The LinkTheater will back up your media files automatically Your camcorder must be in mass storage mode for this to work properly ...

Page 24: ...e box your LinkTheater s basic configuration works well for many users However you have the option to modify many of its settings to give the best match with your other equipment To access settings choose Settings from the Home menu or press the Settings button on your remote ...

Page 25: ...tem Preferences include such settings as the delay times for the screensaver and slideshow LED brightness and whether or not to enable the digital audio output System settings are divided into four categories ...

Page 26: ...tains settings that affect your LinkTheater s network connection By default the LinkTheater uses DHCP to configure all network settings for you automatically but if you prefer you may create new profiles with manual settings ...

Page 27: ...ttings lets you toggle between various video output modes This is where you adjust the picture to display properly on your 16x9 HD monitor Press the Enter button on your remote to toggle through the available modes ...

Page 28: ...ve format for many common HDTVs It s broadcast over the HDMI and D4 component video connectors Most widescreen HDTVs should support this mode It uses 1280x720 progressive resolution If your TV or monitor doesn t support 720p than this mode will NOT work Component 1080i 16x9 This is the best highest resolution mode available from the LinkTheater If your TV or monitor can displays 1080i images then ...

Page 29: ...29 Reset System Settings will return all settings to their factory defaults Any changes you ve made will be lost ...

Page 30: ...ng other functions Windows Media Player 11 streams multimedia content to devices like LinkTheater Currently it s the only way to transmit DRM Digital Rights Management protected multimedia files from a Windows XP PC to LinkTheater If you do not own or use any DRM protected multimedia files then setting up Windows Media Player is not necessary Windows Media Player supports playback of DRM protected...

Page 31: ...31 In Windows Media Player click Tools and choose Options From the Library tab choose Configure Sharing ...

Page 32: ...iangle and an explanation point Highlight the new Unknown Device and click Allow Note If more then one device is listed then multiple media players are available on your network in this case either add all of them or determine which one is your LinkTheater by turning it on and off and seeing how the list is affected Click Settings to specify what media files to share with your LinkTheater ...

Page 33: ...33 Change settings as desired Click OK when done ...

Page 34: ...les created by older utilities such as Windows Media player 7 or 8 you ll need to use transcoder software to convert the files to playable formats To do this click Start Programs BUFFALO MediaServer Transcoder Click Add to add files to the transcode list and then Start to convert them ...

Page 35: ...9 0c You may install DirectX9 0c from the Buffalo software disk An electronic copy of the LinkStation user manual this guide is available on the disk The electronic copy of the manual is in PDF format To read it you will need a PDF reader like Adobe s Acrobat included on the disk for your convenience ...

Page 36: ...sion Speed 10 100 Mbps Connector Type RJ 45 Access Method CSMA CD USB Interface Interface USB2 0 1 1 Data Transfer Speed 480 Mbps Other Supported OS Windows XP Windows 2000 with SP4 Vista Product Voltage 50 60 Hz 120 V Power Consumption Max 19 W Dimensions W 8 25 x H 1 94 x D8 25 in Weight Approx 2 5 lbs Included transcoder software allows conversion of older formats such as WMV 7 8 to playable fo...

Page 37: ...se receipt to get warranty support All defective products shall be returned with a copy of proof of purchase In no event shall Buffalo Technology s liability exceed the price paid for the product from direct indirect special incidental or consequential damages resulting from the use of the product its accompanying software or its documentation Buffalo Technology does not offer refunds for any prod...

Page 38: ... available 24 hours a day 7 days a week USA and Canada Toll free 866 752 6210 Email info buffalotech com Europe Buffalo Technology UK Ltd 2 Bracknell Beeches Old Bracknell Lane Bracknell Berkshire RG12 7BW United Kingdom General Inquiries Email sales buffalo technology com Technical Support European technical support is provided in English German Italian and Spanish For opening hours and relevant ...

Reviews: