background image

5

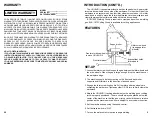
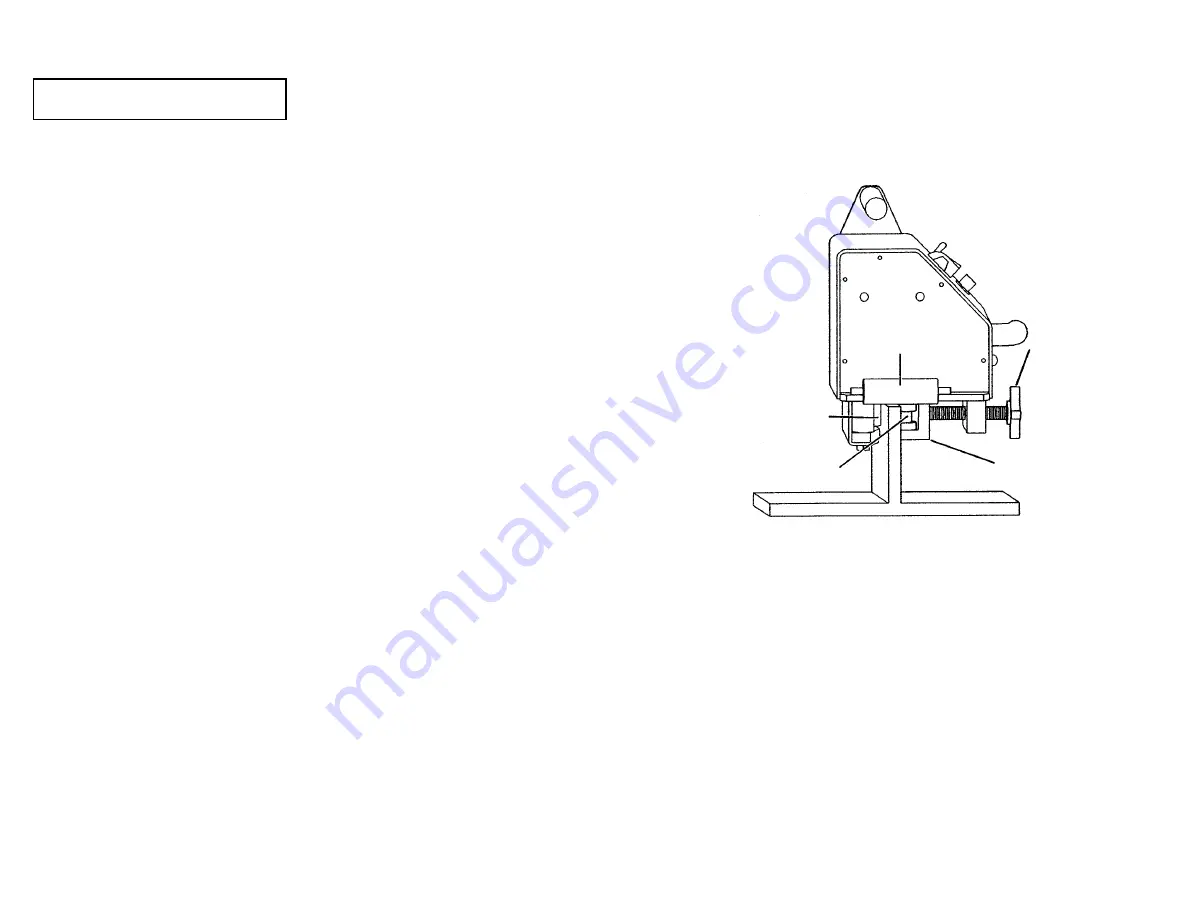
The UNI-BUG II can operate without a track as shown below. A gear motor

turns two drive wheels on one side of the workpiece. On the other side of the
workpiece is a bracket which has four idler wheels mounted on it. An idler
screw knob is used to move the idler wheel bracket into the workpiece and
clamp it between the four idler wheels and the two drive wheels.

BUG-1855 Welding Group is required to clamp and position a welding

gun. BUG-1875 Cutting Group is available for cutting applications.

INTRODUCTION (CONT’D.)

1. Loosen the idler screw knob to open the gap between the idler wheels and

the drive wheels. When the gap is large enough, drop the machine over
the workpiece edge.

2. The machine should be firmly resting on the front and back roller

supports and tilt forward in the direction of desired travel.

3. Engage the idler screw knob until all of the idler and drive wheels are

contacting the workpiece. Tighten another 1/2-3/4 turn to firmly clamp the
workpiece.

4. Adjust the UNI-BUG II racking attachment so the welding gun or cutting

torch is properly positioned. The are should always be placed below the
center of the machine so that the gun or torch can hold the same relative
position as the machine moves from a straight to a curved work section.

5. Set the machine speed using the speed control.

6. Set the travel switch to “ON”.

7. Turn on the weld contactor switch to begin welding.

FEATURES

Support roller

Idler screw knob
(to engage idler
wheels)

Front motor drive wheel
to move UNI-BUG II

Front idler wheel

Bracket that holds
idler wheels

SET-UP

20

WARRANTY

FOR A PERIOD OF TWELVE (12) MONTHS FROM DELIVERY, BUG-O SYSTEMS
WARRANTS TO THE ORIGINAL PURCHASER (DOES NOT INCLUDE AUTHORIZED
DISTRIBUTORS), THAT A NEW MACHINE IS FREE FROM DEFECTS IN MATERIAL
AND WORKMANSHIP AND AGREES TO REPAIR OR REPLACE, AT ITS OPTION,
ANY DEFECTIVE PARTS OR MACHINE. THIS WARRANTY DOES NOT APPLY TO
MACHINES, WHICH AFTER OUR INSPECTION, ARE DETERMINED TO HAVE BEEN
DAMAGED DUE TO NEGLECT, ABUSE, OVERLOADING, ACCIDENT OR IMPROPER
USAGE. ALL SHIPPING AND HANDLING CHARGES WILL BE PAID BY CUSTOMER.

BUG-O SYSTEMS MAKES NO WARRANTY OF MERCHANTABILITY AND MAKES
NO OTHER WARRANTY, EXPRESSED OR IMPLIED, BEYOND THE WARRANTY
EXPRESSLY SET FORTH ABOVE. BUYER’S REMEDY FOR BREACH OF
WARRANTY, HEREUNDER, SHALL BE LIMITED TO REPAIR OR REPLACEMENT
OF NON-CONFORMING PARTS AND MACHINES. UNDER NO CIRCUMSTANCES
SHALL CONSEQUENTIAL DAMAGES BE RECOVERABLE.

HOW TO OBTAIN SERVICE:
IF YOU THINK THIS MACHINE IS NOT OPERATING PROPERLY, RE-READ THE
INSTRUCTION MANUAL CAREFULLY, THEN CALL YOUR AUTHORIZED BUG-
O DEALER/DISTRIBUTOR. IF HE CANNOT GIVE YOU THE NECESSARY
SERVICE, WRITE OR PHONE US TO TELL US EXACTLY WHAT DIFFICULTY
YOU HAVE EXPERIENCED. BE SURE TO MENTION THE MODEL AND SERIAL
NUMBERS.

LIMITED WARRANTY

MODEL _____________________
SERIAL NO. __________________
DATE PURCHASED: ___________

Summary of Contents for UNI-BUG II

Page 1: ...our equipment identification information below for future reference This information can be found on your machine nameplate Model Number Serial Number Date of Purchase Whenever you request replacement parts or information on this equipment always supply the information you have recorded above LIT UBII IPM 0308 UNI BUG II THE UNIVERSAL BUG O INSTRUCTIONS AND PARTS MANUAL ...

Page 2: ... injury may result 3 Verify the customer supplied power connections are made in accordance with all applicable local and national electrical safety codes If none exist use International Electric Code IEC 950 4 Never remove or bypass the equipment power cord ground Verity the equip ment is grounded in accordance with all applicable local and national electrical safety codes If none exist use lntern...

Page 3: ...BUG II 10 EXPLODED VIEW PARTS LIST BUG 1875 UNI BUG CUTTING GROUP 11 EXPLODED VIEW PARTS LIST BUG 1856 UNI BUG WELDING GROUP 12 WIRING DIAGRAM ELECTRICAL COMPONENT CHART 13 EXPLODED VIEW PARTS LIST BUG 1795 COMPACT CORNER FOLLOWER 15 EXPLODED VIEW PARTS LIST UNI 1350 UNI BUG DUAL WELDING 14 UNI BUG II FOR DUAL WELDING RACKMOUNTING UNI 1019 GROUP 16 UNI BUG BULB FLAT WELDER 17 UNI BUG II WITH STITC...

Page 4: ... allows for easy mounting and removal at any point along the workpiece The UNI BUG II can weld or cut both straight line and on an inner radius as small as 6 152 mm It will travel at speeds of 4 75 ipm 102 1905 mm min with a 50 lb 22 7 kg horizontal pulling capacity The UNI BUG II is designed to run on the edge of a bar or stiffener up to 2 50 8 mm thick as shown below Front and rear rollers suppo...

Page 5: ... switch to ON 7 Turn on the weld contactor switch to begin welding FEATURES Support roller Idler screw knob to engage idler wheels Front motor drive wheel to move UNI BUG II Front idler wheel Bracket that holds idler wheels SET UP 20 WARRANTY FOR A PERIOD OF TWELVE 12 MONTHS FROM DELIVERY BUG O SYSTEMS WARRANTS TO THE ORIGINAL PURCHASER DOES NOT INCLUDE AUTHORIZED DISTRIBUTORS THAT A NEW MACHINE I...

Page 6: ...oard Replace the card Failed speed Replace if visually appears damaged potentiometer Verify no loose or broken connec tions to the part Unit runs but erratic Poor input voltage Verify the machine power source is or poor speed control regulation stable and at the correct voltage Measure at the outlet Faulty control Unplug the machine from power card Verify there are no bad connections to the contro...

Page 7: ...ght off and circuit Examine internally and rewire at breaker is tripped fault Burned out part Unplug the machine from power Examine internally and replace any part that looks burned up Other Can only be determined by factory or qualified repair person Does not run Indicator Bad connection Unplug the machine from power light on Examine internally and fix any broken connections Tighten terminal scre...

Page 8: ... Fit Hd Soc Scr 1 4 20 x 3 4 43 4 FAS 1305 Hex Nut 4 40 44 3 FAS 1320 Hex Nut 8 32 45 1 FAS 1445 Si Pan Hd Th Rolling 10 32 x 1 2 46 4 FAS 2824 Fit Hd Sit Scr 8 32 x 1 3 4 47 1 MUG 1192 Rotary Switch w Knob 4P 3 Pos 48 1 UNI 1016 Cover 49 1 UNI 1017 Left Side Panel 50 1 UNI 1018 Right Side Panel 51 1 UNI 1021 Base Plate 52 2 UNI 1022 Slave Shaft 53 2 UNI 1023 Bearing 5 8 OD x 1 2 ID x 1 4 Thk 54 2...

Page 9: ... 60 61 58 59 39 14 19 13 19 10 11 64 16 UNI BUGBULBFLATWELDER Dimensions of machine without torch mounts Torch mounts shown on earlier pages The UNI 1305 Bulb Flat Welder Adaptor Kit can be used with the standard UNI BUG for bulb flat welding Spacer Block For 280 to 430 mm UNI BUG Bulb Flat Welder will weld large bulb angles from 140 430 mm 7 62 194 mm 6 25 159 mm 10 50 267 mm 6 00 152 mm 2 00 51 ...

Page 10: ...ING GROUP 8 2 7 4 1 3 6 9 5 15 EXPLODED VIEW PARTS LIST UNI 1350 UNI BUG DUAL WELDING GROUP Converts a standard UNI 1000 into a dual welder ITEM QTY PART NO DESCRIPTION 1 4 BUG 1853 Machined Rack 7 1 2 2 1 BUG 1881 Cable Anchor w Swivel Clamp 3 1 BUG 1891 Double Racker Mounting Angle includes 2 of item 4 4 4 FAS 0557 Soc Hd Cap Scr 1 4 20 x 3 4 5 2 BUG 2708 Clamp 6 2 BUG 5451 3 5 Rackholder 7 2 BU...

Page 11: ... angle clamp block is attached allowing for an additional rackholder and 7 1 2 rack to be mounted vertically At the end of each vertical rack a swivel clamp assembly and torch clamp are added A cable anchor with swivel clamp is mounted to the front right side of the UNI BUG II to complete the set up UNI BUGIIFORDUALWELDING A UNI BUG II converted for dual welding using a UNI 1350 UNI BUG Dual Weldi...

Page 12: ...BUG 2933 2A PC Power Cord BUG 9445 GOF 3115 BUG 9442 PL Pilot Light BUG 1415 BUG 1428 BUG 1427 T Transformer BUG 9675 GOF 3112 BUG 1466 VT Volt Trap BUG 1393 BUG 1563 BUG 1393 120 VAC PART NO 42 VAC PART NO 240 VAC PART NO UNI 1000 UNI 1002 UNI 1004 13 The UNI BUG II can be used for making fillet welds with the addition of a BUG 1795 Compact Corner Follower shown at right ITEM QTY PART NO DESCRIPT...

Page 13: ...BUG 2933 2A PC Power Cord BUG 9445 GOF 3115 BUG 9442 PL Pilot Light BUG 1415 BUG 1428 BUG 1427 T Transformer BUG 9675 GOF 3112 BUG 1466 VT Volt Trap BUG 1393 BUG 1563 BUG 1393 120 VAC PART NO 42 VAC PART NO 240 VAC PART NO UNI 1000 UNI 1002 UNI 1004 13 The UNI BUG II can be used for making fillet welds with the addition of a BUG 1795 Compact Corner Follower shown at right ITEM QTY PART NO DESCRIPT...

Page 14: ... angle clamp block is attached allowing for an additional rackholder and 7 1 2 rack to be mounted vertically At the end of each vertical rack a swivel clamp assembly and torch clamp are added A cable anchor with swivel clamp is mounted to the front right side of the UNI BUG II to complete the set up UNI BUGIIFORDUALWELDING A UNI BUG II converted for dual welding using a UNI 1350 UNI BUG Dual Weldi...

Page 15: ...ING GROUP 8 2 7 4 1 3 6 9 5 15 EXPLODED VIEW PARTS LIST UNI 1350 UNI BUG DUAL WELDING GROUP Converts a standard UNI 1000 into a dual welder ITEM QTY PART NO DESCRIPTION 1 4 BUG 1853 Machined Rack 7 1 2 2 1 BUG 1881 Cable Anchor w Swivel Clamp 3 1 BUG 1891 Double Racker Mounting Angle includes 2 of item 4 4 4 FAS 0557 Soc Hd Cap Scr 1 4 20 x 3 4 5 2 BUG 2708 Clamp 6 2 BUG 5451 3 5 Rackholder 7 2 BU...

Page 16: ... 60 61 58 59 39 14 19 13 19 10 11 64 16 UNI BUGBULBFLATWELDER Dimensions of machine without torch mounts Torch mounts shown on earlier pages The UNI 1305 Bulb Flat Welder Adaptor Kit can be used with the standard UNI BUG for bulb flat welding Spacer Block For 280 to 430 mm UNI BUG Bulb Flat Welder will weld large bulb angles from 140 430 mm 7 62 194 mm 6 25 159 mm 10 50 267 mm 6 00 152 mm 2 00 51 ...

Page 17: ... Fit Hd Soc Scr 1 4 20 x 3 4 43 4 FAS 1305 Hex Nut 4 40 44 3 FAS 1320 Hex Nut 8 32 45 1 FAS 1445 Si Pan Hd Th Rolling 10 32 x 1 2 46 4 FAS 2824 Fit Hd Sit Scr 8 32 x 1 3 4 47 1 MUG 1192 Rotary Switch w Knob 4P 3 Pos 48 1 UNI 1016 Cover 49 1 UNI 1017 Left Side Panel 50 1 UNI 1018 Right Side Panel 51 1 UNI 1021 Base Plate 52 2 UNI 1022 Slave Shaft 53 2 UNI 1023 Bearing 5 8 OD x 1 2 ID x 1 4 Thk 54 2...

Page 18: ...ght off and circuit Examine internally and rewire at breaker is tripped fault Burned out part Unplug the machine from power Examine internally and replace any part that looks burned up Other Can only be determined by factory or qualified repair person Does not run Indicator Bad connection Unplug the machine from power light on Examine internally and fix any broken connections Tighten terminal scre...

Page 19: ...oard Replace the card Failed speed Replace if visually appears damaged potentiometer Verify no loose or broken connec tions to the part Unit runs but erratic Poor input voltage Verify the machine power source is or poor speed control regulation stable and at the correct voltage Measure at the outlet Faulty control Unplug the machine from power card Verify there are no bad connections to the contro...

Page 20: ... switch to ON 7 Turn on the weld contactor switch to begin welding FEATURES Support roller Idler screw knob to engage idler wheels Front motor drive wheel to move UNI BUG II Front idler wheel Bracket that holds idler wheels SET UP 20 WARRANTY FOR A PERIOD OF TWELVE 12 MONTHS FROM DELIVERY BUG O SYSTEMS WARRANTS TO THE ORIGINAL PURCHASER DOES NOT INCLUDE AUTHORIZED DISTRIBUTORS THAT A NEW MACHINE I...

Page 21: ... allows for easy mounting and removal at any point along the workpiece The UNI BUG II can weld or cut both straight line and on an inner radius as small as 6 152 mm It will travel at speeds of 4 75 ipm 102 1905 mm min with a 50 lb 22 7 kg horizontal pulling capacity The UNI BUG II is designed to run on the edge of a bar or stiffener up to 2 50 8 mm thick as shown below Front and rear rollers suppo...

Reviews: