11
3.4
Operating information
Please observe the following tips and information so that you are able to
continuously achieve perfect adhesive application.
• Surfaces to be glued should be at room temperature and free of dust, gre-
ase and moisture. Remainders of wax, separating oils, plasticizers or imp-
regnation media on the workpieces can lead to loosening of the adhesion
immediately or later.
• Apply the hot-melt adhesive using points or lines. Larger adhesive points
remain adhesive longer than small ones. Immediately after applying the
adhesive, press the workpieces firmly together for a few seconds.
• Apply the adhesive slowly and continuously so that the processing tempe-
rature is not fallen below.
3.5
Changing the adhesive
If you want to change the adhesive type, push the remains of the old adhe-
sive out with the new adhesive candle.
You should never pull the old adhesive candle out of the device.
This can cause damage to the transport mechanism.
3.6
Breaks/end of work
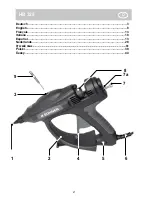
Turn the device off at the power switch (5) if you do not require any adhesive
for longer than 20 or 25 minutes.
The adhesive can remain in the device and be remelted later on.
3.7
Changing the nozzle
Burn hazard!
When carrying out the working steps described below, you must wear
heat-protective gloves!
There is a wide range of special nozzles available for special tasks. To re-
place the nozzle, please carry out the following steps.
1. Heat the device up.
2. Separate the device from the mains by removing the mains plug.
3. Unscrew the nozzle (1).
It is imperative that you do not pull the trigger, to prevent uncontrolled
ejection of adhesive.
4. Screw the replacement nozzle on hand-tight.
The device can be put into operation again immediately.
Operation
GB
Summary of Contents for HB 325
Page 34: ...34 1 3 1 2 3 4 5 6 7 7a 8 9 RUS...
Page 35: ...35 2 2 1 1 200 C 2 2 1 2 4 8 RUS...
Page 36: ...36 3 2 1 2 3 3 1 1 2 5 5 3 3 4 4 8 3 2 3 9 180 190 C 2 3 3 1 7a 2 7 3 7a 230 140 180 RUS...
Page 37: ...37 3 4 3 5 3 6 20 25 5 3 7 1 2 3 1 4 RUS...


