Servicing / Maintenance
27
6.2.1
Cleaning the nozzle
• Wipe the nozzle with a cloth to remove slight external dirt.
• To remove blockages insert a drill bit, needle or wire of suitable diameter into the
nozzle orifice.
In stubborn cases replace the nozzle (see Section 6.3).
6.3
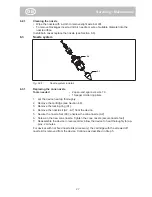
Nozzle system
A1
A2
Fig. 6.3/1:
Nozzle system in detail
6.3.1
Replacing the cone nozzle
Tools needed
• 2 open-end spanners size 19
• 1 Seeger circlip ring pliers
1. Let the device heat up thoroughly.
2. Remove the cartridge (see Section 4.6).
3. Remove the locking ring (A1).
4. Remove the nozzle kit (A2…A7) from the device.
5. Secure the nozzle foot (A3); unscrew the cone nozzle (A2).
6. Screw on the new cone nozzle. Tighten the cone nozzle (secure nozzle foot)
7. Reassemble the device in reverse order; allow the device to heat thoroughly for ap-
prox. 2 minutes.
For devices with not fixed nozzle kits (accessory), the cartridge with the screwed off
nozzle kit is removed from the device. Continue as described in Step 5.
GB


