www.bullard.com
PA30IS Series Powered Air-Purifying Respirator
PA3IS Blower Assembly User Manual
7
RT Hood U
se/Loose-Fitting F
acepiece U
se
RT Series Hood Use
Installing Breathing Tube Assembly in RT Series
Respirator Hoods
For hoods without a threaded port at the
rear, Breathing Tubes PA1BT, PA1BTXS
and PA1BTXL will attach to the hood with a
clamp as follows:
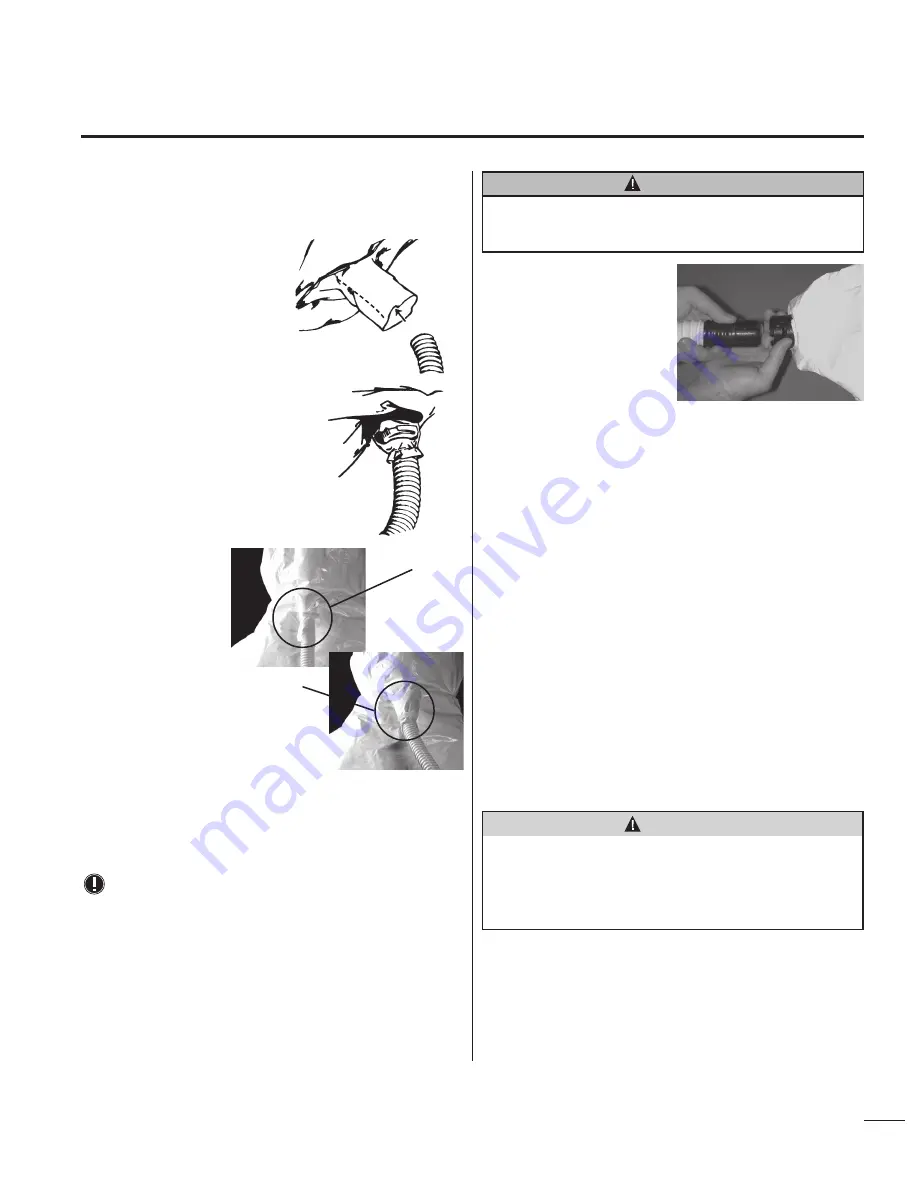
1. Remove nylon clamp from the breathing
tube (see Figure 12).
2. Insert the open end of the breathing
tube approximately five inches into
hood’s air entry sleeve (see Figure 19).
Do not insert breathing tube into hood air
entry sleeve more than 6 inches as it may
cause a flow restriction.
3. Install nylon clamp over air entry sleeve and
breathing tube. If desired, 2 or more clamps
may be used(see Figure 20). The air entry
sleeve seams should be on the sides of the
breathing tube when properly installed and
worn.
4. Engage clamp locks and
squeeze together until tight.
Air entry sleeve should not
be twisted or restricted
(see Figure 21). If so, then
remove the clamp and
repeat steps 2-4.
5. With PAPR blower unit
running, put on RT Series
respirator hood. Pull the
hood over your head until
the neck cuff is securely
around your neck.
6. Ensure that the neck cuff
is down below the chin and
that the air outlets of the cuff are not restricted. If the neck cuff (see Figure
17) is not below the chin, then pull down before continuing (See Figure 18).
For hoods with a threaded port at the rear (designated with a “T” suffix),
Breathing Tubes PAHBT, PAHBTXS, PAHBTXL will attach to the hood by the
threading into the port at the rear (See Figure 13A).
NOTE
The RT3 and RT4 hoods have an adjustable velcro strap near the top of
the lens that allows the user to customize the curvature of the lens to
his/her personal preference. This strap may be removed if desired.
7. Make sure that the breathing tube is not twisted after donning.
8. T uck inner bib of hood into shirt or protective clothing (see Figure 16).
9. Pull respirator outer bib over collar of shirt or protective clothing. Pull the long
outer bib down on the outside of clothing and secure with tie down straps or
tape (if employer operating procedures will allow.)
WARNING
The user should ensure that the neck cuff is unrestricted all around the neck
to allow proper inflation and reduce restrictions.
Battery run time will be reduced by a restricted or improperly donned hood.
Loose-Fitting
Facepiece Use
Installing Breathing
Tube Assembly
in Loose-Fitting
Facepieces
1. The 20LFM, 20LFL, 20LFXL, 20LF2S,
20LF2M and 20LF2L loose-fitting
facepieces have a sewn-in breathing tube connector on the back. The
PA20LFBT breathing tube has a special connector on the hood end with
bayonet type pins.
2. Insert the bayonet connector of the PA20LFBT breathing tube in the hood
connector and turn clockwise until it locks in place (see Figure 22).
Available in extra large 20LFXL, large 20LF2L or 20LFL, medium 20LF2M or
20LFM, and small 20LF2S. Select the size that fits most comfortably and matches
your head size. Remove the protective cover from the visor. Pull the hood over
your head and adjust the headband around your head and the elasticized edge
of the faceseal under your chin. Make sure that the breathing tube is not twisted
after donning.
Final Donning:
• Attach the other end of breathing tube to blower unit (if not already
attached) by screwing adapters together.
• Remove any protective film covering the lens of the headpiece.
• Put on the belt and blower assembly and make any final adjustments to the
belt as necessary, keeping the breathing tube and hood behind the head.
• Turn the blower on by depressing and holding the on/off switch for
approximately 1 second.
• Buckle the belt onto the waist (blower unit should be in the lower back of the
wearer).
• Don the headpiece.
• Place the hood on the head making any final adjustments to the fit as
required at this time to ensure a comfortable and stable fit.
• Tuck inner bib into coveralls or shirt if using a hood with inner bib.
Figure 19
Figure 20
Twisted – incorrect
Correct
Figure 21
Figure 22
Do not enter a hazardous area until you are sure that the blower and hood are
fully operational and the blower is running. The user should periodically leave the
hazardous area to check the airflow through the system. If the low battery or low flow
alarm should sound, or if the user experiences any difficulty in breathing, or senses
any taste or any odors from the hazard, the user should leave the hazardous area
immediately. Failure to observe these warnings could result in death or serious injury.
WARNING


