background image

www.BulletTools.com  |  800 - 406 - 8998  |  3390 W Hayden Ave, Hayden ID 83835  

EZ SHEAR

 SST 20

10

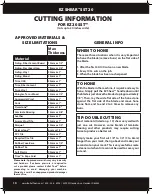
CUTTING INFORMATION

APPROVED MATERIALS & 

SIZE LIMITATIONS

GENERAL INFO

FOR EZ 20 SST™

(Cuts up to 20 inches wide)

Max 
Thickness

Material

Siding, Fiber Cement Board

12mm or 1/2"

Siding, Pressboard Lap

18mm or 3/4"

Siding, Vinyl 

25mm or 1"

Siding, Wood

25mm or 1"

Trim, OSB

25mm or 1"

Trim, Fiber Cement

25mm or 1"

Trim, Vinyl

25mm or 1"

Shingles, Tar or Wood

12mm or 1/2"

Commercial Vinyl

24mm or 1"

Cork

24mm or 1"

Durastone™

6mm or 1/4"

Laminate Flooring

15mm or 5/8"

Leather

25mm or 1"

Luxury Vinyl Tile

25mm or 1"

Parquet

12mm or 1/2"

Permastone™

6mm or 1/4"

PVC Tile

25mm or 1"

Recycled Tire Tile

25mm or 1"

Rubber Cove Base

12mm or 1/2"

Rubber Tile

25mm or 1"

Soft Plastic

25mm or 1"

Tirex™ & Rope Cord

25mm or 1"

Please note:

 Approved materials may vary in density 

and hardness. If extreme pressure is required to 
cut a product please contact Bullet Tools™ before 
proceeding to avoid damaging your machine. 
Warranty is void if an unapproved product damages 
the machine.

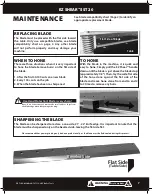
WHEN TO HONE

There are three situations when it is very important 
to hone the blade (remove burrs) on the flat side of 
the blade.

1. After the first 30-100 cuts on a new blade
2. Every 100+ cuts on the job
3. When the blade has been re-sharpened 

TO HONE

With the blade in the machine, it is quick and easy to 
hone; Simply pull the EZ Shear™ handle down until 
the blade is just above the blade stop (approximately 
1/8"). Then, lay the wide flat side of the hone stone 
against the flat side of the blade and move hone 
stone from end to end 2 to 3 times to remove any 
burrs. 

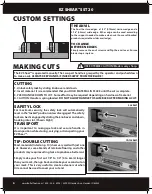
TIP: DOUBLE CUTTING

Most materials (listed on p. 10) shear very well with 
just one cut. However, some brands of laminate 
flooring and other products may require cutting 
twice to produce a better cut.

Simply make your first cut 1/8" to 1/4" (3 to 6mm) 
longer than your mark, then go back and make your 
second cut on your mark. This is very useful to create 
a cleaner cut when trim cannot be used to cover your 
cut end. 

Summary of Contents for EZ Shear SST 20

Page 1: ...Click Here To View Item at www GapPower com...

Page 2: ...1 2011 Bullet Tools DUST FREE CUTTING FOR SIDING SIDING TRIM MORE POUR LES PLANCHERS LE BARDAGE ET PLUS ENCORE PARA COLOCACION DE PISOS CUBIERTAS DE PARED Y MAS INSTRUCTION MANUAL READ BEFORE USE MANU...

Page 3: ...ce chips dings scratches caused by normal use and wear This limited warranty does not cover any damage due to accident misuse abuse or negli gence Further it is valid only if the product is used with...

Page 4: ...ight tool Do not force the EZ SST or use it for a job for which it was not designed use only on approved materials see list on p 10 9 Keep blade sharp A dull blade will not perform properly 10 Always...

Page 5: ...HP Screws Item E 4 10 x 1 PH Phillips Self Tapping Screws Item F 4 M8 x 20 SHCS Item G 1 M6 Allen Wrench SET UP ASSEMBLY WELCOME YOUR EZ SHEAR COMES READY TO ASSEMBLE 1 ATTACH RAILS Attach rails reinf...

Page 6: ...t insert screws from handle assembly and tighten with hex wrench Note To ensure correct alignment start each of the four 4 bolts by hand before using item G hex wrench 5 PLACE THE FENCE Your EZ Shear...

Page 7: ...our mark then go back and make your second cut on your mark This is very useful to create a cleaner cut when trim cannot be used to cover your cut end USE EXTREME CAUTION Blade is very sharp SAFETY LO...

Page 8: ...edge It is important to note that the blade must be sharpened only on the beveled side leaving the flat side flat We recommend that power grinding only be done professionally as the blade must be flu...

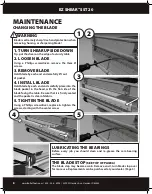
Page 9: ...re use Replacements can be purchased at your dealer Page 3 1 TURN SHEAR UPSIDE DOWN Tip put the shear on the edge of a sturdy table 2 LOOSEN BLADE Using a Phillips screwdriver remove the Item D screws...

Page 10: ...Z SHEAR STAND 709 Provides a sturdy raised platform for use or display Mounting bracket not included ANGLE GUIDE KIT 856AG 20 Provides a fixed stop point for more accurate repeat multiple cuts Include...

Page 11: ...contact Bullet Tools before proceeding to avoid damaging your machine Warranty is void if an unapproved product damages the machine WHEN TO HONE There are three situations when it is very important to...

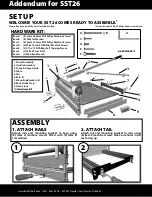
Page 12: ...em E 4 10 x 1 FH Phillips Self Tapping Screws Item F 2 M8 x 50mm SHCS Item G 1 M6 Allen Wrench Set up Addendum for SST26 Welcome Your SST 26 Comes ready to assemble You will need 2 3 Phillips head scr...

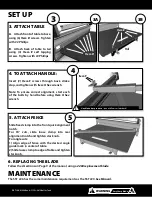
Page 13: ...5 attach Fence Slide fixed clamp into the front quick alignment notch For 90 cuts slide loose clamp into rear alignment notch and tighten star knob For angle cuts 1 Align edge of fence with the desire...

Reviews: