background image

8

Maintenance

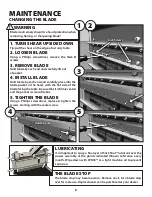
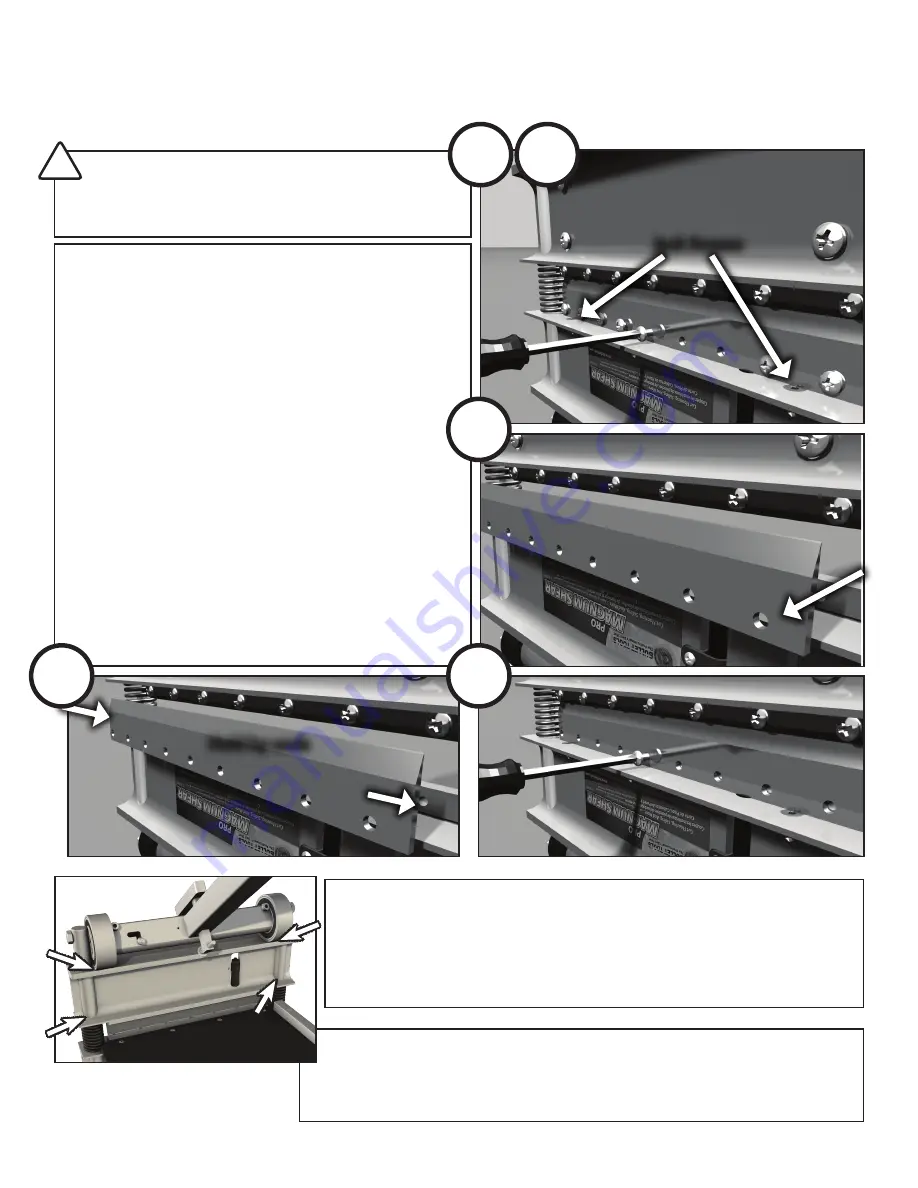
changing the blaDe

    Warning

Blade is extremely sharp! Use hand protection when 
removing, honing, or sharpening blade!

lubricating

It is important to spray a fine layer of Slick Shot™ lubricant over the 
power assembly at the points indicated (Shown Left) once every 
month. Wipe down with WD40™ or a light machine oil to prevent 
corrosion.

the blaDe stop

The blade stop may become worn. Remove anvil, turn blade stop 
over for more use. Replacements can be purchased at your dealer.

1. turn shear upsiDe DoWn

Tip: put the shear on the edge of a sturdy table.

2. loosen blaDe

Using a Phillips screwdriver, remove the 

Item D


screws.

3. reMoVe blaDe

Hold blade by each end and carefully lift out 
of pocket.

4. install blaDe

Hold blade by each end and carefully place into the 
blade pocket in the head, with the flat side of the 
blade facing the table. Be sure that it is firmly seated 
and the pocket is clear of debris.

5. tighten the blaDe

Using a Phillips screwdriver, replace & tighten the 
screws, starting with the center screw.

!

1 2

3

4

5

Hold by ends

Jack Screws

Summary of Contents for Magnum 620

Page 1: ...Applies to Model Numbers 620 626 Read Before Use USER GUIDE Read Before Use PRT INS 0600Rev D 8 19 2019 Bullet Tools www BulletTools com 208 772 0175 620 626 ...

Page 2: ... the right tool Do not force the Magnum Siding Shear or use it for a job for which it was not designed use only on approved materials 9 Keep blade sharp A dull blade will not perform properly 10 Always keep hands away from blade while operating or carrying 11 Do not alter or misuse this tool The Magnum Siding Shear is precision built modifications not specified in this manual may result in a dange...

Page 3: ...tem G 1 10mm Hex Wrench Not Shown Set up Assembly 1 Attach Rails Attach rails to base using ItemA machine screws fitted with star washers Item B Do not tighten screws until after step 3 Please Review and Verify Parts Included in Box Hardware kit A E F D C B 2 3 4 8 5 6 9 A B 1 7 2 Attach Tail Attach tail and angle bracket s to rails using Item C machine screws Make sure holes in tail are facing up...

Page 4: ...eplastictieandorangetaguntilhandleisboltedinplace Handle under extreme pressure do not allow to slam back 4 b c d e f j g h a Fence mounts on top of pivot PIVOT FENCE Y YES PIVOT DOES NOT INSERT INTO FENCE THIS IS WRONG Z NO Installing the AngleMaster fence system 1 Swing corner pivots out to align parallel with head beam Fasten both fencesa on top of corresponding corner pivots b See picture Y be...

Page 5: ...DO NOT ALLOW HANDLE TO SLAM BACK AFTER MAKING A CUT TIP Double Cutting Mostmaterials listedonp 10 shearverywellwithjustonecut However somebrandsoffibercement siding and other products may require cutting twice to produce a better cut Simply make your first cut 1 8 to 1 4 3 to 6mm longer than your mark then go back and make your second cut on your mark This is very useful to create a cleaner cut wh...

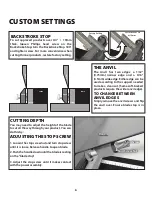
Page 6: ...VIL EDGES Simply remove the anvil screws and flip the anvil over Ensure blade stop is in place Cutting Depth You may need to adjust the height of the blade to cut all the way through your product You can do this by Adjusting the Stop Screw 1 Loosen the stop screw nut and turn stop screw until it is loose Release handle to open blade 2 Pushthehandledownuntilthebladeisresting on the blade stop 3 Adj...

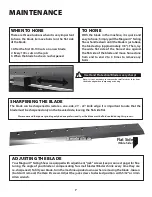
Page 7: ...ws see pic on next page for fine tuning the angle of your blade or compensating for small blades Blades shrink every time they are re sharpened To tilt your blade turn the machine upside down as when removing the blade loosen but don t remove the Item D screws Adjust the jack screws to desired position with 5 32 or 4mm Allen wrench To Hone With the blade in the machine it is quick and easy to hone...

Page 8: ... for more use Replacements can be purchased at your dealer 1 Turn Shear upside down Tip put the shear on the edge of a sturdy table 2 Loosen Blade Using a Phillips screwdriver remove the Item D screws 3 Remove Blade Hold blade by each end and carefully lift out of pocket 4 Install Blade Hold blade by each end and carefully place into the blade pocket in the head with the flat side of the blade fac...

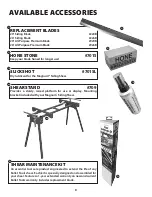
Page 9: ...the Magnum Siding Shear 1 1 2 2 3 3 Shear Stand 709 Provides a sturdy raised platform for use or display Mounting bracket included with your Magnum Siding Shear 4 4 Shear Maintenance kit An essential tool care product engineered to extend the life of any Bullet Tools shear Each kit is specially designed and assembled for your shear Features a 1 year extended warranty on new and current Bullet Tool...

Page 10: ...documentation Bullet Tools deems acceptable for the product Bullet Tools at its option shall repair or replace the defective unit covered by this warranty Bullet Tools disclaims all warranties express or implied including all warranties of merchantability and or fitness for a particular purpose Additional rights may be available under the laws of your state or province Any and all warranties writt...

Reviews: