background image

            3.2 parts and their functions


 (1)control panel    (2)The cartridge group       (3)HP ink box      
 (4)pinch roller     (5)Paper roll grinding wheel (6) Paper roll 
 (7) Began to collect paper sensor                  (8)  Stop paper sensor  
 (9) Feed roller     (10) protective cover        (11) power switch     
 (12) The side panel  (13) The beam                 (14) Pressure paper rod   
 (15) The base 


Summary of Contents for A200-2

Page 1: ...Ink jet plotter Operating manual...

Page 2: ...uch as love Lancaster OPTITEX Bo Rick etc as for ink jet plotter output drawing commands drawing management center will all tasks related to information accurate dynamic real time displayed advocating...

Page 3: ...the machine environment 2 2 other considerations Chapter III Brief introduction 3 1 the basic introduction 3 2 parts and their functions Chapter fourth Installation 4 1 the installation of the machine...

Page 4: ...radation plotter plotter or even destroy the power board Power plug should be plugged into the power strip with a ground wire such as the machine is not grounded because static electricity discharge c...

Page 5: ...nto the plotter otherwise it will cause the components from the damage of circuit board short circuit of the machine Don t try to lubricating the moving parts of the machine Unless the machine instruc...

Page 6: ...ondensation inside the machine dust entering the plotter and cause short circuit or poor contact and seriously affect the plotter to avoid performance in strong electromagnetic interference or put som...

Page 7: ...the basic performance indicators Model A200 2 A220 2 A240 2 A240 4 Maximum width on paper 172cm 190cm 220cm 210cm The biggest drawing width 165cm 185cm 200cm 190cm The average speed of drawing 80 SQ M...

Page 8: ...cartridge group 3 HP ink box 4 pinch roller 5 Paper roll grinding wheel 6 Paper roll 7 Began to collect paper sensor 8 Stop paper sensor 9 Feed roller 10 protective cover 11 power switch 12 The side...

Page 9: ...installation This machine consists of the following items host support group including the left and right sides around the base beam the power cord USB cable HP cartridges paper feeding roller the pre...

Page 10: ...re the way for drawing 4 3 Paper was After installation of the machine our paper work can be carried out in paper cones fixed drum paper note that the direction of the paper the pressure lever on the...

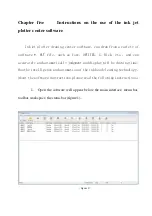
Page 11: ...as love OPTITEX G Rick etc and can accurately and automatically judgment and display will be drawing time Has the intelligence and automation of the ink head cleaning technology About the software ins...

Page 12: ...gure 2 figure 2 3 File to import click the file to import files or toolbar figure 3 choose to print Pit file click ok figure 4 Figure 5 will see in print control directory will print file for detailed...

Page 13: ...figure 3 figure 4...

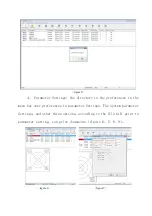
Page 14: ...tory in the preferences in the menu bar user preferences in parameter Settings The system parameter Settings and other three options according to the file will print to parameter setting can print doc...

Page 15: ...ng click to choose the file to print click start printing and sure plotter will draw this file and in the process of drawing the workspace and the status bar will clearly reflect the process of drawin...

Page 16: ...figure 11...
Reviews: