10
When the proper type of milk is displayed, fill the measuring mug with milk
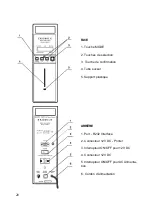
sample to be measured. Place the measuring mug on the plastic support (5)
with the tube (sucker) into the milk sample.
Pull up very carefully the plunger. This way the milk is driven into the measur-
ing camera.
Warning: Pull up the plunger smoothly to prevent formation of air bubbles
in the measuring camera. In case of formation of air bubbles in the
measuring camera the message EMPTY CAMERA will appear on the
display. In this case make the measurement again.
Press
OK
to start the measurement.
The message
WORKING
appears on the display while measurement is go-
ing on.
As soon as the measurement is completed the display shows the results
for following milk parameters:
FAT, SOLIDS NON FAT (SNF), MILK DENSITY
- on the upper row
ADDED WATER TO MILK, FREEZING VALUE*, PROTEIN -
on the bottom row
*FREEZING VALUE = FREEZING POINT [°C]
*
(-100)
Pull down the plunger to pump out the milk from the measuring camera into
the mug and throw the used milk sample away.
CLEANING OUT
This section has for an object to give directions for daily and periodical
cleaning of milk analyzers Ekomilk with a view to protect their measuring
systems from contamination and ensure troublefree work for a long time.
1. DAILY PROCEDURE
It is necessary to clean the analyzer within the working day in the following
cases:
- The interval between two consecutive measurements is more than
half an hour;
- End of working day.
1.1. Cleaning out when the interval between two consecutive measure-
ments is more than half an hour.
Steps:
1.1.1. Fill the measuring mug with clean, warm (but not hot) and clean water
(40°- 60°C).
1.1.2. Press the
MODE
button once. Press the search buttons
to select
CLEANING
option. Confirm with OK. The display shows message
CYCLES
01 - number of cleaning cycles to be done. One cleaning cycle pumps the
water in and out of the sensor five times. Press the search buttons
to set
the desired number of cleaning cycles. This number can range from 1 to 99.
We recommend one or two cleaning cycles to be chosen. When the desired
number is displayed, press
OK
to start the cleaning. When the
CLEANING
stage is over
CLEANING END
is shown on the display.


