

Page 7
to be removed from the total brew time period; then immediately press and hold down the START or BREW
switch until three clicks are heard. Release the switch. (Failure to release the switch within two seconds after
the third click causes the volume setting to be aborted and previous volume setting will remain in memory).
Allow the brew cycle to finish in order to verify that the desired volume has been achieved.
2. Setting batch sizes. To set a batch volume, first check that the SET/LOCK switch is in the “SET” position on
the circuit board. Press and hold the START or BREW switch until three distinct clicks are heard, and then
release the switch. (Failure to release the switch within two seconds after the third click causes the volume
setting to be aborted and previous volume setting will remain in memory). View the level of the liquid being
dispensed. When the desired level is reached, turn the ON/OFF switch to “OFF” (lower). The brewer remembers
this volume and will continue to brew batches of this size until the volume setting procedure is repeated.
NOTE: When brewing coffee, batch volumes will decrease due to absorption by the coffee grounds.
3. Setting programming disable feature. If it becomes necessary to prevent anyone from changing brew times
once programmed, you can set the SET/LOCK switch to the “LOCK” position. This will prevent any program-
ming to be done until switch is once again placed in the “SET” position.
NOTE: If the clicks can not be heard, lightly grip the incoming water line to feel when the valve cycles on
and off.
OPERATING CONTROLS
BREW SELECTOR SWITCH (Triple - set timer models only)
Placing the switch in the
1
⁄
2
Gal, 1 Gal, or 1
1
⁄
2
Gal position selects the amount of coffee to be brewed in sub-
sequent brew cycles. Repositioning this switch after a brew cycle has been initiated does not change the brew
batch in progress.
ON/OFF SWITCH
Placing the switch in the unlighted lower position cuts power to the brew station warmer and stops brewing.
Stopping a brew cycle after it has been started will not stop the flow of water from the funnel. Placing the switch
in the lighted upper position supplies power to the brew station warmer and enables the brew circuit.
START SWITCH
Momentarily pressing and releasing this switch starts a brew cycle when the On/Off switch is in the lighted
upper position.
GRINDER SELECTOR SWITCH
Pressing the right or left side of the switch selects the corresponding brew station.
NOTE – The On/Off switch must be in the lighted upper position to initiate and complete a brew cycle.
COFFEE BREWING
1. Select the desired batch size.
2. Insert a BUNN filter into the funnel.
3. Pour the proper amount of fresh ground coffee into filter and level the bed of grounds by gently shaking.
4. Slide the funnel into the funnel rails.
5. Place an empty server under the funnel.
6 Place the On/Off switch in the lighted upper position. Momentarily press and release the start switch.
7. When brewing is completed, simply discard the grounds and filter.
CLEANING
1. The use of a damp cloth rinsed in any mild, non-abrasive, liquid detergent is recommended for cleaning all
surfaces on Bunn-O-Matic equipment.
2. Check and clean the sprayhead. The sprayhead holes must always remain open.
NOTE – In hard water areas, this may need to be done daily. It will help prevent liming problems in the brewer
and takes less than a minute.
27040 011110
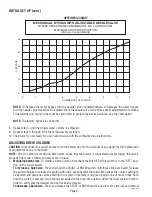
INITIAL SET-UP (cont.)


