background image

25

SERVICE (cont.)

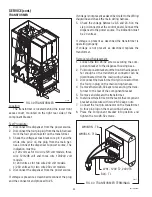
FROTHER AND WHIPPER MOTOR

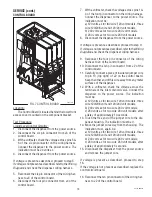
FIG. 15 FROTHER AND WHIPPER MOTOR

P1641.40

Location:


The frothers are located behind the dispenser door, 

mounted on the whipper motor shaft inside the whipper 

chamber.


The whipper motors are located on the back side 

of the whipper motor mounting panel.

Test Procedure:

1.  Check that the rinse/run switch is in the rinse (up) 

position.

2.  Disconnect the dispenser from the power source.

3.  Disconnect the white/violet and white wires on the 

right motor, orange and white wires on the center 

motor or the red and white wires on the left motor 

from the black leads on the motors.

4.  Press  and  hold  the  appropriate  dispense  switch 

and, with a voltmeter, check the voltage across the 

disconnected harness. Connect the dispenser to the 

power source. The reading must be:


a) 120 volts ac for two wire 120 volt models, three 

wire 120/208 volt and 120/240 volt models.


b) 240 volts ac for two wire 240 volt models.


c) 230 volts ac for two wire 230 volt models.

5.  Disconnect the dispenser from the power source.

If voltage is present as described, replace the motor.

If voltage is not present as described, refer to the 

Wiring 

Diagrams

 and check the dispenser wiring harness

                     9       8     7  6    5   4   3

10

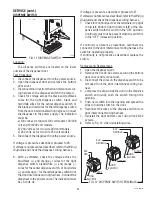
FIG. 16 MIXING/WHIPPER CHAMBER 

COMPONENTS

P1630.35

1.   Steam Collector
2.   Mixing Chamber 

3.   Dispense Tip

4.   Whipper Chamber

5.   O-Ring

6.  Frother

7.   Nut

8.  Receptacle w/Seal

9.   Slinger

10.  Motor Assy.

11.  Fan

12.  Vacuum Hose

13.  Baffle

11  12  13

1    2

29170 090407

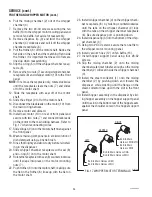
Removal,  Cleaning  and  Replacement  (Refer  to  Fig. 

16):

1.  Open the dispenser door and raise the top front 

cover.

2.  Lift the front edge of each hopper assembly over 

the tab on the hopper support panel and slide each 

hopper assembly out the front of the dispenser. Set 

aside for reassembly.

3.  Remove the four #8-32 screws securing the hopper 

support panel to auger motor mounting panel and 

the whipper motor mounting panel. Set aside for 

reassembly.

4.  Disconnect  vacuum  hose  (12)  from  fan  baffle 

(13).

5.  Remove the steam collector (1) by pulling it forward 

and at the same  time twisting it clockwise.

Summary of Contents for FMD-3

Page 1: ...S N FMD0013000 UP 29170 0000F 09 07 1998 Bunn O Matic Corporation To obtain the Illustrated Parts Catalog visit the Bunn O Matic website at www bunn com This is absolutely FREE and the quickest way to obtain the catalog Contact Bunn O Matic Corporation at 1 800 286 6070 to obtain a paper copy of the required Illustrated Parts Catalog mailed via U S Postal Service ...

Page 2: ... by such individuals whether oral or written do not constitute warranties and should not be relied upon If BUNN determines in its sole discretion that the equipment does not conform to the warranty BUNN at its exclusive option while the equipment is under warranty shall either 1 provide at no charge replacement parts and or labor during the applicable parts and labor warranty periods specified abo...

Page 3: ...FORE BUYING OR USING THIS PRODUCT THIS APPLIANCE IS HEATED WHENEVER CONNECTED TO A POWER SOURCE 00831 0000F 3 98 1998 BUNN O MATIC CORPORATION This equipment must be installed to comply with the Basic Plumbing Code of the Building Officials and Code Administrators International Inc BOCA and the Food Service Sanitation Manual of the Food and Drug Administration FDA For models installed outside the ...

Page 4: ...n will damage electronic components 1 An electrician must provide electrical service as specified 2 Using a voltmeter check the voltage and color coding of each conductor at the electrical source 3 Open the front door of the dispenser and place the heater switch in the OFF upper position 4 Connect the dispenser to the power source 5 If plumbing is to be hooked up later be sure the dispenser is dis...

Page 5: ...nnected to a cold water system with operating pressure between 20 and 90 psi 138 and 620 kPa from a 1 2 or larger supply line A shut off valve should be installed in the line before the dispenser Install a regulator in the line when pressure is greater than 90 psi 620 kPa to reduce it to 50 psi 345kPa The water inlet fitting is 1 4 flare NOTE Bunn O Matic recommends 1 4 copper tubing for installat...

Page 6: ...ll flash about once every 5 seconds Once the cause of the refill error has been investigated see the troubleshooting guide and cured the system can be reset by disconnecting for at least 5 seconds and then reconnecting the power to the machine RINSE TIMER The dispenser is shipped from the factory with the rinse timer disabled To enable the rinse timer remove power from the dispenser remove the low...

Page 7: ...inse run switch in the center program position 2 Hold the increase decrease switch in the desired increase or decrease position 3 While holding the increase decrease switch press and release the dispense switch for the chamber you wish to adjust Each time the dispense switch is pressed the rinse L E D will flash and the motor speed for that hopper will be increased decreased by approximately 2 1 2...

Page 8: ...t the Bunn O Matic Technical Service Department Inspection testing and repair of electrical equipment should be performed only by qualified service person nel All electronic components have 120 volt ac 230 volt ac or 240 volt ac and low voltage dc potential on their terminals Shorting of terminals or the application of external voltages may result in board failure Intermittent operation of electro...

Page 9: ... black wires on three wire 120 240 volt dispenser A3 Check for 240 volts across the white and black wires on two wire 240 volt dispenser A4 Check for 230 volts across the black and white wires on two wire 230 volt dispensers B Check circuit breakers or fuses Refer to Service Dispense Switch for testing procedure See page 23 RefertoService DispenseSolenoid Valve for testing procedures See page 34 o...

Page 10: ... depending on local water condi tions Excessivemineralbuild upon stainless steel surfaces can initiate corrosive reactions resulting in seri ous leaks 2 Control Thermostat REMEDY A Direction of flow arrow must be pointing towards dispenser B Remove the strainer and check for obstructions Clear or replace Inspect the tank assembly for ex cessive lime deposits Delime as required Refer to Operations ...

Page 11: ...tch 1 Dispense Switch 2 Dispense Solenoid Valve Hot or Cold REMEDY Inspect the tank assembly for ex cessive lime deposits Delime as required Removethedispensesolenoidvalve and clear any obstructions Rebuild orreplacethevalveifnecessary See page 34 or 35 Refer to Service Control Board and Probe for testing procedures See page 19 Refer to Service Solenoid Valve Inlet for testing procedures See page ...

Page 12: ...ature settings decal in USER NOTICES on page 3 B Reading for electronic thermo stat should be185 F 85 C to190 F 88 C Adjust the control thermostat to increase or decrease the water tem perature Replace if necessary RefertoService WhipperMotorfor testing procedure See page 26 Refer to Service Frother Compo nents See page 25 RefertoService DispenseSolenoid Valve for test procedures See page 34 or 35...

Page 13: ...d 90 psi 620 kPa Install a regulator if necessary to lower the working pressure to ap proximately 50 psi 345 kPa Remove and clean lime off the tank heater See page 37 Refer to Service Fan for testing procedures See page 25 Refer to Service Control Board for testing procedures See page 19 Refer to Service Lamp see page 27 for lamp replacement Refer to Service Lamp Holder for testing procedures See ...

Page 14: ... Lamp 29 Lamp Starter and Socket 30 Limit Thermostat 31 Overflow Protection Switch 32 Rinse Run Switch 33 Solenoid Cold Drink Optional 34 Solenoid Dispense 35 Solenoid Inlet 36 Tank Heater 37 Tank Heater Switch 39 Transformer 40 Whipper Motor 26 Wiring Diagrams 41 42 FIG 1 AUGER DRIVE COMPONENTS AUGER DRIVE COMPONENTS P1637 40 29170 080900 Location The auger components are located inside the botto...

Page 15: ...y is not present as described replace the auger motor Removal Cleaning and Replacement Hopper Auger Early models 1 Open the dispenser door and raise the top front cover 2 Lift the front edge of hopper assy 20 over the tab on hopper support plate 19 and slide hopper assembly out the front of the dispenser 3 Remove hopper lid 1 and empty product 4 Pull off the ejector elbow 13 5 Remove auger disk as...

Page 16: ...ispenser 3 Remove hopper lid 1 and empty product 4 Pull off the ejector elbow 10 5 Remove agitator disk assy 2 by pushing out on the side of the hopper rotating the agitator disk assy out of the mounting hubs and lifting the agitator disk assy from the hopper Remove the mixing blades 4 from the agitator disk by tugging sharply 6 Remove auger 9 by pulling it out the front of the hopper 8 7 Remove t...

Page 17: ...16 13 7 Remove the four 8 32 screws securing the auger motor to the auger motor mounting bracket 8 Remove auger motor and discard 9 Using four 8 32 screw install new auger motor 16 13 on mounting bracket 15 12 10 Install dust seal 17 14 on auger motor shaft 11 Using four 8 32 locking screws install auger mo tor dust seal and mounting bracket to the rear of the auger motor mounting panel 14 11 12 R...

Page 18: ... 3 Check for continuity between the two black leads on the ballast If continuity is present as described the ballast is operating properly If continuity is not present as described replace the ballast Removal and Replacement 1 Disconnect the wires from the ballast 2 Remove the two 8 32 screws securing the ballast to the component bracket 3 Remove and discard ballast 4 Install new ballast using two...

Page 19: ...ltageisnotpresentasdescribed refertotheWiring Diagrams and check the dispenser wiring harness 9 Reconnect the four pin connector of the wiring harness to J4 of the control board 10 Disconnect the ten pin connector from J2 of the control board 11 Carefully connect a piece of insulated jumper wire to pin 10 top right of J2 on the control board Keep the other end of thiswire awayfrom any metal surfac...

Page 20: ...ect the dispenser from the power source 2 Disconnect the six pin connector from J3 of the control board 3 With a voltmeter check the voltage across pins 5 6 of the six pin connector on the wiring harness Connect the dispenser to the power source The indication must be 24 volts ac 4 Disconnect the dispenser from the power source If voltage is present as described proceed to step 5 Ifvoltageisnotpre...

Page 21: ...rature probe from the tank 4 Withavoltmeter checkthevoltageacrosstheblack wirefromthecontrolthermostatandthewhite wire on the tank heater with the tank heater switch in the ON lower position Connect the dispenser to the power source The indication must be120 volts ac for two wire 120 volt models Ifvoltageispresentasdescribedthecontrolthermostat is operating properly Reinstall temperature probe int...

Page 22: ... Thermostat BLK from Tank Heater Switch SERVICE cont CONTROL THERMOSTAT cont MECHANICAL THERMOSTAT TAN to WHI BRN in Main Wiring Harness BLK to Main Wiring Harness WHI to Main Wiring Harness BLK to Main Wiring Harness ELECTRONIC THERMOSTAT 29170 091598 ...

Page 23: ...lack white and orange wires for the center dispense switch or blue white and orange for the left dispense switch from the door interconnect wiring harness Connect the dispenserto thepower source Theindicationmust be 5 volts dc If voltage is present as described proceed to 7 Ifvoltageisnotpresentasdescribed refertotheWiring Diagrams and check the dispenser wiring harness 7 Check for continuity acro...

Page 24: ... for two wire 230 volt models If voltage is present as described replace the fan If voltage is not present as described refer to Wiring Diagrams and check the dispenser wiring harness SERVICE cont 29170 090407 Removal and Replacement 1 Disconnect the vacuum hose from the fan 2 Remove the two 8 32 locking screws securing the fan to the dispenser housing base plate 3 Disconnect the wires from the fa...

Page 25: ...240 volt models c 230 volts ac for two wire 230 volt models 5 Disconnect the dispenser from the power source If voltage is present as described replace the motor If voltage is not present as described refer to the Wiring Diagrams and check the dispenser wiring harness 9 8 7 6 5 4 3 10 FIG 16 MIXING WHIPPER CHAMBER COMPONENTS P1630 35 1 Steam Collector 2 Mixing Chamber 3 Dispense Tip 4 Whipper Cham...

Page 26: ...roughly and allow to dry before reinstall ing in the dispenser 20 Slide whipper chamber receptacle with seal 8 and o ring 5 on to the motor shaft 21 Rotatethereceptaclewithseal 8 counterclockwise until it snaps into place on the motor mounting nuts 7 22 Pushfrother 6 ontothemotorshaft makingsure the flat in the frother 6 lines up with the flat on the motor shaft 23 Install whipper chamber 4 on the...

Page 27: ... 5 Ifvoltageisnotpresentasdescribed refertotheWiring Diagrams and check the main wiring harness 5 Disconnect the wires from the switch terminals 6 With the switch in the Cold upper position check for continuity between the center terminal and the bottom terminal With the switch in the Hot lower position check for continuity between the center terminal and the upper terminal If continuity is presen...

Page 28: ...witch is in the center position If continuity is present as described the switch is operating properly If continuity is not present as described replace the switch RED BLK from Control Board J2 6 GRN from Control Board J2 9 BRN BLK from Control Board J2 1 FIG 21 INCREASE DECREASE SWITCH TERMINALS P1208 Removal and Replacement 1 Open the dispenser door 2 Removethefacenutsecuringtheincrease decrease...

Page 29: ... harness as an assem bly 6 Disconnect the wires from the lamp holder to be replaced from the door wiring harness 7 Rotate lamp 3 90 and remove from lamp holders 2 8 Remove the 6 32 screw securing the lamp holder 2 to be removed remove lamp holder 2 and discard 9 Install new lamp holder 2 and secure with a 6 32 screw 10 Connect the wires on the new lamp holder to the door wiring harness 11 Install ...

Page 30: ...s operating properly Note If continuity tests are both as described and lamp does not light replace the starter socket Removal and Replacement Refer to Fig 22 1 Open dispenser door assy 1 2 Remove the five 6 32 screws securing the door lower panel 5 to the door assy 1 3 Disconnect the leads on the starter socket from the door wiring harness 4 Remove lower door panel 5 and starter w socket 6 as ass...

Page 31: ...3 Check for continuity across the limit thermostat terminals SERVICE cont Ifcontinuityispresentasdescribed thelimitthermostat is operating properly If continuity is not present as described replace the limit thermostat Removal and Replacement 1 Remove all wires from the limit thermostat termi nals 2 Carefully slide the limit thermostat out from under the retaining clip and remove the limit thermo ...

Page 32: ...t is again lowered If continuity is present as described reconnect the red wires to the black wire and the blue wire from the main harness If continuity is not present as described replace the overflow protection switch 29170 080900 Removal and Replacement 1 Disconnecttheredleadsfromtheoverflowprotec tion switch from the black wire and the blue wire from the main harness 2 Remove the nut beneath t...

Page 33: ...t when the switch is in the center posi tion If continuity is present as described the switch is operating properly If continuity is not present as described replace the switch FIG 28 RINSE RUN SWITCH TERMINALS P1644 GRY to Control Board J2 2 GRN to Control Board J2 9 YEL to Control Board J2 3 WHI BRN to Door Harness BLK from Main Harness WHI BRN to Door Harness Removal and Replacement 1 Open the ...

Page 34: ...press the left dispense switch and listen carefully in the vicinity of the solenoid valve for a clicking sound as the coil magnet attracts 7 Disconnect the dispenser from the power source If the sound is heard as described and water will not pass through the solenoid valve there may be a block age in the water line before the solenoid valve or the solenoid valve may require inspection for wear and...

Page 35: ...sent as described reconnect the white and white violet orange or tan wires to the solenoid If continuity is not present as described replace the solenoid valve 6 Check the solenoid valve for coil action Connect the dispenser to the power source With RUN RINSE switch in the RINSE upper position press the appropriate dispense switch and listen carefully in the vicinity of the solenoid valve for a cl...

Page 36: ...ve for coil action Connect the dispenser to the power source Listen carefully in the vicinity of the solenoid valve for a clicking sound as the coil magnet attracts 7 Disconnect the dispenser from the power source If the sound is heard as described and water will not pass through the solenoid valve there may be a block age in the water line before the solenoid valve or the solenoid valve may requi...

Page 37: ...mainsunabletoheat remove and inspect heater for cracks in the sheath Removal and Replacement 1 Shut off water supply to the dispenser 2 Disconnect the water supply tube on the tank lid 3 Disconnect the black wires on the limit thermo stat 4 Disconnect the black wire and the white or red wire from the tank heater terminals 5 Disconnect the pink wire from the liquid level probe 6 Disconnect the gree...

Page 38: ...38 SERVICE cont TANK HEATER cont FIG 36 TANK HEATER TERMINALS P1218 WHI or RED to Main Wiring Harness BLK to Limit Thermostat 29170 080900 ...

Page 39: ...ter and the upper terminal With the switch in the OFF upper position no continuity should be present between center and upper terminals Ifcontinuityispresentasdescribed theheater ON OFF switch is operating properly If continuity is not present as described replace the switch Removal and Replacement 1 Refer to the hopper section in this manual and remove the hopper assemblies and the hopper support...

Page 40: ...acket and secure with two 6 32 keps nuts 7 Connect the four pin connector on the transformer to four pin plug on the main wiring harness 8 Place the component bracket into position and tighten the two 8 32 screws WHI BLK T12 WHI GRN T8 WHI 120V T2 240V T6 BLK TI FIG 40 TRANSFORMER TERMINALS P1647 29170 090407 TRANSFORMER FIG 39 TRANSFORMER P1646 Location The transformer is located behind the lower...

Page 41: ...41 29170 091598 ...

Page 42: ...42 29170 080900 ...

Reviews: