15
3. To decrease the pump speed, press and hold the left-hand “Hidden Switch” (half-filled circle) and then mo-
mentarily press the “Product Dispense Switch (“+/STOP Switch” for portion control dispensers). Each time
the “Product Dispense” (“+/STOP”) Switch is pressed, the motor speed is decreased by one step (5 RPM.)
Note that each step is confirmed by a single flash of the appropriate “REFILL” indicator and a single tone
from the beeper.
4. Repeat as necessary at the remaining dispense stations.
5. Exit the “Pump Speed Programming” mode by simultaneously pressing both “Hidden Switches”. Note that
the beeper sounds twice and that the “PROGRAM” indicator extinguishes.
NOTE: Dispense at least 12 oz. of finished product before dispensing a sample to check brix. This will allow the
pump time to adjust to the new speed.
Chilled Water Flow Testing and Adjustment
1. Enter the “Pump Speed Programming” mode by simultaneously pressing both “Hidden Switches”. Note that
the beeper sounds twice and that the “PROGRAM” indicator begins flashing.
2. Place a graduated measuring cup or the large chamber of the empty brixing cup (BUNN-O-MATIC part number
33095.0000) under the appropriate dispense nozzle.
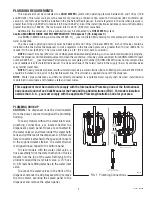
3. Press and hold the “Chilled Water Switch” Fig 4 or Fig 5, for 5 seconds. Note that the beeper sounds once
per second (6 times, total) during this period.
4. At the end of the 5 second period, the chilled water will dispense
for 3 seconds.
5. Measure the water dispensed. (Approx. 4.5 fl. oz. [133 ml])
6. If adjustment is required, remove all concentrate bottles from
dispenser and disconnect any optional ambient concentrate
hoses. Remove product shelf from dispenser.
7. Adjust the Chilled Water Flow Valve Fig 8, clockwise to decrease
flow rate; counterclockwise to increase flow rate.
8. Repeat steps 3 through 6 as necessary until the desired water
flow rate is achieved.
9. Exit the “Pump Speed Programming” mode by simultaneously
pressing both “Hidden Switches”. Note that the beeper sounds
twice and that the “PROGRAM” indicator extinguishes.
Cup Size Programming (Portion Control Dispensers Only)
1. Enter the “Cup Size Programming” mode by simultaneously pressing the “LARGE” and “SMALL” cup size
switches at any dispense station. Note that the beeper sounds twice and that the “PROGRAM” indicator lights
steadily.
2. Press and hold the desired cup size switch at the appropriate dispense position until the correct cup volume
is achieved. Top up as necessary by momentarily pressing the same cup size switch. Note that if DIP switch
#2 on the control board is set to the “on” position, concentrate must be present in order to dispense or
program cup sizes.
3. Repeat as necessary for the remaining cup sizes and dispense stations.
4. Exit the “Cup Size Programming” mode by pressing any of the “+/STOP Switches”. Note that the beeper
sounds twice and that the “PROGRAM” indicator extinguishes.
Dispenser Lockout
Dispense and Rinse functions of the dispenser can be electronically locked-out to prevent unauthorized use of
the dispenser, while keeping the refrigeration system running. Two different lock-out modes are available as
follows:
Mode #1 locks out all dispense functions.
Mode #2 locks out all dispense functions except the chilled water dispense.
ADJUSTMENT & OPTIONAL SETTINGS (cont)
FIG 8 Chilled Water Flow Valve
P3487
38218.1 030306


