13
SERVICE (cont.)
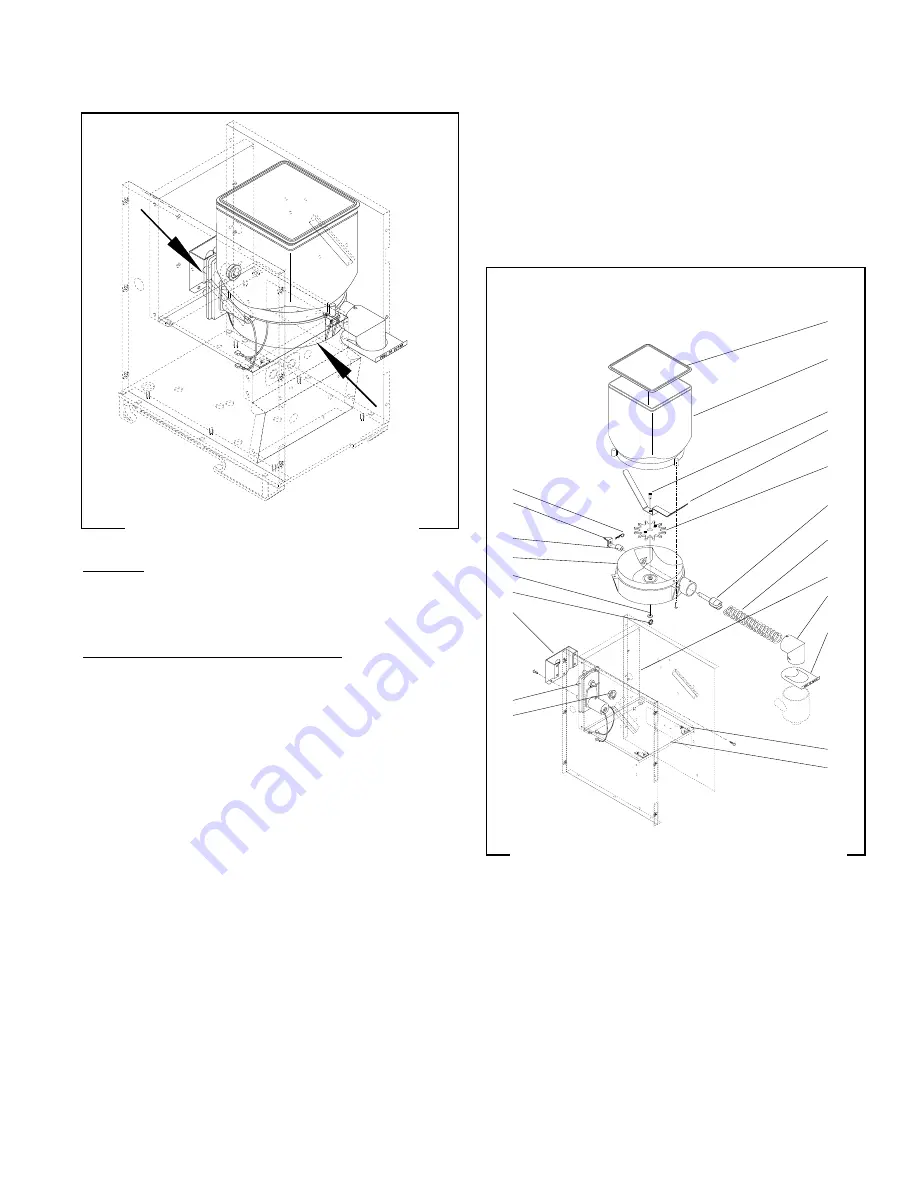
FIG. 2 AUGER DRIVE COMPONENTS
Location
The auger drive components are located in the bot-
tom of the hopper assembly.
Removal, Cleaning and Replacement
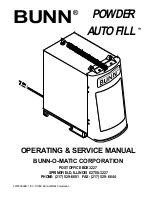
1. Open the dispenser door.
2. Lift the hopper assembly over the retainer plates
(16) on hopper support plate (12) and slide hopper
assembly out the front of the dispenser.
3. Remove hopper lid (1) and empty product.
4. Pull off the ejector elbow (15) and remove the slide
gate (21).
5. Remove retainer ring (11) and washer (10) from
the bottom of the hopper base (9).
6. Remove wiper shaft (3), wiper blade (4) and wiper
drive gear (5) from the hopper base (9).
7. Remove auger wire (14) by pulling it out the front
of the hopper base (9).
8. Remove auger drive shaft (13) by removing the
retaining clip (6) from auger drive shaft.
9. Slide spacer (8) and auger drive shaft bracket (7)
off of the auger drive shaft (13).
10. Remove auger drive shaft (13) from hopper base
(9).
11. Wash components in a mild solution of dish deter-
gent using a bristle brush when needed.
AUGER DRIVE COMPONENTS
P1922
12. Rinse and dry each item thoroughly.
13. Check for damaged or broken components, re-
place any if necessary and reassemble hopper
assembly.
14. Install hopper assembly in the dispenser by sliding
hopper assy on the hopper support plate (12) until
the hopper base (9) seats firmly behind the re-
tainer plates (16) on the hopper support plate (12).
FIG. 3 AUGER DRIVE & HOPPER ASSEMBLY
1. Hopper Lid
2. Hopper
3. Wiper Shaft
4. Wiper Blade
5. Wiper Drive Gear
6. Retainer Clip
7. Auger Drive Bracket
8. Spacer
9. Hopper Base
10. Washer
11. Retainer Ring
12. Hopper Support Plate
13. Auger Drive Shaft
14. Auger Wire
15. Ejector Elbow
16. Hopper Retainer Plates
17. Auger Motor Bracket
18. Auger Motor
19. Dust Seal
20. Auger Motor Mounting
panel
21. Slide gate
P1894
6
7
8
9
10
11
17
18
19
1
2
3
4
5
13
14
20
15
21
16
12
29793 061599


