background image

Page 2

INTRODUCTION

The brewer incorporates a wireless interface system that allows the DBC Grinder to load certain information 

into the "programming chip" located inside the handle of the funnel.  This information includes what flavor of coffee 

is being ground and what batch size will be brewed (small, medium, or large). Once the correct flavor name and 

amount of coffee is ground, the funnel is loaded into the brewer. The information from the funnel handle is then 

transferred into the brewer. The brewer then takes this information and dispenses the amount of water preset 

in the brewer for that particular flavor of coffee and batch size. The brewer can also be programmed to adjust 

different functions of the brewing process, such as brew temperature, brew volumes, bypass percentages, pulse 

brew, etc. This allows the operator to program a certain "recipe" for each coffee flavor to be brewed.

Revised 11/01/07

BUNN-O-MATIC COMMERCIAL PRODUCT WARRANTY

Bunn-O-Matic Corp. (“BUNN”) warrants equipment manufactured by it as follows:

1) All equipment other than as specified below: 2 years parts and 1 year labor.

2) Electronic circuit and/or control boards: parts and labor for 3 years.

3) Compressors on refrigeration equipment: 5 years parts and 1 year labor.

4) Grinding burrs on coffee grinding equipment to grind coffee to meet original factory screen sieve analysis: parts and 

labor for 3 years or 30,000 pounds of coffee, whichever comes first.

These warranty periods run from the date of installation BUNN warrants that the equipment manufactured by it will be 

commercially free of defects in material and workmanship existing at the time of manufacture and appearing within the 

applicable warranty period. This warranty does not apply to any equipment, component or part that was not manufactured 

by BUNN or that, in BUNN’s judgment, has been affected by misuse, neglect, alteration, improper installation or operation, 

improper maintenance or repair, damage or casualty. This warranty is conditioned on the Buyer 1) giving BUNN prompt 

notice of any claim to be made under this warranty by telephone at (217) 529-6601 or by writing to Post Office Box 3227, 

Springfield, Illinois 62708-3227; 2) if requested by BUNN, shipping the defective equipment prepaid to an authorized BUNN 

service location; and 3) receiving prior authorization from BUNN that the defective equipment is under warranty.

THE FOREGOING WARRANTY IS EXCLUSIVE AND IS IN LIEU OF ANY OTHER WARRANTY, WRITTEN OR ORAL, EXPRESS 

OR IMPLIED, INCLUDING, BUT NOT LIMITED TO, ANY IMPLIED WARRANTY OF EITHER MERCHANTABILITY OR FITNESS 

FOR A PARTICULAR PURPOSE. The agents, dealers or employees of BUNN are not authorized to make modifications to 

this warranty or to make additional warranties that are binding on BUNN. Accordingly, statements by such individuals, 

whether oral or written, do not constitute warranties and should not be relied upon.

If BUNN determines in its sole discretion that the equipment does not conform to the warranty, BUNN, at its exclusive 

option while the equipment is under warranty, shall either 1) provide at no charge replacement parts and/or labor (during 

the applicable parts and labor warranty periods specified above) to repair the defective components, provided that this 

repair is done by a BUNN Authorized Service Representative; or 2) shall replace the equipment or refund the purchase 

price for the equipment.

THE BUYER’S REMEDY AGAINST BUNN FOR THE BREACH OF ANY OBLIGATION ARISING OUT OF THE SALE OF THIS 

EQUIPMENT, WHETHER DERIVED FROM WARRANTY OR OTHERWISE, SHALL BE LIMITED, AT BUNN’S SOLE OPTION 

AS SPECIFIED HEREIN, TO REPAIR, REPLACEMENT OR REFUND.

In no event shall BUNN be liable for any other damage or loss, including, but not limited to, lost profits, lost sales, loss of 

use of equipment, claims of Buyer’s customers, cost of capital, cost of down time, cost of substitute equipment, facilities 

or services, or any other special, incidental or consequential damages.

BrewWISE, BUNN Gourmet Ice, BUNN Pour-O-Matic, BUNN, Bunn-OMatic, Bunn-O-Matic, BUNNlink, BUNNserve, BUNN 

Espress, DBC, Dr. Brew, Dual, EasyClear, EasyGard, Easy Pour, FlavorGard, Gourmet Ice, Gourmet Juice, High Intensity, 

IMIX, Infusion Series, Legendary for Quality, The Mark of Quality in Beverage Equipment Worldwide, My Café, Power-

Logic, Safety-Fresh, Single, Smart Funnel, Smart Hopper, Soft Heat, SplashGard, System III, ThermoFresh, AXIOM, Bever-

age Profit Calculator, Beverage Bar Creator, BrewLOGIC, BrewMETER, BrewWIZARD, BUNNSERVE, BUNNsource, Coffee 

At Its Best, Coffee Spot, Cool Froth, Digital Brewer Control, Earth-1st,  Earth 1st, Earth First, Intellisteam, Nothing Brews 

Like a BUNN, Pouring Profits, Pulse Wave, Quality Beverage Equipment Worldwide, Scale-Pro, Signature Series, Silver 

Series, Smart Heat, SmartWAVE, Tea At Its Best, The Horizontal Red Line, Titan, Ultra, are either trademarks or registered 
trademarks of Bunn-O-Matic Corporation.

Summary of Contents for Single TF BrewWISE DBC

Page 1: ...rated parts catalog please visit the Bunn O Matic website at www bunn com This is absolutely FREE and the quickest way to obtain the latest catalog and manual updates Contact Bunn O Matic Corporation at 1 800 286 6070 to obtain a paper copy of the required Illustrated Parts Catalog mailed via U S Postal Service 35058 0001C 11 07 2005 Bunn O Matic Corporation www bunn com DUAL TF DBC WITH SMART FUN...

Page 2: ... that the defective equipment is under warranty THE FOREGOING WARRANTY IS EXCLUSIVE AND IS IN LIEU OF ANY OTHER WARRANTY WRITTEN OR ORAL EXPRESS OR IMPLIED INCLUDING BUT NOT LIMITED TO ANY IMPLIED WARRANTY OF EITHER MERCHANTABILITY OR FITNESS FOR A PARTICULAR PURPOSE The agents dealers or employees of BUNN are not authorized to make modifications to this warranty or to make additional warranties t...

Page 3: ...ew Recipe no Smart Funnel nor G9 2T DBC Grinder 22 Review Recipes Modify Recipes Set up No Name Coffee 23 Set Brew Volumes 24 Set Bypass Percentages 25 Set Pulse Brew Times 26 Easy Pulse 28 Enter Times 29 Set Preinfusion Times 30 Set Drip Times 31 Assign Recipes 32 Copy Settings 32 Enable Ads 33 Set Temp Brewing Temperature 33 Set Ready Ready Temperature 34 Refill Adjust Sensitivity 34 Spray Oz M ...

Page 4: ...656 0000 00831 0000 00658 0000 20201 5600 USER NOTICES The notices on this brewer should be kept in good condition Replace unreadable or damaged labels 37881 0000 03408 0004 03409 0004 27508 0000 35058 1 042007 ...

Page 5: ... source and verify the voltage at the terminal block before proceeding 6 If plumbing is to be hooked up later be sure the brewer is disconnected from the power source If plumb ing has been hooked up the brewer is ready for Initial Set Up WARNING Electrical connections must be made as specified above Failure to follow these instructions can result in personal injury property or equipment damage 350...

Page 6: ...l block 4 Feed the cord through the strain relief and connect it to the terminal block 5 Connect the brewer to the power source and verify the voltage at the terminal block before proceeding Re place the front panel 6 If plumbing is to be hooked up later be sure the brewer is disconnected from the power source If plumbing has been hooked up the brewer is ready for Initial Set Up WARNING Electrical...

Page 7: ...n bottom of brewer 2 Turn on the water supply 35058 1 111907 This equipment must be installed to comply with the Basic Plumbing Code of the Building Officials and Code Administrators International Inc BOCA and the Food Service Sanitation Manual of the Food and Drug Administration FDA For models installed outside the U S A you must comply with the appli cable Plumbing Sanitation Code for your area ...

Page 8: ...ow of water Pressing this switch during the programming of the brewer will exit the setup and return to the main screen d BREW SWITCH Momentarily pressing and releasing this switch begins a brew cycle e SWITCH Pressing and holding the switch allows entry to the programming menus Pressing and releasing the switch steps through each function screen during programming f FUNCTION SCREEN This is the di...

Page 9: ...ils and select batch size Proceed to step 5 3 If a G9 2T DBC or MHG grinder is used with a compatible Smart Funnel select the desired batch size on the grinder Grind the selected amount of fresh coffee into funnel and level grounds by gently shaking It is not necessary to select a size on the brewer 4 Slide the funnel into the funnel rails The brewer will read the size ground through the chip in t...

Page 10: ...and still impede water flow 3 Insert the long end of sprayhead cleaning tool into the sprayhead fittings and rotate several times to remove any mineral deposits from the fitting 4 Insert the short end of sprayhead cleaning tool into the bypass fittings and rotate several times to remove any mineral deposits from the fitting 5 Remove sprayheads from brewer Disassemble by removing the seal 6 Use the...

Page 11: ...d into the funnel and allows for the brewer to automatically set itself to what is read from the funnel handle LAST ON TIME During a pulse brew this is the time set for the second on time and each alternating on time for the remainder of the brew cycle MAIN SCREEN The term used to describe the screen that is displayed when the brewer is not in use This screen is also displayed after exiting the pr...

Page 12: ...function screens hidden programming switches are used There are five of these switches that will be used for the setup of the brewer 1 2 3 4 5 1 symbol upper right of the BUNN logo This is used to access the programming mode and is also used to scroll forward through the function list 2 Upper left corner of the B in the BUNN logo This is used to scroll backwards through the function list 3 Digital...

Page 13: ...it this function screen and return to the MAIN SCREEN on the display PROGRAMMING THE BREWER The programming of the brewer is divided into two levels There is one function in Level 1 All other functions are accessed in Level 2 The following function screens are in order of appearance Each screen will have instructions on how to access and the procedures to program the various functions of the brewe...

Page 14: ...CENTAGES PULSE BREW TIMES PREINFUSION TIMES and DRIP OUT TIMES METHOD 3 Not using a Smart Funnel and or a G9 2T DBC or MHG Grinder ThisallowstheoperatortoenterONEsetofbrewing parameters for each side in the event a Smart Funnel and or a G9 2T DBC or MHG is not used with the Dual TF Brewer This is referred to as a NO NAME coffee flavor If the brewer does not read the information in the funnel s han...

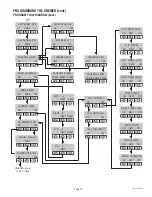
Page 15: ...XT B Continue to C THAT WAS THE LAST RECIPE COPY SETTINGS NO YES LEFT RIGHT NO YES Continue to D Cycles thru right side program constants Cycles thru left side program constants Continue to E FULL 1 2 1 4 LEFT SET ALL 3 BATCHES FULL 1 2 1 4 RIGHT SET ALL 3 BATCHES ARE YOU SURE NO YES 3 BATCHES DONE NO YES SET NEW RECIPE NO YES A INSERT FUNNEL WITH NEW NAME UNITS METRIC DONE ENG Sets unit of measur...

Page 16: ... A PROGRAM FLOW DIAGRAM Cont PROGRAMMING THE BREWER cont DONE 1st ON TIME X XX DONE OFF TIMES X XX DONE LAST ON Prel DONE 3 BATCHES DONE NO YES 1st OFF LAST X XX X XX PreI TRANSFER COMPLETE ENABLE ADS NO DONE YES SET TEMP 200 F DONE SET READY 195 F DONE 0 REFILL 155 DONE L SPRY OZ M XX X DONE R SPRY OZ M XX X DONE Continue to F E D 1st OFF LAST X XX X XX X XX FULL 1 2 1 4 RIGHT SET ALL 3 BATCHES F...

Page 17: ...VE ON NEXT OFF LEFT FUNNEL LOCK ON NEXT OFF RIGHT BREW VALVE ON NEXT OFF RIGHT BYPASS ON NEXT OFF RIGHT FUNNEL LOCK ON NEXT OFF REFILL VALVE ON NEXT OFF HEATER CONTACTOR ON NEXT OFF SPRAY HEAD CAL NO YES BYPASS CAL NO YES CONTAINER RDY QUIT YES CONTAINER RDY QUIT YES CALIBRATE BYPASS PRESS BREW START CALIBRATE SPRAY PRESS BREW START TEST FREQUENCY NO YES LEFT BYPASS ON NEXT OFF TANK HEATERS ON NEX...

Page 18: ...ormationstoredelsewhere so that the machine can be reprogrammed Procedure for modifying units of measure 1 Press and hold upper right hidden switch until the display reads UNITS Release switch Press and release METRIC or ENG to make a selection P3260 2 Press DONE to proceed The display should now read CHANGING UNITS WILL ERASE ALL PREVIOUSLY STORED RECIPES AND ALL SETUP INFO WILL BE LOST ARE YOU S...

Page 19: ...he name of the coffee from the grinder did not load properly into the funnel or if a grind has not yet been done the display will read MUST GRIND INTO FUNNEL FIRST It will be necessary to grind another batch following steps 1 and 2 7 If the grind is acknowledged by the brewer the displaywillreadBEGINSETUPOF COFFEENAME ThenthescreenwilldisplayBREWOZ andabatch lightwillbeblinking RefertoBREWOZ SETTI...

Page 20: ...tting pulse brew by ENTER TIMES entering known times press NO The display should read ENTERTIMES PressandreleaseYESandproceed with the setup instructions for SETTING PULSE BREW ENTER TIMES SET DRIP TIME Refer to SET DRIP TIME for description 18 The display should now read DRIP TIME along witheitherthewordOFF oratimewillbeshowing A batch light should also be blinking 19 Using and set the amount of ...

Page 21: ...of RECIPE CARDS NOTE Instructionstoprogramthebrewerandgrinder areprintedontheRECIPECARD alongwiththecoffee name that is being programmed Procedure to program the coffee name 1 Remove the funnels if present from the left and right funnel rails 2 Position the RECIPE CARD vertically so that the top end of the CHIP is beneath the left side funnel sensing coil 3 AfterashortpausethedisplaywillreadCARDCO...

Page 22: ... TIMES and DRIP OUT TIMES The brewer will perform in the same capacity as a standard Bunn Dual TF Brewer The instructions for programming the NO NAME settings are on the following pages The same steps are followed for setting the recipe as those that are used to MODIFY A RECIPE beginning on page 21 Note that when the display reads NO NAME LEFT that is when MODIFY should be pressed in order to set ...

Page 23: ...ase SHOW The screen will scroll through all the brew settings for that particular coffee flavor name When finished the display will return to the coffee name just viewed 4 To see settings again press SHOW To advance to the next coffee flavor name press NEXT 5 To exit press NEXT until the display reads THAT WAS THE LAST RECIPE 6 After 5 seconds the display will return to the REVIEW RECIPES screen P...

Page 24: ...epeat step 5 for that size for each batch size to be modi fied Continue setting all batch sizes 7 When finished setting all batch sizes press and release DONE The display should read 3 BATCH SIZES DONE 8 If the three batch sizes are not correct press and release NO to return to the BREW OUNCES setup screen and repeat steps 5 6 and 7 9 Ifthethreebatchsizesarecorrect pressYES This will advance to th...

Page 25: ...e modified 7 Using and set the amount of bypass water percentage to be dispensed around the grounds for that particular batch size 8 Whenfinished pressanotherbatchsizeandrepeat step 7 for each batch to be modified 9 When finished setting all batch sizes press DONE The display should read 3 BATCHES DONE 10 If they are not correct press and release NO to return to the BYPASS setup screen 11 Ifthe3ba...

Page 26: ...f to 4 minutes Off time off to 4 minutes Last on time Preinfusion to 4 minutes NOTE IfthebrewerisalreadyintheSETPULSEBREW screen it is not necessary to follow steps 1 through 8 in this section but proceed directly to step 9 1 Press and hold the upper right hidden switch until the display reads UNITS Release the switch then press and release the switch until the display reads REVIEW RECIPES 2 Press...

Page 27: ...NAMES PROGRAMMED IN THE BREWER S MEMORY WHEN THE LAST COFFEE NAME IN THE BREWER S MEMORY IS DISPLAYED PRESSING NEXT WILL EXIT AND THE DISPLAY WILL THEN READ See SET PULSE BREW EASY PULSE SETUP See SET PULSE BREW ENTER TIMES REVIEW RECIPES NO YES SET PULSE BREW NO YES EASY PULSE SETUP NO YES ENTER TIMES NO YES RECIPE NAME MODIFYSHOWNEXT THAT WAS THE LAST RECIPE NO NAME LEFT MODIFYSHOWNEXT P2409 1 3...

Page 28: ...NE DRIP TIME XX X DONE 1st OFF LAST XX X XX X XX X EASY PULSE SETUP NO YES ENTER TIMES NO YES See SET PULSE BREW ENTER TIMES 3 When finished select another batch size to be set by pressing the switch next to the indicator light Repeat step 2 for each batch size to be set 4 When finished setting all batch sizes press done The display should read 3 BATCHES DONE 5 If the three batch sizes are not cor...

Page 29: ...nfinished pressDONE Thedisplaywillshow thethreetimesjustenteredforthatbatchsize After a 5 second delay the display will read 3 BATCHES DONE 10 If other batch sizes need to be modified press NO 12 Press a different batch size and repeat steps 3 through 7 Repeat until all the desired batch sizes are set for the left side 13 When finished press YES in 3 BATCHES DONE The display will then read DRIP TI...

Page 30: ...nt of time the flow of water into the funnel will be off 7 When finished press DONE The display will now read LAST ON PreI 8 If the display shows a time use and to set it to read PreI PreI is an abreviation for preinfu sion 9 Whenfinished pressDONE Thedisplaywillshow thetwosettingsandPreIjustenteredforthatbatch size After a 5 second delay the display will read 3 BATCHES DONE 10 If other batch size...

Page 31: ...hould also be blinking 10 Using the and set the amount of time from when the brew solenoid shuts off to when drip out occurs for that batch size NOTE Set to OFF to prevent funnel locks from engag ing to disable this function for a particular batch size To set to OFF press and release until OFF is displayed REVIEW RECIPES NO YES 3 BATCHES DONE NO YES DRIP TIME X XX DONE NO NAME LEFT MODIFYSHOWNEXT ...

Page 32: ...ress and hold the upper right hidden switch until thedisplayreadsUNITS Releasetheswitch Con tinue to press and release switch until the display reads COPY SETTINGS EXIT TO NEXT FUNCTION SCREEN COPY LEFT SIDE SETTINGS TO RIGHT SIDE COPY RIGHT SIDE SETTINGS TO LEFT SIDE EXIT TO NEXT FUNCTION SCREEN COPY SETTINGS NO YES LEFT RIGHT NO YES LEFT RIGHT NO YES ARE YOU SURE NO YES TRANSFER COMPLETE P2298 A...

Page 33: ...RD This message will be displayed when the brewer is not in use Procedure to Enable Disable Ads 1 Press and hold the upper right hidden switch until thedisplayreadsUNITS Releasetheswitch Con tinue to press and release switch until the display readsENABLEADS TheYESorNOwillbeflashing to indicate the current selection 2 Press and release the NO pad to disable this func tion no ads will be displayed o...

Page 34: ...ure allowable to start a brew cycle The range can be from 185 F 85 C to within 2 F 1 7 C oftheSETTEMP Thewatermustbeatthe SETREADY temperatureorhigherforthedisplaytoindicateREADY TOBREW Ifbrewlockoutisenabled thebrewingpro cess will not start below this READY temperature NOTE The upper limit for SET READY temperature is 2 F 1 7 C less than the water temperature SET TEMP setting SET TEMP cont P2721...

Page 35: ... After about 5 seconds the display will return to the CALIBRATE FLOW screen 8 To exit the CALIBRATE FLOW program press NO to advance to the next function screen or press PROGRAMMING THE BREWER cont Procedure to adjust the flow rate setting 1 Press and hold upper right hidden switch until the display reads UNITS Release switch Continue to press and release switch until the display reads L SPRY OZ M...

Page 36: ...he next function screen BREW COUNTERS 4 Press and release NO to advance to the BYPASS CALIBRATION screen 5 Press and release YES The display should read CONTAINER READY If the container is under the funnel press YES The display should read CALI BRATE BYPASS PRESS BREW TO START 6 Press and release the BREW switch on the side to be calibrated The display should read CALIBRATE BYPASS 60SECTOFINISH Th...

Page 37: ...XT RIGHT XXXX NEXT RESET BREW COUNTERS NO YES Procedures to view reset the brew counters 1 Press and hold the upper right hidden switch until the display reads UNITS Release the switch Con tinue to press and release switch until the display reads BREW COUNTERS 2 Pressing NO in this screen will advance to the next function Press YES to view the first brew counter left This number represents the bre...

Page 38: ...s If this function is activated and a brew cycle is attempted with the funnel not properly situated the display will read FUNNEL NOT IN PLACE until one is in place 5 Select NO to allow brewing without a Smart Fun nel in place This is selected when brewing with a funnel other than a Smart Funnel a regular brew funnel 6 When finished press and release DONE This will retain the changes exit this func...

Page 39: ...f the tank heaters to check for voltage 21 Press ON The correct voltage should be present at the heater terminals 22 Press OFF to end testing of the tank heaters NOTE The tank heater will automatically turn off if left on too long 23 Aftertestingthetankheater pressNEXTtoadvance to the next test 24 The HEATER CONTACTOR is used only on certain models Check the machine schematic to see if the contact...

Page 40: ...N SCREEN NOTE If the operator wishes to test more than one function in the SERVICE TOOLS section outputs switches servers or coil frequency it is not necessary to exit the program Use the flow chart for SERVICE TOOLS to navigate to a particular function FACTORY DEFAULTS Thisfunctionallowstheoperatortoeraseallofthe previously entered recipes and ad messages Factory set default values will replace a...

Page 41: ...n minutes without a supply of water The use of two wrenches is recommended whenever plumbing fittings are tightened or loosened This will help avoid twists and kinks in the tubing Make certain that all plumbing connections are sealed and electrical connections tight and iso lated This brewer is heated at all times Keep away from combustibles WARNING Exercise extreme caution when servicing electric...

Page 42: ...o heat to the proper temperature b Disable the BREW LOCKOUT function Removefunnel checkcontents and insert back into the funnel rails OR Press BREW to start a brew cycle without removing the funnel To resume brewing correctly posi tion the funnel and press BREW again The brew cycle will resume from the point it was interrupted OR Press ON OFF to terminate the cycle TEMPERATURE TOO LOW CHECK FUNNEL...

Page 43: ...ailure 2 Triac Failure 3 Control Board Thermistor failure To resume brewing press BREW again Thebrewcycleresumesform the point it was interrupted OR PressON OFFtoterminatethebrew cycle Service Required Service Required Service Required TO CANCEL PRESS ON OFF TO FINISH PRESS BREW BREW STOPPED IS SWITCH OFF CHECK HEATING CIRCUIT HEATING TIME TOO LONG 35058 1 071205 ...

Page 44: ...erature Sensor Probe wire s shorted to housing or to each other Check water supply shut off Service required Service required Check wire and connection of both blackandwhitewiresoftemperature probe Check to confirm that wire s are not pinched between two surfaces or connected to each other CHECK WATER SUPPLY FILL TIME TOO LONG CHECK FOR BAD CONNECTIONS TEMP SENSOR OUT OF RANGE CHECK WIRE FOR SHORT...

Page 45: ...a plate within 10 Check plumbing and shut off valves Test the ON OFF switch Refer to the switch test procedures on page 33 Test the BREW switch Refer to the switch test procedures on page 33 Test the Brew valve Refer to Test ing Individual Components on page 33 Substitute a control board known to be in good working order Check plumbing and shut off valves A Direction of flow arrow must be pointing...

Page 46: ...a low value when water IS touching the probe For best opera tion the right number should be set toavaluemidwaybetweentheselow and high numbers Before changing the setting confirm that the refill probe is free of scale buildup and the connection to it is secure Test the Refill valve Refer to Testing Individual Components When this condition occurs the brewerwilldisplayOVERFLOWCUP FULL EMPTY CUP The...

Page 47: ...waterisNOTtouchingtherefill probe to a low value when water IS touching the probe For best opera tion the right number should be set toavaluemidwaybetweentheselow and high numbers Before changing the setting confirm that the refill probe is free of scale buildup and the connection to it is secure Substitute a control board known to be in good working order Remove power from the brewer Press reset ...

Page 48: ... the voltage mea sured is very low or zero then substitute a control board known to be in good working order Remove power from the brewer Connect a voltmeter across one of the tank heaters Reapply power to the brewer and refer to Testing Individual Components If the full supply voltage is measured when the tank heater is turned on and zero voltage is measured with the triac off then the triac is g...

Page 49: ...al times to confirm a consistent volume of dispensed water If not consistent check the valve tubing and spray head for lime buildup If bypass is being used on the inconsistent brewing recipe test the Bypass Valve Refer to Testing Individual Components Turn the valve on for 30 seconds and collect the water collected from the bypass opening Repeat the test several timestoconfirmaconsistentvolume ofd...

Page 50: ...d coffee in the funnel The BUNN paper filter should be centered in the funnel and the bed of ground coffee leveled by gentle shaking Empty the server remove its cover and place the server beneath the sprayhead Place empty funnel over the server entrance with ON OFF switch in the ON position press the Brew switch and release it Check the water temperature immediately below the sprayhead with a ther...

Page 51: ...ion Plumbinglinesshouldnotberesting on the counter top A The brewer must be connected to a cold water line B Water pressure to the brewer must not be higher than 90 psi 620 kPa Install a regulator if necessary to lower the working pressure to ap proximately 50 psi 345 kPa Remove and clean lime off tank heaters 6 Incorrect Recipe 1 Solenoid Inlet 2 Plumbing lines 3 Water Supply 4 Tank Heaters Weak ...

Page 52: ...U 14 SHIELD 1 J4 1 J4 5 J4 10 J4 15 J4 19 J11 1 J11 5 CONTROL PC BOARD J11 10 J11 18 J9 1 J9 1 J9 5 J2 1 J2 5 J2 10 WHI PNK BLK GRN TEMP PROBE A1 Left Brew C3 Left Small Batch A2 Left On Off C4 Right Large Batch A3 Right On Off C5 Right Medium Batch A4 Right Brew C6 Right Small Batch B1 Hidden Left D1 Digital Left Hidden Button B2 Hidden Right D2 Brewer Center Hidden Button C1 Left Large Batch D3 ...

Page 53: ...PROBE TEMP PROBE WHI VIO WHI YEL WHI WHI BRN WHI BRN BLK BLU BLK BLU PNK BLK BLK RED BLK GRN GRY ORN CONTROL PC BOARD WHI ORN WHI GRN T AN YEL REFILL SOL SOL SOL SOL SOL SOL SOL R BYPASS L BYPASS R BREW L BREW RED RED N C OVERFLOW PROTECTION SWITCH L FUNNEL LOCK R FUNNEL LOCK J11 1 J11 5 J11 10 J11 18 J9 1 J2 1 J2 5 J2 10 J9 5 J4 1 J4 5 J4 10 J4 15 J4 20 Switch Unit Assembly Codes A1 Left Brew A2 ...

Page 54: ...W IDDEN EFT IDDEN 2IGHT EFT ARGE ATCH EFT EDIUM ATCH EFT ARGE ATCH EFT EDIUM ATCH EFT 3MALL ATCH EFT N FF 2IGHT N FF 2IGHT ARGE ATCH 2IGHT EDIUM ATCH 2IGHT 3MALL ATCH EFT 3MALL ATCH 2IGHT ARGE ATCH 2IGHT EDIUM ATCH 2IGHT 3MALL ATCH IGITAL EFT IDDEN UTTON REWER ENTER IDDEN UTTON ONTROL 2IGHT IDDEN UTTON 9 7 6 7 9 42 0 2 3WITCH 5NIT SSEMBLY ODES gS 6 7 2 7 2 2 29 4 4 9 2 7 2 5 5 3 3 3 3 3 2 2 90 33 ...

Page 55: ...LED L2 Left Medium Batch LED L3 Left Small Batch LED L4 Left On Off LED L5 Right On Off LED L6 Right Large Batch LED L7 Right Medium Batch LED L8 Right Small Batch LED C3 Left Small Batch C4 Right Large Batch C5 Right Medium Batch C6 Right Small Batch D1 Digital Left Hidden Button D2 Brewer Center Hidden Button D3 Control Right Hidden Button YEL WHI VIO WHI YEL J9 5 CONTROL PC BOARD J2 1 J2 5 J2 1...

Page 56: ... VIO WHI YEL J9 5 CONTROL PC BOARD J2 1 J2 5 J2 10 Switch Unit Assembly Codes LED s 20 VIO WHI ORA WHI GRN ORA GRY YEL BLK RED BLK BRN WHI BRN BLK BLU BLU BLK SOL SOL SOL SOL SOL BREWER ON OFF SWITCH REFILL R BYPASS L BYPASS R BREW L BREW J4 19 J4 15 J4 10 J4 5 J4 5 J4 1 J11 1 J11 5 J11 10 J11 18 RED RED SOL SOL N C OVERFLOW PROTECTION SWITCH L FUNNEL LOCK R FUNNEL LOCK RED RED SCHEMATIC WIRING DI...

Reviews: