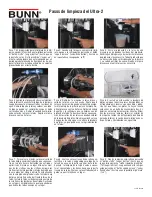
Ultra-2 Cleaning Steps
Step 1: In preparation for cleaning the machine
turn-off the auto-fill function by pressing the
“auger button” until the display reads “auger
on”. The auto-fill will need to be turned-off at a
pre-determined period of time prior to cleaning.
This will depend on your predicted volume thru
the rest of the day.
Step 2: When ready to begin cleaning, turn off
the refrigeration by pressing the “snowflake but-
ton” until display reads off.
Step 3: Empty the product from the hopper. Try
to get as much product out of the hopper as pos-
sible. Add warm water to help remove excess
product if needed. All dispensed product must
be thrown away and not reused. Repeat the pro-
cess for the other hopper as necessary.
Step 4: Begin the hopper tear-down process by
unplugging the lamp lid, followed by disconnect-
ing the concentrate and water lines. Remove the
hopper lid and set aside, this can not be sub-
merged in water and must be hand-washed.
Take-out the auto-fill refill probe, before you
remove the hopper. Repeat the process for the
other hopper.
Step 5: Remove the hopper, auger, hopper seal,
and auger nose seal, if used, from the machine.
With the hopper removed you can now start dis-
assembling the faucet assembly to be cleaned.
Repeat the process for the other hopper. Re-
move the drip tray and grate to be cleaned with
hopper parts. All items except for the rubber
seals can be placed in the dishwasher. It is not
recommended to use rinse agents if using the
dishwasher- as this may cause stress cracking
on the hopper.
Step 6: If you are not using the dishwasher, place
all removed and disassembled parts in the sink
to be washed with warm soapy water. Once all
parts have been washed place in a Kay-5 sanita-
tion bath (120°F) to soak for at least 5 minutes.
While the parts are soaking wipe down the exte-
rior of the machine, cooling drum, hopper drip
tray, and auto-fill refill probe.
Step 7: To re-assemble, attach the clean, hop-
per seal at the base of the cooling drum followed
by putting the auger nose seal, if used, on the
auger shaft. Place the auger over the cooling
drum pushing it as far onto the auger shaft; this
may require rotating the auger. With the machine
prepped for the hopper, reassemble the hopper
dispense faucet and ensure the auger nose bush-
ing is secured in place. Slide the hopper over the
auger and cooling drum pushing it firmly onto
the hopper seal before pressing slightly down-
ward to lock the hopper in place.
Step 8: Re-attach the auto-fill refill probe to the
hopper. Then place the hopper lid back on-top of
the hopper, plugging in the lid lamp. Re-connect
the concentrate and water lines to the back of
the hopper. Re-attach the drip tray and put the
grate in place.
Step 9: Turn the auto-fill option back on by
pressing the auger button until the display reads
“left auger refill on”. Followed by turning on the
refrigeration by pressing the “snowflake button”
until the display reads ice.
43645.0000A 07/10 ©2010 Bunn-O-Matic Corporation
RELEASED FOR PRODUCTION
DIR Num: 43645.0000 19, May 2015


