


TSE HOME 4001
English |
9
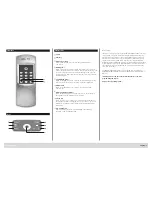
Menu functions
Besides numbers, the keypad also includes letters. In order to program
individual functions, number or letter combinations must be typed.
The initial letters of a program function create a code combination,
intended for easy memorizing. Each submenu explicitly includes this.
1 Starting the programming mode to change the lock settings
– Press “On”, then type in 76, press “Enter”
– Enter the 6-digit pincode
– The green key confirmation LED flashes briefly and the program
mode icon turns on.
The code combination “76” stands for “PM” – Programming Mode.
2 Changing the opening code (factory setting 1 2 3 4 5 6)
– Enter the programming mode, using the current pincode
– Type in your new 6-digit pincode and press “Enter”
– Repeat your new 6-digit pincode and press “Enter” briefly. If the green
“ready for opening”-icon turns on, the code change was successful.
In case the red “entry denied”-icon turns on, the code entry was wrong
and the former settings persist.
3 Unblocking the lock
– Press the “On” key
– Type the 6-digit user code, then press the “Enter” key
– The green „ready for opening“ icon goes on
– The lock can be opened by turning the door knob
4 Recording or overwriting an E-KEY in one
of the memory positions 1 to 5
– Start the programming mode using the current pincode
– Set the E-KEY into the programming mode (hold the button on the E-KEY
until the green LED on the E-KEY flashes three times in succession)
– Type in 32X (X indicates the E-KEY position on the memory cell,
numbers 1 to 5 are allowed), then press “Enter”.
– You need to leave the programming code to activate the permission to
access. Therefore press the button „On“ twice and enter the opening
code via the keypad once, then press „Enter“.
7 Resetting the radio channel
– The radio channel can be reset here (12 channels to select from; factory
setting: channel 1)). This may be required when the radio channel is
already used by another application, e.g. WLAN, which can possibly
lead to interference. In such case, please select another channel with
a spacing of at least 3 radio channels.
– Enter the programming mode using the current opening code
– Type 72X (X indicates the radio channel, numbers 1 to 12, also 01 etc.,
are allowed), then press the “Enter” key.
The combination “72” stands for “RC” – RF channel). When the action has
been performed successfully, the green „ready for opening“ LED goes on,
while the red „entry denied“ one goes on in case of error.
8 Registering the keypad
– Press “On”, type in “82”, then press “Enter”.
– Type in the valid pincode
Attention: When registering a new cylinder,
the factory code (123456) has to be entered.
When the action has been executed successfully, the green
„ready for opening“ LED turns on, while in case of rejection,
the red „entry denied“ one turns on.
In case a wrong key has been entered by mistake, the “On” key
can generally be used to return to the initial lock setting. You can
then restart the locking operation from the beginning.
As long as the programming mode is active, the icon „Prog“ is lit,
other E-KEYS can be programmed without re-entering the code.
The combination “32” stands for “AE” - add E-KEY. When the action has been
performed successfully, the green “ready for opening” LED turns on, while in
case of rejectiion, the red “entry denied” one turns on.
You can note the names of the E-KEY users and the corresponding position
numbers on page 16 of this User and Assembly Manual.
5 Deleting an E-KEY in one of the user positions 1 to 5
– Start the programming mode using the current pincode
The code combination “35” stands for “RE” - remove E-KEY. When the action
has been carried out successfully, the green „ready for opening“ LED turns on,
while in case of rejection the red „entry denied“ one turns on.
6 Synchronising the E-KEY
– In this menu, the radio channel of the E-KEY can be synchronised to
the channel of the keypad. This is necessary when the radio channel
of the cylinder is modified, although E-KEYs with the old channel
setup are still in use.
– Set the E-KEY into the programming mode (hold the button on the E-KEY
until the green LED on the E-KEY flashes three times in succession)
– Type in “37”, then press “Enter”
The combination “37” stands for “ES” – E-KEY sync. When the action has
been carried out successfully, the green „ready for opening“ LED turns on,
while in case of rejection, the red „entry denied“ one turns on.


