background image

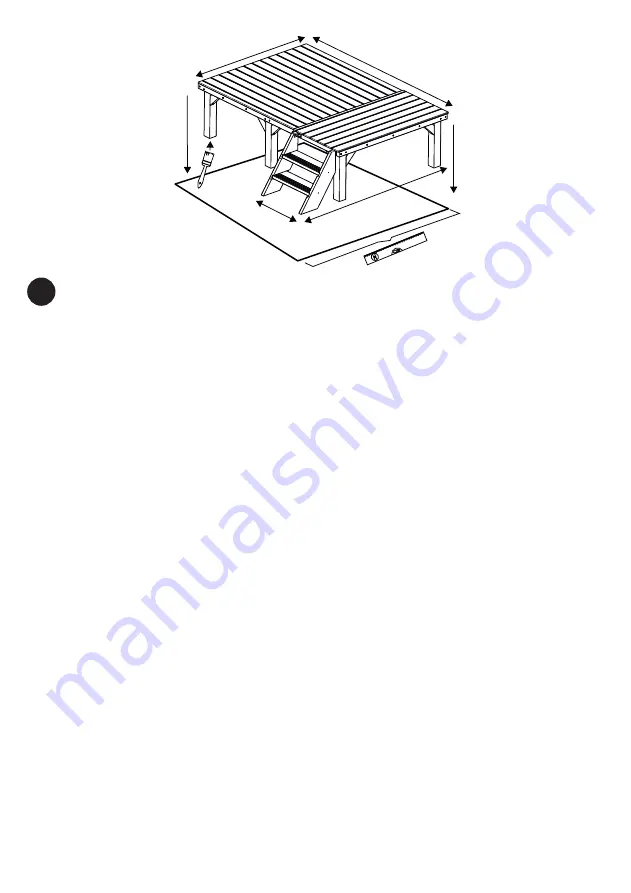
1147 mm

1558 mm

487 mm

1720 mm

réf. 499 • 519_MAJ_22/01/2015_

7/16


 We thank you for having chosen on our products from the BURGER kids range, designed and developed by our engineers and


designers, in accordance with the current standard. We have conceived it to satisfy you completely.

Installation advice

• Read the manual carefully and number each part before beginning to assemble this product.
• Check the whole content of the parcels and the quantity of the available pieces.
• Remember to sort the packaging from your product for recycling (cardboard, plastic stretch wrap, …)
• Before mouting, all the wooden pieces must be treated with a preservation product for wood appropriated to children's' use, 
  particularly the components that will no more be accessible after mounting.
• Think to treat the posts end that will be in contact with your ground.

Caution

• Unsuitable for children under 3 years. 
• Use 3 children max (maximum weight of child 50 kg)
• Use outside
• Reserved for a family use.
• It must absolutely be assembled by an adult
• Little elements. Risk of suffocation.

Mounting and installation instructions

• Before putting up the game, be sure that the surface of the ground is leveded and not flowing. Make sure there is a minimum of 
2 metres of space between the product and any other structure or obstacle such as fence, garage, house, branches of a tree, 
washing lines or electric cables.
• In order to improve the stability of the product, bracktets adapted to the nature of the ground can be fixed on the posts.
• All system of fitting of the product must be placed at the ground level or under the ground in order to avoid all risk of stumbling.
• Do not install the product on concrete, tarmac or any other hard surface.
• When mounting, don't let no screw, no nail go past.
• These mounting instructions must be kept, so that you can refer to it later
• No modification can be done to the original toy.

Maintenance

• Fill in the holes ((5<Ø<12mm) that can appear (when a knot is falling) with a paste (as mastic), appropriated to children's use.
• You are advised to check the condition of the product at the beginning of each season.
• Check the screws, nuts and bolts and tighten them if necessary.
• Grease all the movable metalic parts.
• Replace the faulty parts in accordance with the manufacturer instructions
• Apply a cleaning product (tint, paint) in order to guarantee the good quality of the produit in the time.
• Remove snow from the product.
• For lack of proceeding to these verifications, the toy could knock over or become a danger .

Warranty

• This product is warrantied 2 years.  The warranty applies only to problems due to manufacturing defects (hidden defects) and is only 
  valid when the recommended conditions for use have been met and the product used normally.   Any modifications made to the 
  product will invalidate the warranty.  The warranty doesn’t apply to changes in appearance of the materials if the product has not 
  been installed and maintained according the recommendations given in the instructions.

GB

Summary of Contents for 499

Page 1: ...stionados correctamente Garantimos que as nossas madeiras são provenientes de florestas geridas de forma sustentável Garantiamo che i nostri legni provengono da foreste correttamente gestite Wij garanderen dat ons hout afkomstig is van goed beheerde bossen We guarantee that all the timber we use is sourced from managed forests Wir garantieren dass unsere Hölzer aus nachhaltig bewirtschafteten Wäld...

Page 2: ...ut être apporté au jouet d origine Maintenance Boucher les trous 5 Ø 12mm pouvant apparaître noeuds sautés avec une pâte type mastic adapté à un usage pour les enfants Il est conseillé de vérifier à chaque début de saison l état de votre produit Vérifier les vis écrous et boulons et les reserrer si nécessaire Graisser toutes les parties mobiles métalliques Remplacer les éléments défecteux conformé...

Page 3: ...ar la estabilidad del producto los soportes se adaptan al tipo de suelo y pueden ser fijados en los postes Todo sistema de fijación de producto debe ser colocado a nivel de suelo o enterrado con el fin de evitar tropiezos No instalar el producto sobre el hormigón asfalto o cualquier otro revestimiento duro Durante el montaje no dejar ningún tornillo o clavo sobresalir Estas instrucciones de montaj...

Page 4: ...icos Para melhorar a estabilidade do produto uns suportes adaptados à materia do chão podem ser fixados aos postes Todo o sistema de fixação do produto deve ser posto ao nivel do chao para evitar todo o risco de poder tropeçar Não instalar o produto sobre betão asfalto ou qualquer outro revestimento duro No momento da instalação não deixar pregos execederem As instruções de instalação devem ser gu...

Page 5: ...igliorare la stabilità del prodotto dei supporti adattati alla natura del suolo possono essere fissati sui pali Ogni sistema di fissassione del prodotto deve essere piazzato a livello del suolo o sotto il suolo per evitare ogni richio di caduta Non installare il prodotto su cemento asfalto o altre pavimentazioni rigide Al momento del montaggio non lasciare ne viti ne chiodi sporgere Queste istruzi...

Page 6: ...ektriciteitsleidingen Om de stabiliteit van het product te verbeteren kunnen steunen afgestemd op de aard van de grond op de palen bevestigd worden Elk bevestigingssysteem van het product moet op of onder de grond geplaatst worden om struikelgevaar te vermijden Het product niet plaatsen op beton asfalt of een andere harde bekleding Vergeet bij de montage geen enkele schroef of nagel Deze montage i...

Page 7: ...mprove the stability of the product bracktets adapted to the nature of the ground can be fixed on the posts All system of fitting of the product must be placed at the ground level or under the ground in order to avoid all risk of stumbling Do not install the product on concrete tarmac or any other hard surface When mounting don t let no screw no nail go past These mounting instructions must be kep...

Page 8: ...sicht nehmen zu können Es dürfen keine Änderungen am originalen Spielgerät gemacht werden Maintenance Verschließen Sie eventuell auftretende Astlöcher 5 Ø 12mm mit einer für Kinder ungefährlichen Holzspachtelmasse Wir raten Ihnen bei Beginn jeder Spielsaison den Zustand Ihres Produktes zu kontrollieren Kontrollieren Sie Schrauben Schraubenmuttern und Bolzen und ziehen Sie diese eventuell fest Fett...

Page 9: ...mm x1 40x1364x1170 mm x1 40x1395x1170 mm x1 28x28x100 mm x1 28x28x1387 mm x4 15x28x1180 mm x1 15x28x1110 mm 28x28x1180 mm x2 x1 x1 8x1180x1180 mm x1 1 2 3 4 5 6 10 9 8 7 11 12 13 14 35x45x1379 mm x1 x2 19 20 21 22 23 15 16 28 18 17 11 5mm 28mm 28x45x1180 mm 35x45x1147 mm x3 H 15 mm H 10x70x868 mm 10x70x1200 mm x2 x4 K 40x40x20 mm x2 60x35x240mm 28x145x735mm x12 70x70x589mm x6 28x506x1056mm 28x506x...

Page 10: ...1 4 2 5 4x F 6 3 4 1 3x E 6x F 3 8 8 I 2x E 2x C518mm Ø5 mm 8 I 6x 23 12x 24 2x F 4x F 1 2 1 2 2x F 4x F 2x 4x réf 499 519_MAJ_22 01 2015_10 16 ...

Page 11: ...5 6 7 8 2 9x E 3 J C 9 2x E 30 mm 60 mm 10 mm 14 mm 20 mm 10 4x D 2x G 22 5 mm 95 mm 100 mm 22 5 mm 554 mm Ø2 5 mm 15mm 15mm 28 4xD 15mm 15mm 28 7x F réf 499 519_MAJ_22 01 2015_11 16 ...

Page 12: ...9 11 10 4x 11 4x B 1355mm 2x 13 13 13 12 8x D 12 41mm 29mm 442mm 627mm 15 17 16 6x E 4x F réf 499 519_MAJ_22 01 2015_12 16 ...

Page 13: ...12 13 14 9x D 14x A H 12 16x A H 0 mm 580m m 1240mm H 750m m 1240mm H 710mm 540mm réf 499 519_MAJ_22 01 2015_13 16 ...

Page 14: ...16 15 11 5mm 4x E 21 10mm 21 22 18 2x 18 2x E 22 18 5x E 2x E réf 499 519_MAJ_22 01 2015_14 16 ...

Page 15: ...17 18 2x F 3x E 7 25 26 20mm 4x E 8x D 2x K 2x 27 réf 499 519_MAJ_22 01 2015_15 16 ...

Page 16: ...19 20 4x D 8x D 20 14 19 19 19 20 4x D 19 5mm 19 5mm 14mm 41mm 8x D 19 29mm 22mm 8mm 43mm réf 499 519_MAJ_22 01 2015_16 16 ...

Reviews: