background image

Page 13 of 20 

Commissioning the Appliance  

On completion of the installation, when any fire cement or paint used has dried, a smoke ‘bomb’ 
should be burnt and all joints checked for smoke leakage and the chimney draw checked with all 
doors and windows closed. Please leave the instructions with the customer and inform them;- 

The first time the stove is lit only a small fire should be used to allow the paint to cure properly. 

Ventilate the room well as the fumes can be pungent.

  Use a small amount of kindling to start 

the fire. If possible leave the door  on the catch, although the fire looks fierce it is comparatively 
cool due to all the air being drawn in. Add a little more kindling as it burns down. When you have a 
small bed of embers place a small split log in the fire, allow it to catch well, and then close the door 
with the lever to the right. Stay with the fire during this process. When this first log is burning down 
add another log, when this one is burning well you should be able to move the lever midway to the 
centre. Keep feeding the stove for three hours with a small split log as it burns low. 

When you need to remove some ash wait until it is cold and then take some out using the scoop 
provided. Always leave an approximate minimum depth of ¾” (20mm) of wood ash so you have a 
nice bed for your next fire. 


USER INSTRUCTIONS 

To Light the Stove 

It is important to keep an approximate minimum depth of ¾” (20mm) of wood ash in the fire box at 
any time.  You will achieve this after the first few firings.  


Place 1 or 2 firelighters  in the bottom, then  add  some  kindling wood criss-crossed,  and  finally  a 
small log on top.  Light the firelighters, open the air vent to maximum (to the right) and close the 
door to the first latch so there is an air gap around it. 

Leave it like this for around five minutes or so, the fire should be well alight and the door can now 
be closed to become air tight. Leave the air control lever to the right for a further 10 to 20 minutes 
to get the stove completely up to running temperature.  If the stove does goes out when the door is 
closed then the flue is still too cold and will not pull, in this case you may need to leave the door 
open with kindling burning for longer.  The flues pull will change dependant on temperature and 
atmospheric conditions. 

The best lever position, to


achieve maximum efficiency, will depend on the chimney draw, but will 

normally be near the centre.  Every chimney is different, and you will eventually find your stove’s 
optimum position.  This is when the flames are swirling in a lazy manner around the stove, not 
roaring.  If the lever is pushed too far to the left, you starve the fire of oxygen, causing the glass to 
darken.  Move the lever a small amount to the right until the glass just stays clean.  We do not 
recommend use of a stove thermometer – the high efficiency of the stove means flue gases are 
cool and would give an inaccurate reading, leading to over firing  and damage to internal 
components.  The best way to run any wood stove is ‘little and often’. If you are with the fire, it is 
best to keep adding a small log every 45 minutes rather than adding large ones every 2 hours. 


THE STOVE IS NOT DESIGNED TO BE USED WITH THE DOOR OPEN!   

To reload, open the door slowly to allow the pressure to equalise.  Using the glove provided, place 
the fresh log towards the rear of the appliance.  Close the door. 

Summary of Contents for 9307 Fireball

Page 1: ...User Manual for the super efficient Wood Burning Stoves Models 9307 Wood Burning Stove Applicable Appliance Carlby 9307 Document reference BUR 04 16 Revision date April 2016 THESE INSTRUCTIONS MUST BE LEFT WITH THE USER FOR FUTURE REFERENCE ...

Page 2: ...12 Fitting the optional base s 12 Commissioning the Appliance 13 USER INSTRUCTIONS 13 To Light the Stove 13 Using the Moisture Meter 14 Stove Thermometers DO NOT USE WITH OUR STOVES 15 Care of Glass 15 Troubleshooting Poor Appliance Operation 16 Reasons for Premature Wear of Internal Parts 17 Chimney Sweeping and Maintenance 17 Safety 18 Warranty 18 If you need further help 18 Spare Parts 19 Custo...

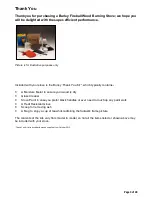
Page 3: ...ly contains A Moisture Meter to ensure your wood is dry Glass Cleaner Stove Paint in case you prefer black handles or ever need to touch up any paint work A Heat Resistant Glove Scoop for removing ash A Mug to enjoy a cup of tea whilst admiring the fantastic flame picture The contents of the kits vary from model to model so not all the items listed or shown above may be included with your stove Th...

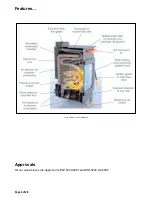
Page 4: ...Page 4 of 20 Features Cross Section Artist Impression Approvals All our wood stoves are approved to EN13240 2001 and EN13240 A2 2004 ...

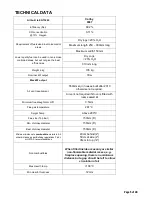
Page 5: ... 2010 otherwise not required Air vent not required if stove is fitted with room sealed kit Minimum flue draught mm H O 0 5mm Flue gas temperature 261 C Spigot Temp Above 200 C Flue size Top Exit 150mm 6 Min chimney diameter 150mm 6 Best chimney diameter 150mm 6 Minimum distance to combustible materials All other distance as per Building regulations Part J or HETAS recommendations 40cm behind 2 50c...

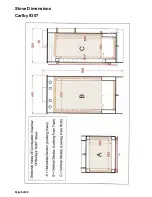
Page 6: ...Page 6 of 20 Stove Dimensions Carlby 9307 ...

Page 7: ...of the authority to be a smoke control area It is an offence to emit smoke from a chimney of a building from a furnace or from any fixed boiler if located in a designated smoke control area It is also an offence to acquire an unauthorised fuel for use within a smoke control area unless it is used in an exempt appliance exempted from the controls which generally apply in the smoke control area The ...

Page 8: ...e downdraught problems where the wind tries to stop the fumes rising up the chimney An anti downdraught cowl might help but anti downdraught cowls reduce the draw We recommend you seek the advice of a HETAS 0845 634 5626 or NACE 01526 322 555 registered supplier and installer before purchasing any stove or heating appliance It may be wise to contact your local chimney sweep before the stove is ins...

Page 9: ...of 225mm in front of the stove When a stove is freestanding the hearth should always extend a minimum of 150mm either side of the stove Strength and heat resistance of the hearth Stoves are very heavy and most materials used for hearths crack very easily It is impossible for Burley to inspect each hearth or comment on every installation so the onus is on the installer to ensure the construction of...

Page 10: ...e preferred as heat loss from the room will be greatly reduced If the stove is not on an outside wall it may be possible to use an angled room sealing kit part number ROOMSEALKIT90 This leaves the back of the stove at right angles and can run along a wall or taken vertically downwards through the floor and onto the outside using additional ducting Only permanently open vents can be used and consid...

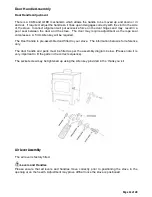
Page 11: ...l compresses A 5mm Allen key will be required The Door handle is pre assembled and fitted to your stove The information below is for reference only The door handle and parts must be fitted as per the assembly diagram below Please note it is very important to fit the parts in the correct sequence The socket screw may be tightened up using the Allen key provided in the thank you kit Air Lever Assemb...

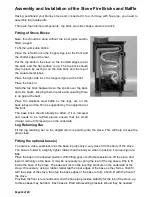
Page 12: ...he base brick should already be fitted If it is removed and needs to be refitted please ensure that the small circular cut out if present is on the underside Log Retaining Bar Fit the log retaining bar so the angled return is pointing into the stove This will help to keep the glass clean Fitting the optional base s To ensure a close seamless joint the base is purposely a very close fit to the body...

Page 13: ...criss crossed and finally a small log on top Light the firelighters open the air vent to maximum to the right and close the door to the first latch so there is an air gap around it Leave it like this for around five minutes or so the fire should be well alight and the door can now be closed to become air tight Leave the air control lever to the right for a further 10 to 20 minutes to get the stove...

Page 14: ... terrible at burning All the energy of the wood is used trying to boil the water If the log is 3kg and the moisture content of the wood is 33 that is effectively 1 litre of water being poured on the fire Remove the plastic cap covering the two contact pins The pins are sharp for a reason so please use it carefully Push the pins into the inner surface of the split log 5mm as a guide this will give ...

Page 15: ...f Glass A fine layer of ash is deposited on the glass after each firing this should be cleaned off every time before the next firing It is easy to clean but if it is left on over a period of time it will build up and the massive amount of heat generated inside the fireball stoves can actually fire the ash into the glass Clean the glass each time before re lighting Clean glass with a ceramic glass ...

Page 16: ...can cause excess smoke and be a potential fire hazard The appliance must not be operated with the appliance door left open except as directed in the instructions Overloading the fire bed The maximum amount of fuel specified in this manual should not be exceeded The weight of dry wood per hour is 1 75kg for the 9307 Overloading can damage components of the stove The stove is not designed for overni...

Page 17: ...rack Only clean the glass when it is cold Chimney Sweeping and Maintenance It may be wise to contact your local chimney sweep before the stove is installed Your chimney should be swept at least once a year by a registered sweep twice a year with heavy use The sweep should also replace the fire cement at the base of the flue if necessary The chimney can be swept through the stove Unless advised by ...

Page 18: ...or fit parts to the appliance that are not recommended by the manufacturer Never use this appliance in the same flue as another appliance The surface of a wood burning stove gets extremely hot in normal use When using the stove in situations where children or aged and or infirm persons are present a fireguard must be used to prevent accidental contact with the stove The fireguard should be manufac...

Page 19: ...1 BACK VERMICULITE BOARD WBACLINER9307 1 BOTTOM VERMICULITE BOARD WBOTLINER5 1 LEFT HAND VERMICULITE BOARD WL HLINER9307 1 RIGHT HAND VERMICULITE BOARD WR HLINER9307 1 GLASS WGLA9307 2 HALF GLASS WGLAS9307H 2 GLASS ROPE TAPE WROPE 1M DOOR SEAL ROPE WSEALROPE 1M STAINLESS STEEL BAFFLE WLOWBAFSMA 1 ...

Page 20: ... contact details Chimney Swept Date Notes Made in the UK Burley Appliances Limited Lands End Way Oakham Rutland LE15 6RB United Kingdom Further information can be found at http burley co uk category wood burning stoves Email sales burley co uk Phone 01572 756956 Fax 01572 724390 ...

Reviews: