9
Input amplification
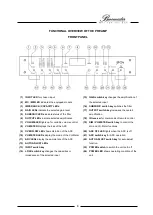
With this option you are able to adjust the playback volume of the MC or MM module to the
pickup system of your record player.
By pressing the
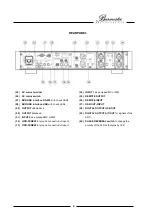
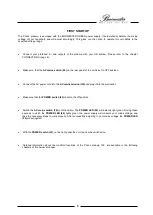
GAIN switch key (15)
up or down or with the navigation buttons
►
◄
on
your remote control you will change this setting for each input. Choose the option which
sounds best to you. Therefore you have six different steps.
The input amplification differs depending on which module is installed. The scale for MC
modules is 57dB, 60dB, 63dB, 66dB, 69dB and 72dB. For MM modules the scale is 37dB,
40dB, 43dB, 46dB, 49dB and 52dB.
The chosen amplification will be displayed by the
GAIN LEDs (4)
.
Subsonic filter
The 100 offers the option to activate a subsonic filter. The subsonic filter eliminates low
frequency signals, which might come from the record player or wavy records. Switch on the
subsonic filter, if the bass membranes of your loudspeakers are moving very slowly with a
large swing.
The subsonic filter is activated or deactivated with the
SUBSONIC switch key (16)
, or by
shortly pressing the
SUBT
button on your remote control. If the subsonic filter is activated,
the
SUBSONIC ON LED (5)
illuminates.
Output amplification
If you are operating the preamp 100 with amplifiers with low input sensitivity, it is possible to
enhance the maximum amplification by +6dB.
To change the amplification the
OUTPUT switch key (17)
needs to be pulled up or the
SUBT
button on your remote control needs to be pressed longer (app. 2 seconds). At high
amplification the
6dB LED (6)
will illuminate.
Pressing the
OUTPUT switch key (17)
down or again longer pressing the
SUBT
button on
your remote control deactivates this function.
VU-Meter
The 100 is equipped with an analog VU-Meter to display the modulation amplitude of the
ADC (Analog Digital Converter). If the VU-Meter displays 0dB
FS
, the maximum level of 2
Volts is present at the ADC input. This level must never be exceeded. Otherwise digital
distortion will occur. Adjust the input amplification of the 100 to a level that –3dB
FS
(beginning of the red area) is not reached.
The
OVERFLOW LED (9)
is an additional display for the distortion without any inertia.
The meter displays either the left channel, the right channel or a mono equivalent of both
channels. By pressing the
DIM / VU-Meter switch key (19)
up or by pressing the
MODE
button on your remote control you can toggle between the different operation modes. If
none of the
VU-METER LEDs (10)
is lit, the function is disabled.
Display brightness
By pushing the switch key
DIM / VU-METER (19)
down, or by shortly pressing the
DIM
button on your remote control you can adjust the brightness of your display in four steps
from “maximum brightness” to “off”.
If mode “off” is chosen, the display illuminates when the device is operated to indicate that a
function is controlled, and dims out after approximately six seconds.
ADC activation
The 100 is equipped with an Analog Digital Converter (ADC) which allows you to digitalize
your record collection. You require a digital recording unit or a PC connected to the 100 to
be able to record music. By pressing the
ADC switch key (21)
up or by pressing the
AUDIO
button on the BURMESTER remote control shortly the ADC function is activated.
One of the
ADC-LEDs (11)
illuminates indicating the active sample frequency. If the ADC is
activated the digital signals will be supplied at the outputs
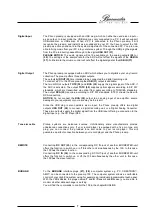
A/D OUT (39)
and
USB (37)
.
By pressing the
ADC switch key (21)
down or by pressing the
AUDIO
button on the
BURMESTER remote control longer (app. 2 seconds) the ADC is deactivated and
completely cut off from the signal path. This will be displayed by the
ADC OFF LED (20)
.

