90
X. Operation
G. Changing Adjustable Parameters (continued)
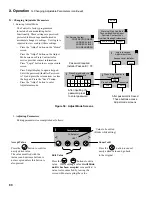
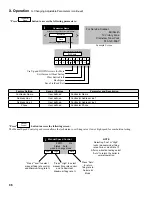
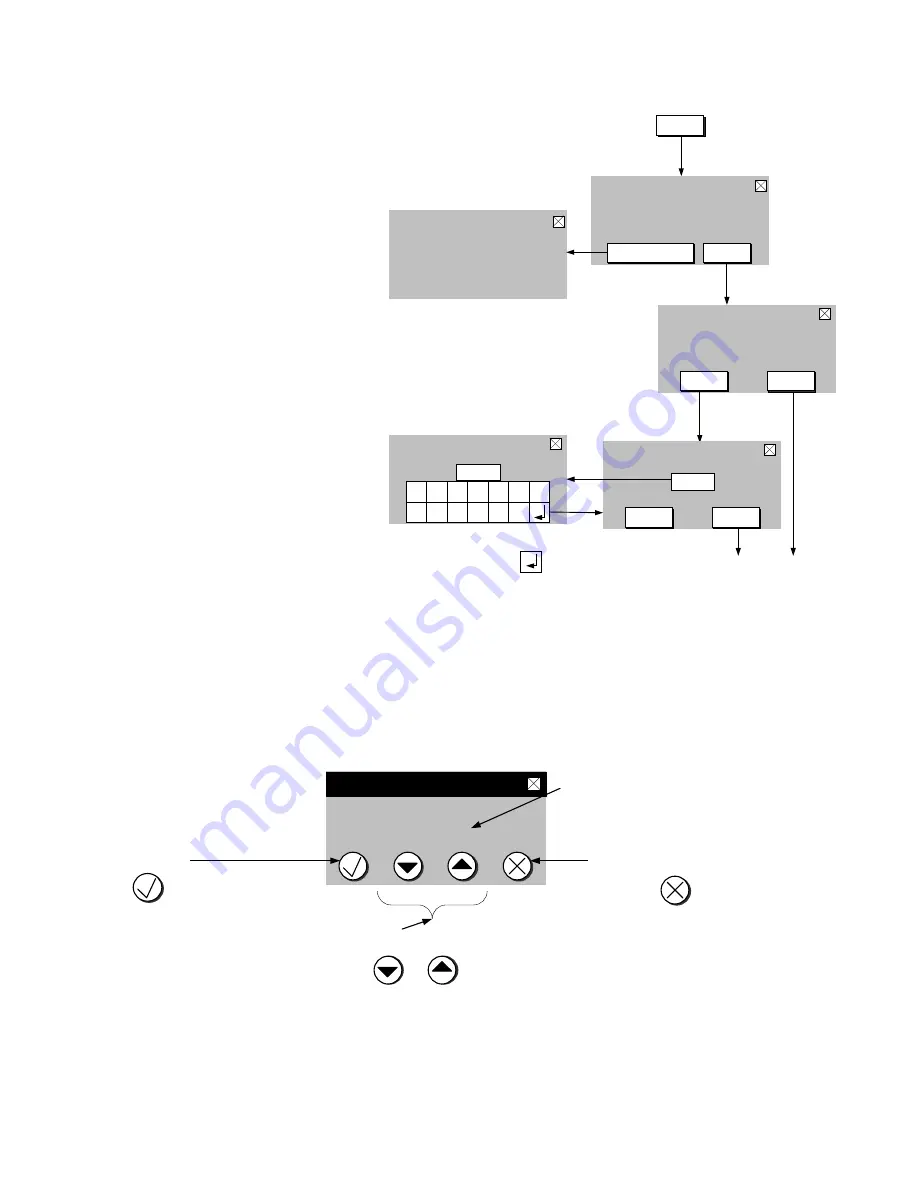
1. Entering Adjust Mode
The Control is factory programmed
to include basic modulating boiler
functionality. These settings are password
protected to discourage unauthorized or
accidental changes to settings. User login is
required to view or adjust these settings:
- Press the “Adjust” button on the “Home”
screen.
- Press the “Adjust” button on the Adjust
Mode screen or Press Contractor for
service provider contact information.
- Press “Login” button to access password
screen.
- Press 5-digit display to open a keypad.
Enter the password (Installer Password
is 76) and press the return arrow to close
the keypad. Press the “Save” button.
- Press the “Adjust” button to enter
Adjustment mode.
G.
Changing Adjustable Parameters
Active
Fault
Login to Access
Adjustment Mode
For Service Contact:
CONTRACTOR NAME
ADDRESS LINE
1
ADDRESS LINE
2
PHONE NUMBER
Access Level: Installer
Password required
Installer Password
=
76
Warning! Only Qualified
Technicians Should Adjust
Controls,
Contact Your
Qualified Heating Professional
i
Press 5-digit display to
Input Password
Press Save to enter password
i
000
1
CL
R
ES
C
5
4
3
2
6
B
S
0
9
8
7
Press 5-digit display to
Input Password
i
076
After inputting the
password press
to enter password
After password is Saved
These buttons access
Adjust mode screens
Service Contact
Adjust
Login
Adjust
Save
Adjust
Adjust
Figure 56: adjust Mode Screens
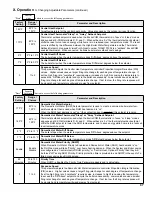
2.
Adjusting Parameters
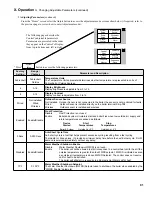
Editing parameters is accomplished as follows:
Value to be edited
(blinks while editing)
Edit Value
Press the buttons to edit a
value. While editing a value
it will blink
until it has been accepted
or cancelled. A
value is also cancelled by leaving the
screen without accepting the value.
Cancel edit
Press the button to cancel
newly edited value and go back
to the original
Accept Value
Press the button to confirm
newly edited value.
The value modified with the
increase and decrease buttons is
not accepted unless this button is
also pressed
CH Setpoint
Central Heat
<
>
180
F
i
Summary of Contents for Apex APX399
Page 65: ...65 VIII Electrical continued Figure 43 Ladder Diagram ...
Page 66: ...66 VIII Electrical continued ...
Page 67: ...67 Figure 44 Wiring Connections Diagram VIII Electrical continued ...
Page 110: ...110 1P 3 1P 2 1P 1 XIII Repair Parts continued 1C 1D 1E ...
Page 116: ...116 XIII Repair Parts continued ...
Page 118: ...118 XIII Repair Parts continued ...
Page 129: ...129 SERVICE RECORD DATE SERVICE PERFORMED ...
Page 130: ...130 SERVICE RECORD DATE SERVICE PERFORMED ...

