29
3) Joining Pipe -
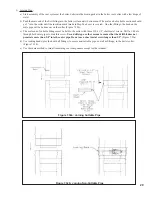
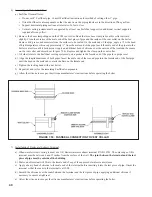
a) Start assembly of the vent system at the boiler. Lubricate the brown gasket in the boiler vent collar with a few drops of
water.
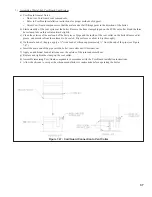
b) Push the male end of the first fitting into the boiler collar until it bottoms out. The male end of cuttable sections should
go 1” into the collar until the insertion mark (made in Step 2d above) is covered. On other fittings, the bead on the
male pipe will be bottom out on the collar (Figure 7.32b).
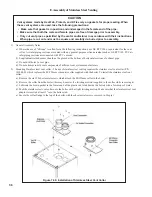
c) The male end of cuttable fittings must be held to the collar with three #10 x 1/2” sheet metal screws. Drill a 1/8 hole
through both outer pipes to start this screw.
Use a drill stop or other means to ensure that the drill bit does not
penetrate more than 3/8” into the outer pipe. Do not use a sheet metal screw longer than 1/2”
(Figure 7.32a).
d) Use locking bands (provided with all fittings) to secure non-cuttable pipe, as well as fittings, to the boiler collar
(Figure 7.32b).
e) Use the same method to join all remaining vent components except for the terminal.
Figure 7.32a: Joining Cuttable Pipe
Figure 7.32b: Joining non-Cuttable Pipe
Summary of Contents for FREEDOM
Page 8: ...8 Figure 1 Wall Mounting Hole locations ...
Page 9: ...9 Figure 5 2 Boiler Mounting Hardware ...
Page 11: ...11 Figure 6 1 Boiler Installed In A Confined Space Ventilation Air From Inside ...
Page 42: ...42 FIGURE 7 51 CONDENSATE PIPING ARRANGEMENT ...
Page 55: ...55 Figure 10 1 Wiring Connections Diagram ...
Page 56: ...56 Figure 10 2 Ladder Diagram ...
Page 57: ...57 Figure 10 3 Wiring of Isolation Relay for Control of Two Heating Circulators ...
Page 60: ...60 FCM Series Lighting and Operating Instructions ...
Page 66: ...66 FIGURE 12 2 BASIC MENU TREE ...
Page 75: ...75 ...
Page 77: ...77 ...
Page 79: ...79 ...
Page 80: ...80 ...
Page 81: ...81 ...
Page 83: ...83 150 151 152 153 154 155 ...
Page 84: ...84 156 157 158 159 160 161 ...
Page 85: ...85 162 ...

