14
5 thru 12) throughout the assembly sequence outlined
below as it applies to your installation.
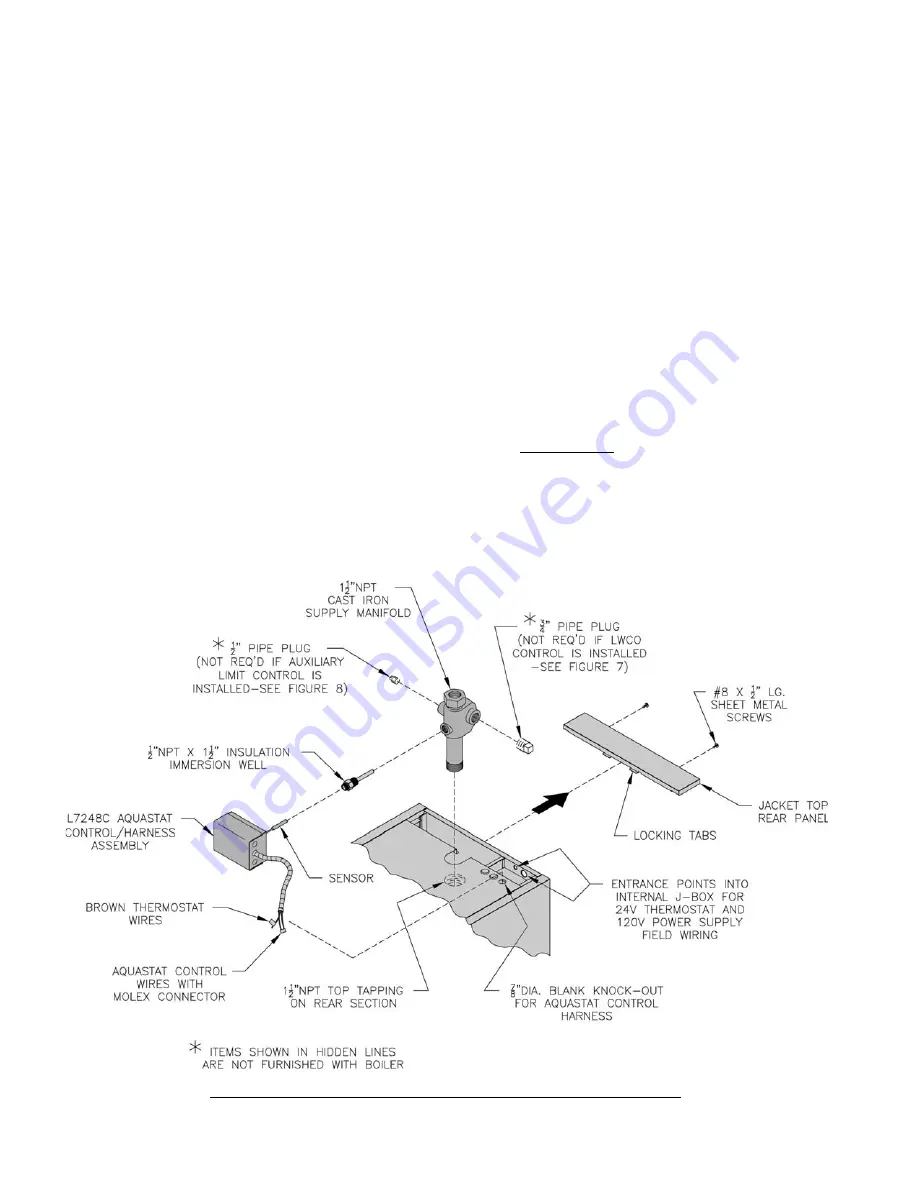
1. Install supply manifold and aquastat control, refer to
Figure 5.
Step a.
Remove two (2) #8 x 1/2" lg. sheet metal
screws securing jacket
top rear
panel to jacket
rear
panel. Slightly lift and pull jacket
top rear
panel away from jacket
top
panel to gain access
to internal J-box wiring harness.
Step b.
Locate the cast iron supply manifold shown
in Figure 5. Apply thread sealant to 1-1/2" NPT
male threads. Thread male end into 1-1/2" NPT
top tapping on rear section. Using hex head on
top, tighten manifold until 1/2" NPT boss for
control well is facing forward and joint is water
tight.
Step c.
Locate 1/2" NPT x 1-1/2" immersion well.
Apply thread sealant to 1/2" NPT male threads.
Thread well into 1/2" NPT boss on front of
supply manifold. Using hex head, tighten well
until water tight.
Step d.
Locate L7248C Aquastat Control/Harness
Assembly. Loosen mounting screw on bottom of
case. Insert sensor into immersion well. Mount
control on immersion well and tighten screw to
secure control in horizontal position with harness
on right side as shown in Figure 5.
Step e.
Insert two (2) brown thermostat wires and
three (3) aquastat wires with Molex socket
connector located on opposite end of aquastat
harness through 7/8" dia. blank knockout in
jacket
top
panel. Fish these wires to rear of
internal junction box. Insert snap-in conduit
connector in 7/8" blank knockout, squeeze tabs
on side of connector, push into knockout and
release tabs to lock connector in place.
Step f.
Inside internal junction box, locate wires
with mating aquastat plug connector labeled
"Aquastat" (refer to Figure 6 for details of
harness located inside internal junction box).
Align mating halves of socket connector from
aquastat control with harness plug connector.
Push connectors together until snap on connector
is locked in place.
2. If required on this water boiler application, install
low water cut-off (LWCO) Kit, optional equipment
- Burnham P/N 100106-01, refer to Figure 7. Also
refer to instructions provided with LWCO Kit.
If not required
, proceed to Paragraph 3.
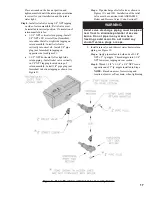
Step a.
Apply sealant to probe threads and install
in 3/4" NPT tapping on right side of manifold as
shown. Tighten so that the mounting screws are
horizontally aligned and joint is water tight.
Step b.
Remove wing nut from the probe terminal.
Loosen screw and open cover on control box.
Figure 5: Supply Manifold and Aquastat Control Assembly Details
Summary of Contents for MPO Series
Page 6: ...6 Figure 1 MPO 84 Thru MPO 231 Water Boiler ...
Page 22: ...22 Figure 13A Water Boiler Piping for Circulator Zoned Heating System Supply Side Circulator ...
Page 38: ...38 Figure 27 L1 L2 and V1 Head Electrode Positioning and Gun Setting Beckett AFG ...
Page 49: ...49 SERVICE RECORD DATE SERVICE PERFORMED ...
Page 50: ...50 Bare Boiler Assembly ...
Page 52: ...52 Bare Boiler Assembly ...
Page 54: ...54 Jacket Assembly ...
Page 56: ...56 MPO84 Thru MPO231 Water Boilers Trim and Controls ...
Page 58: ...58 Beckett AFG Burner ...
Page 61: ...61 Figure A2 LWCO Location ...


