background image

35

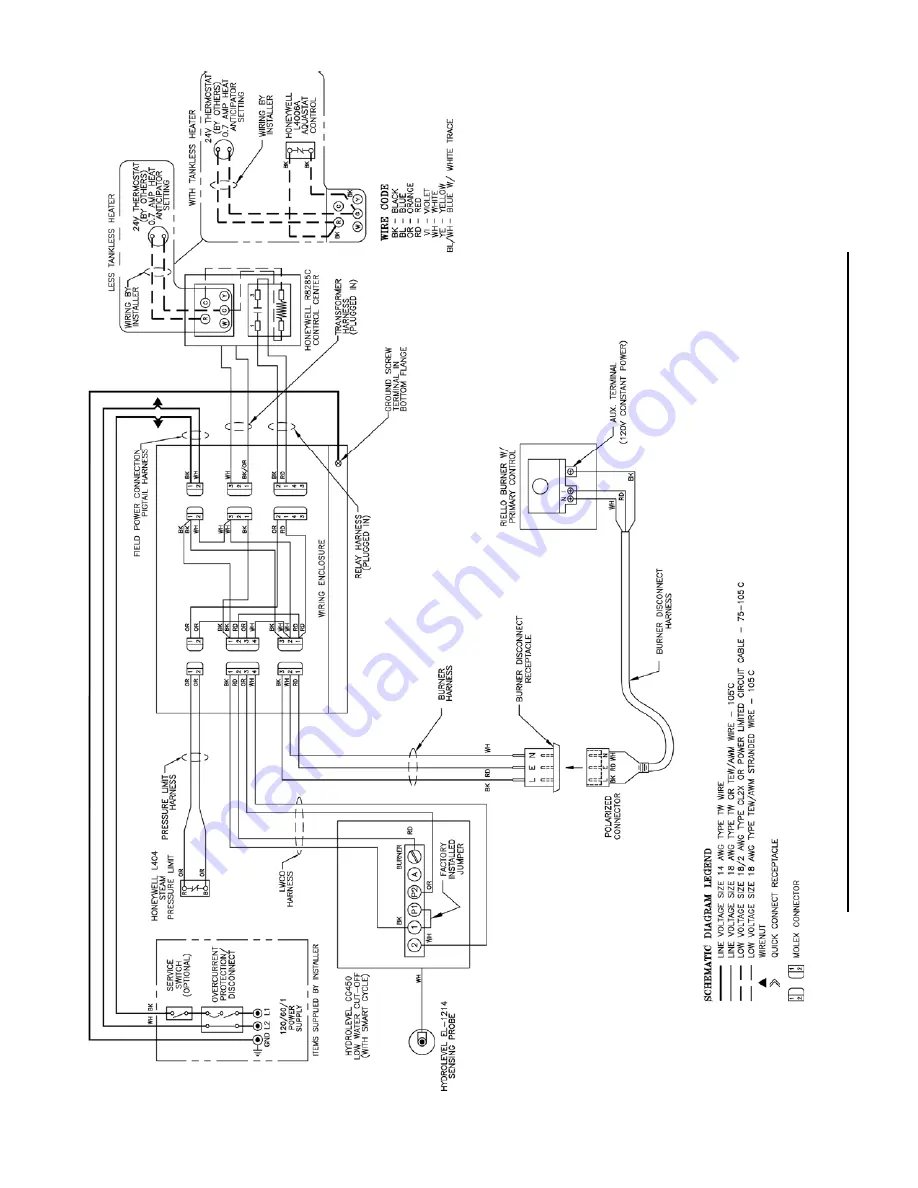
Figure 18A:  W

iring Diagram, Riello 40 Series Burner

, Steam, Hydrolevel CG450 Probe L

WCO

Summary of Contents for MST288

Page 1: ...M R E L I O B L I O S S A P 3 g n i k e e s n e h W r e i l p p u s l i o r o r o t c a r t n o c g n i t a e h r u o y l l a c r e l i o b o t s r i a p e r r o e c i v r e s r o F g n i t a R n o n w o h s s a r e b m u N l a i r e S d n a r e b m u N l e d o M r e l i o B e d i v o r p r e l i o b n o n o i t a m r o f n i r e l i o b e h t f o p o t n o d e t a c o l l e b a L r e b m u N l e ...

Page 2: ... Surface rust on cast iron sections may be attributed to the manufacturing process as well as condensation during storage Surface rust is normal and does not affect the performance or longevity of a boiler All boilers must be installed in accordance with National State and Local Plumbing Heating and Electrical Codes and the regulations of the serving utilities These Codes and Regulations may diffe...

Page 3: ...er Assembly and Steam Boiler Trim Piping Sections of this manual for details It is the responsibility of the installing contractor to see that all controls are correctly installed and are operating properly when the installation is completed This boiler is suitable for installation on combustible flooring Do not install boiler on carpeting Do not tamper with or alter the boiler or controls Inspect...

Page 4: ...er is supplied with controls which may cause the boiler to shut down and not re start without service If damage due to frozen pipes is a possibility the heating system should not be left unattended in cold weather or appropriate safeguards and alarms should be installed on the heating system to prevent damage if the boiler is inoperative This boiler is designed to burn No 2 fuel oil only Do not us...

Page 5: ... Figure 1 MST288 Thru MST629 Steam Boiler with and without Tankless Heater Beckett Burner Shown ...

Page 6: ... 6 15 3 14 9 20 29 607 MST513 28 5 8 30 6 19 7 19 3 27 29 744 MST629 34 5 8 36 7 24 1 23 8 34 29 881 NOTE 1 Maximum Working Pressure Steam 15 PSI Boiler Model No Burner Capacity I B R NET Ratings Minimum Chimney Requirements AFUE GPH MBH DOE Heating Capacity MBH Steam MBH Steam Sq Ft Round In Dia Rectangle In x In Height Ft MST288 0 75 105 92 69 288 6 8 X 8 15 86 0 MST396 1 05 147 127 95 396 6 8 X...

Page 7: ...way cleaning MST513 36 for flueway cleaning MST629 b Clearance from Jacket Left Side Panel 19 for burner swing door if opened fully with burner mounted otherwise 1 with burner removed 12 access clearance to service rear of boiler if right side clearance is less than 12 1 minimum if right side clearance is 12 or larger to access and service rear of boiler c Clearance from Jacket Right Side Panel 6 ...

Page 8: ...able with Beckett burner Metal cover applications P N 611280031 Plastic cover applications P N 102119 01 Refer to Fresh Air Accessory Kit Instructions for installation and air intake piping details or b Outdoor air may be provided with the use of two permanent openings which communicate directly or by duct with the outdoors or spaces crawl or attic freely communicating with the outdoors Locate one...

Page 9: ... Heater Part 100567 05 100045 02 100021 01 2 ___ Control Carton ____ CG450 LWCO W Tankless Heater Part 100608 01 ____ PS801 LWCO W Tankless Heater Part 100622 01 ____ 67 LWCO W Tankless Heater Part 100678 01 ____ CG450 LWCO L Tankless Heater Part 100680 01 ____ PS801 LWCO L Tankless Heater Part 100681 01 ____ 67 LWCO L Tankless Heater Part 100679 01 3 ___ Jacket Carton ____ MST3 Part 100609 03 ___...

Page 10: ...ual Cast Iron Section Burner Swing Door Smoke Box Assembly removal prepare one piece of 4 x 4 x 16 lg or two pieces of 2 x 4 x 16 lg and two pieces of 1 Sch 40 black pipe to be used as handles Suggested pipe length for each handle is 72 3 section 78 4 section and 84 5 section 7 Place wooden block s 12 from rear of skid as shown See Figure 4 Boiler Removal from Skid 8 Insert 1 Sch 40 black pipe han...

Page 11: ...11 Figure 4 Boiler Removal from Skid ...

Page 12: ...ion for part identification 3 Open Part Carton locate Hardware Bag remove two 5 16 18 x Phillips pan head machine screws 4 Place front jacket panel over front section attachment bosses and align jacket holes with front section boss holes 5 Firstly install two 5 16 18 x Phillips pan head machine screws hand tight to secure front jacket panel right side to casting 6 Secondly insert 5 16 18 hex head ...

Page 13: ...nsulation on models MST288 MST396 MST513 will not have any by pass pockets If insulation is damaged or improper type regarding the pockets it must be replaced 11 Upon inspection completion lift door and place integral cast hinge pins into door mounting bracket slotted holes Do not close and secure door at this time proceed to installing stainless steel flueway baffles 12 Locate remove four 8 x sho...

Page 14: ...2nd pass flueway To install flueway baffle in 2nd pass flueway on right side of boiler hold baffle with word Right readable at the top Slide baffle in flueway until position tab touches fins on left side of 2nd pass flueway F Closing Securing Burner Swing Door 1 To close and secure Burner Swing Door a From fully open position rotate the door to the closed position b Lift door upward into the build...

Page 15: ... studs with short threaded end into lower attachment bosses on rear section 5 Install both 5 8 x 2 9 32 round spacers over tap studs 6 Place rear jacket panel over rear section so both tap studs clear thru lower panel holes rear section cleanout openings clear thru matching panel cutouts and brass sample port plug clears panel matching hole 7 Secure panel bottom to studs with acorn nuts hand tight...

Page 16: ...er Gauge Glass Pressuretrol LWCO Float LWCO E 2 11 Supply Front Rear Tappings F 14 Safety Valve G 1 11 Condensate Return H 1 11 Optional Front Return J 1 11 Surface Blowoff Plugged K 1 11 Indirect Water Heater Supply L 14 Indirect Water Heater Limit M 4 pcs 5 16 18 Jacket Front Panel Burner Swing Door Mounting Bracket N 2 pcs 3 8 16 Burner Swing Door P 10 pcs 5 16 18 Jacket Rear Panel Smoke Box Co...

Page 17: ... securely 4 Pick up Right Side Jacket Panel from Jacket Carton See also Repair Parts Section Jacket Assembly illustration for part identification 5 Pick up Molex end of Burner Harness stuffed between front panel insulation and insulation wrapper and feed it thru Right Side Jacket Panel front cutout letting the harness connector to hang over the cutout edge temporarily 6 Place Right Side Jacket Pan...

Page 18: ...arness over the probe and clamp in place Note that CG450 LWCO will be positioned right side up with diagnostic LED s on the top flange while PS801 LWCO will be positioned upside down with diagnostic LED s on the bottom flange Connect the wire s between the probe and control per manufacturer s instructions 4 Pick up the LWCO harness Molex end and feed it into the enclosure thru external electrical ...

Page 19: ...19 Figure 9 Float Type LWCO and Pressure Limit Installation ...

Page 20: ...ess each stripped end and wrap hooks around screws under terminals R and G of the R8285C Transformer Relay then tighten screws securely Q Safety Valve and Drain Valve Installation 1 Remove safety valve and related piping 3 4 NPT x 3 lg black nipple 3 4 NPT x 8 lg black nipple NPT 90 black elbow and NPT black coupling from Part Carton 2 Thread 3 4 NPT x 3 lg black nipple into rear section safety va...

Page 21: ...r for size angle and type inspect electrode settings and check insertion depth and turbulator setting Refer to Table 8A Riello burner Specifications at rear of this manual i Installation Removal of Drawer Assembly Refer to Figure 11A a Removal Disconnect oil delivery tube nut from pump Loosen SCREW 3 and then unplug PRIMARY CONTROL 1 by carefully pulling it back and then up Remove the AIR TUBE COV...

Page 22: ...d in Table 8A Riello Burner Specifications at rear of this manual vi Verify Turbulator Setting Refer to Figure 11D a Confirm the turbulator setting is as specified in Table 8A Riello Burner Specifications of this supplement b If adjustment required loosen RETAINING NUT 1 then turn SCREW 2 until the INDEX MARKER 3 is aligned with the correct index number shown in Table 8A Riello Burner Specificatio...

Page 23: ...e the pump body Riello manometers and vacuum gauges do not require any adapters and can be safely connected to the pump ports An NPT x metric adapter must be used when connecting other gauge models viii Replace Burner Cover and Tighten Burner Cover Screws c Place oil burner gasket on burner and align holes d Remove three 3 5 16 18 x 3 4 lg cap screw from burner swing door used for mounting burner ...

Page 24: ... pipe boiler may result in improper operation and damage to boiler or structure Do not increase steam boiler input above the ratings NOTICE Do not use softened water in steam boilers Accelerated boiler corrosion will result Tie in fresh water supply to the boiler upstream of a water softener Oxygen contamination of boiler water will cause corrosion of iron and steel boiler components and can lead ...

Page 25: ...25 Figure 12 Recommended Boiler Piping for Gravity Return Steam Boiler ...

Page 26: ...e the user will not waste as much hot water while seeking a water temperature Higher temperature hot water required by dishwashers and automatic washers is possible by piping the hot water from the heater prior to entering the mixing valve The mixing valve should be trapped by installing it below the cold water inlet to heater to prevent lime formation in the valve Refer to Figure 13 3 FLUSHING OF...

Page 27: ...TANKLESS HEATER DATA Figure 13 Schematic Tankless Water Heater Piping Boiler Model Heater No Heater Rating GPM Pressure Drop thru Heater PSI MST288 222A 3 00 22 0 MST396 3 25 24 3 MST513 3 50 26 5 MST629 4 00 31 0 ...

Page 28: ...28 Figure 14 Alliance SL Water Heater Piping with MegaSteam Boiler B CONNECT Alliance SL INDIRECT WATER HEATER PIPING as shown in Figure 14 1 Refer to Alliance SL manual for additional information ...

Page 29: ...y shall be examined by a qualified person in accordance with the requirements of Chapter 11 of NFPA 211 Standard for Chimneys Fireplaces Vents and Solid Fuel Burning Appliances SECTION V VENTING Air intake piping a Loose Mortar Loose mortar could be an indication of a prior history of condensing flue gases upon the inside walls of the chimney Colder climates are more susceptible to this condition ...

Page 30: ...30 Figure 15 Recommended Vent Pipe Arrangement and Chimney Requirements Figure 16 Proper and Improper Locations of Draft Regulator ...

Page 31: ... Temperature 1 The temperature of the flue gases has a significant effect on the amount of draft created in a vertical chimney as well as the propensity to create condensate The higher the stack temperature the greater the amount of draft that can be generated A lower stack temperature not only reduces the amount of draft that can be created but it also increases the possibility that the flue gase...

Page 32: ... connector and minimum stack temperature outlined in this section can be maintained ONLY AVAILABLE WITH BECKETT BURNER Refer to Section I Paragraph C Steps 5 6 for optional air intake piping installation information WARNING Using outdoor air in the middle of winter may result in lower stack temperatures and chimney degradation Any signs of condensate seepage or discoloration at the base of chimney...

Page 33: ...m thermostat so there will be free movement of room air around this control Heat Anticipator in Thermostat should be set to match the requirements of the control to which it is connected See Figures 18 thru 20A for desired system and heat anticipator setting If system tends to overheat above the thermostat s temperature setting reduce heat anticipator setting by 1 or 2 amps If system tends to shor...

Page 34: ...34 Figure 18 Wiring Diagram Steam Hydrolevel CG450 Probe LWCO ...

Page 35: ...35 Figure 18A Wiring Diagram Riello 40 Series Burner Steam Hydrolevel CG450 Probe LWCO ...

Page 36: ...36 Figure 19 Wiring Diagram Steam McDonnell Miller PS 801 Probe LWCO ...

Page 37: ...37 Figure 19A Wiring Diagram Riello 40 Series Burner Steam McDonnell Miller PS 801 Probe LWCO ...

Page 38: ...38 Figure 20 Wiring Diagram Steam McDonnell Miller 67 Float LWCO ...

Page 39: ...39 Figure 20A Wiring Diagram Riello 40 Series Burner Steam McDonnell Miller 67 Float LWCO ...

Page 40: ... for heat The probe low water cut off will shut down the burner after a 10 15 second delay if the water level in the boiler drops below the probe level The probe low water cut off will reset and restart the burner with a call for heat a few seconds after the water is returned to its normal level On burner start if the cad cell does not see flame within approximately 15 sec onds primary control wil...

Page 41: ...D copper tubing Copper tubing shall have a 032 minimum wall thickness WARNING Under no circumstances can copper with sweat style connectors be used NOTICE Some jurisdictions require the use of a fusible shutoff valve at the tank and or the burner In addition some jurisdictions require the use of a fusible electrical interlock with the burner circuit Check your local Codes for special requirements ...

Page 42: ...ctions for a two pipe system Some manufacturers require the insertion of a bypass plug 3 Under no circumstances is a manual shutoff valve to be located on the return line of a two pipe system Accidental closure of the return line will rupture the oil pump seals Lift H See Fig 22 Maximum Length of Tubing H R See Figure 22 3 8 OD Tubing 3 GPH 1 2 OD Tubing 3 GPH 0 93 100 2 85 100 4 77 100 6 69 100 8...

Page 43: ...ore details A ALWAYS INSPECT INSTALLATION BEFORE STARTING BURNER 1 Verify that the venting water piping oil piping and electrical system are installed properly Refer to Installation Instructions contained in this manual 2 Confirm all electrical water and oil supplies are turned off at the source and that the vent is clear from obstructions WARNING Completely read understand and follow all instruct...

Page 44: ... overfire pressure when baffles are both installed and removed 3 READJUST THE HEAD SETTING only if necessary a MST288 MST396 Beckett MB L1 Head burner has a fixed head which is non adjustable b MST513 MST629 Beckett MD V1 variable Head burners have the ability to control air by moving the head It might be necessary to move the head forward or back one position at a time to optimize the smoke and C...

Page 45: ...45 Figure 24 L1 and V1 Head Electrode Positioning and Gun Setting Beckett AFG ...

Page 46: ...estricted Mode Press and hold the reset button for 30 seconds When the LED flashes twice the device has reset v T T Jumper Select models have pre installed T T jumper Do not remove jumper See Figure 25 vi Diagnostic LED The indicator light on oil primary control provides lockout recycle and cad cell indications as follows Flashing at 1 Hz second on second off system is locked out or in Restricted ...

Page 47: ... runs beyond safety switch cut off time cell is good If not install new cell v Power Failure Check After Flame is established turn the power off to the control burner The burner should shut down safely When power is restored a normal ignition sequence should be started 3 WARNING Check Pressure Limit Control Jumper Thermostat Terminals Allow burner to operate until shut down by limit Installation i...

Page 48: ... Long sleeved loose fitting clothing 3 Gloves 4 Eye Protection Take steps to assure adequate ventilation Wash all exposed body areas gently with soap and water after contact Wash work clothes separately from other laundry and rinse washing machine after use to avoid contaminating other clothes Discard used RCF components by sealing in an airtight plastic bag RCF and crystalline silica are not clas...

Page 49: ...y a moderate amount of good quality pipe dope to the pipe threads on the probe leaving the two end threads bare Do not use PTFE Teflon tape j Screw the probe into the boiler tapping k Mount the low water cut off control on the probe l Reconnect the control to probe wiring m Fill the boiler to its normal waterline n Add boiler water treatment compound as needed refer to Paragraph B o Restore electr...

Page 50: ...ain valves to floor drain Close gate valve in Hartford Loop and open drain valve in return main Fill boiler to normal water level turn on oil burner and operate boiler at this water level for at least 30 minutes after the condensate begins to run hot then turn off burner Close all radiator valves Remove all supply main air valves and plug the openings in supply main ii Draw about 5 gallons of hot ...

Page 51: ... of free oxygen or chloride salts in the boiler corrodes the cast iron from the inside More make up water and higher concentrations of contaminants damage the boiler sooner Our warranty does not cover oxygen corrosion and sediment related damage Clearly it is in everyone s best interest to prevent this type of failure You can do your part by ensuring that your system is leak free D ATTENTION TO BO...

Page 52: ...in the bottom of the combustion chamber and smoke box B Clean the Combustion Chamber Use a wire or fiber bristle brush to clean the surfaces of the combustion chamber Vacuum all of the loose debris in the bottom of the combustion chamber C AFTER CLEANING vacuum all remaining debris as necessary Inspect burner swing door insulation and rope gasket for signs of damage If damaged replace as needed D ...

Page 53: ...to a dirty or inadequate chimney The interior of the chimney flue must be inspected and cleaned before the start of the heating season and should be inspected periodically throughout the heating season for any obstructions A clean and unobstructed chimney flue is necessary to allow noxious fumes that could cause injury or loss of life to vent safely and will contribute toward maintaining the boile...

Page 54: ... pump Water in the fuel in smaller amounts will cause excessive wear on the pump but more importantly water doesn t burn It chills the flame and causes smoke and unburned fuel to pass out of the combustion chamber and clog the flueways of the boiler SECTION XI TROUBLE SHOOTING 8 COLD OIL If the oil temperature approaching the fuel pump is 40 F or lower poor combustion or delayed ignition may resul...

Page 55: ...uit SMC is designed to provide lockout in the event of a stuck or welded motor relay NOTICE If flame is not established within 15 seconds of oil valve actuation known as Trial For Ignition TFI lockout will occur Lockout is indicated by a red LED solid on located on the oil primary control Latch up will occur if the control locks out three 3 times during a call for heat This is indicated by steady ...

Page 56: ...Boiler Co Inc Wholesale Distributor Should you require assistance in locating a Wholesale Distributor in your area or have questions regarding the availability of U S Boiler Co Inc products or repair parts please contact Burnham Customer Service at 717 481 8400 or Fax 717 481 8408 Bare Boiler Assembly ...

Page 57: ...16 x 20 3 4 Lg 80861012 1 Lower Tie Rod 3 8 16 x 27 Lg 80861018 1 1G 3 8 Flat Washer USS Plain 80860600 4 4 4 4 1H 3 8 16 Heavy Hex Nut Plain 80860400 4 4 4 4 1J Spanner Bar w Threaded Inserts 1 1 4 x 1 1 2 x 20 3 8 Lg 100012 02 2 2 Spanner Bar w Threaded Inserts 1 1 4 x 1 1 2 x 26 3 8 Lg 100012 03 2 Spanner Bar w Threaded Inserts 1 1 4 x 1 1 2 x 32 3 8 Lg 100012 04 2 1K Carriage Bolt 3 8 16 x 1 1...

Page 58: ...58 Bare Boiler Assembly ...

Page 59: ...ated 80860611 2 2 2 2 1AA Smokebox 100021 01 1 1 1 1 1BB 5 16 Flat Washer USS Plated 80860611 4 4 4 4 1CC Cap Screw 5 16 18 x 3 4 Lg Plated 80861340 4 4 4 4 1DD 1 4 NPT Pipe Plug Square Head Brass 806603542 1 1 1 1 1EE Smokebox Collar 6 Dia 100093 01 1 1 1 7 Dia 100094 01 1 1FF 5 16 Flat Washer USS Plated 80860611 2 2 2 2 1GG Cap Screw 5 16 18 x 7 8 Lg Plated 80861371 2 2 2 2 1HH Cast Iron Clean C...

Page 60: ...60 Jacket Assembly ...

Page 61: ...4 03 1 1 100614 04 1 100614 05 1 2K Jacket Left Side Panel 3 Section 100581 03 1 1 Jacket Left Side Panel 4 Section 100581 04 1 Jacket Left Side Panel 5 Section 100581 05 1 2L Jacket Right Side Panel 3 Section 100583 03 1 1 Jacket Right Side Panel 4 Section 100583 04 1 Jacket Right Side Panel 5 Section 100583 05 1 2M Jacket Top Panel 3 Section 100585 03 1 1 Jacket Top Panel 4 Section 100585 04 1 J...

Page 62: ...62 MST288 Thru MST629 Steam Boilers Trim and Controls ...

Page 63: ...co 13 511 08 81660530 1 1 1 1 3M Gauge Glass Set 6 Conbraco 20 104 10 8056091 1 1 1 1 3N Low Water Cut off McDonnell Miller 67 80160597 1 1 1 1 3P Nipple 1 1 2 NPT x 5 Lg 808600060 1 1 1 1 3Q Tee 1 1 2 x 1 1 2 x 3 4 806601105 1 1 1 1 3R Drain Valve 3 4 NPT Conbraco 35 302 03 806603061 1 1 1 1 3S Limit Honeywell L4006A2015 80160400 1 1 1 1 3T Well 1 2 NPT x 3 Honeywell 123872A 80160497 1 1 1 1 3U O...

Page 64: ...64 Beckett AFG Burner ...

Page 65: ...lectrode Clamp Screw 4219 4219 4219 4219 Electrode Insulator Assembly 5780 5780 5780 5780 Support Spacer Assembly 5992 5992 5992 5992 Escutcheon Plate Adjusting Plate Assembly 5941 5941 5941 5941 Head 5913 5913 5913 5913 Head Screws 4221 4221 4221 4221 Flange Gasket 3811 3811 3811 3811 AFG Housing 5874GY 5874GY 5874GY 5874GY Motor 21805E 218 21805E 218 21805E 218 21805E 218 Nozzle Adapter 213 213 ...

Page 66: ...IELLO OIL BURNER PART NUMBERS FOR MEGASTEAM 3 Pass Oil BOILERS For replacement Riello oil burner parts contact your wholesaler or the burner manufacturer Riello Corporation of America 35 Pond Park Road Hingham Massachusetts 02043 Telephone 617 749 8292 Facsimile 617 740 2069 Toll Free outside Massachusetts 800 992 7637 Riello Canada Inc 2165 Meadowpine Blvd Mississauga Ontario L5N 6H6 Telephone 90...

Page 67: ...iello Burner Specifications r e l i o B l e d o M r e n r u B l e d o M r e n r u B t u p n I H P G e l z z o N e t a G r i A g n i t t e s r o t a l u b r u T g n i t t e s p m u P e r u s s e r P I S P n o i t s u b m o C d a e H n o i t r e s n I h t p e D h c n I x o r p p A g n i p p i h S O C 2 e l f f a B n o i t a c o L s s a P k c a t S x o r p p A e s a e r c n I p m e T s e l f f a B t ...

Page 68: ...einstalling the alleged defective part or its replacement and all labor and material connected therewith and transportation to and from U S Boiler Company Inc b Components that are part of the heating system but were not furnished by U S Boiler Company Inc as part of the residential boiler c Improper burner adjustment control settings care or maintenance d This warranty cannot be considered as a g...

Reviews: