background image

Read and understand this entire manual before riding!

Owners Manual

TT Series Electric Minibike

Summary of Contents for TT Series

Page 1: ...Read and understand this entire manual before riding Owners Manual TT Series Electric Minibike ...

Page 2: ......

Page 3: ...ng Guide 21 23 TT250 Side View 24 TT350R TT450R TT750R Side View 25 TT250 Electrical Diagram 26 TT350R TT450R TT750R Electrical Diagram 27 Warranty Information 28 Contents NOTE Manual illustrations are for demonstration purposes only Illustrations may not reflect exact appearance of actual product Specifications subject to change without notice ...

Page 4: ... affected by the rider s size weight or skills Any rider unable to fit comfortably on the Mini Bike should not attempt to ride it A parent s decision to allow his or her child to ride this product should be based on the child s maturity skill and ability to follow rules DO not exceed the maximum recommended rider weight WARNING Rider weight does not necessarily mean a person s size is appropriate ...

Page 5: ...ated with downhill rides Never risk damaging surfaces such as carpet or flooring by use of an electric mini bike indoors Do not ride at night or when visibility is limited PROPER RIDING ATTIRE Always wear proper protective equipment such as an approved safety helmet with chin strap securely buckled A helmet may be legally required by local law or regulation in your area Elbow pads and knee pads a ...

Page 6: ... See page 10 12 for charging information During assembly you can familiarize yourself with the vehicles components and design Enjoy the process and take your time to insure all components are safe and secure REQUIRED TOOLS WARNING DO NOT USE NON Burromax PRODUCTS WITH YOUR Burromax vehicles These vehicles have been built to certain Burromax design specifications The original equipment supplied at ...

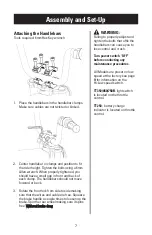
Page 7: ...n throttle control Attaching the Handlebars Tools required 6mm Hex Key wrench 1 Place the handlebars in the handlebar clamps Make sure cables are not twisted or kinked 2 Center handlebar in clamps and position to fit the rider height Tighten the bolts using a 6mm Allen wrench When properly tightened you should have a small gap in front and back of each clamp The handlebars should not move forward ...

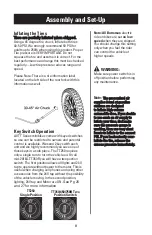
Page 8: ...duct Proper Tire pressure is VERY IMPORTANT Do not squeeze the tire and assume it is correct For the best performance and range this must be checked regularly Low tire pressure reduces range and speed Please Note There is a tire information label located on the left side of the rear fork with this information as well Key Switch Operation All TT Series minibikes come with keyed switches so use can ...

Page 9: ...ol the vehicle at higher speeds To switch from low speed to high speed does not require the removal of the side cover Please see below 1 High Low speed switch is hidden under the battery cover as shown below There is a small hole in the top of the battery side cover Insert a small tool the size of a toothpick and Move front to back this will select the switch to your desired position O for high sp...

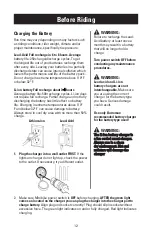
Page 10: ...y Turn power switch OFF before charging and conducting any maintenance procedures The Lead Acid Battery Your new electric mini bike is partially charged from the factory Charge before Riding Standard Lead Acid TT250 To achieve the best performance and life from your new battery the first charge and full discharge cycles are important After the first charge Run the battery down not dead and then re...

Page 11: ...ou should charge the battery for at least 4 hours to ensure a full charge The Lithium Battery offers you less weight 1 3 the weight of similar size lead acid battery Longer run times approximately twice as long as lead acid battery Shorter charging times partial charge okay fully recharge in 3 4 hours 75 charge in 1 1 2 hour No need to cycle the battery it has no memory Longer life 500 charge and ...

Page 12: ...recharge them after every ride Leaving your batteries in a partially discharged state can cause internal sulfation which lowers the performance and life of the battery pack Do not charge in extreme temperature above 110 F or below 32 F Li ion battery Full recharge about 3 4 hours Average battery life 500 recharge cycles Li ion does not require full recharge Partial charge and not fully discharging...

Page 13: ...e rare it is possible for an aggressive rider to run into a curb or wall and wreck bend or break a frame fork or suspension components Get in the habit of inspecting your s regularly Tire Inflation Tires are Not Fully inflated when shipped Using an air compressor equipped with a 45 degree end inflate both tires to 40 50 PSI Heavier riders us 50 PSI This information is also located on the left side...

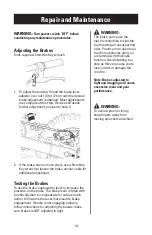
Page 14: ...To use the brake squeeze the lever to increase the pressure on the brake The brake lever is fitted with a cable adjuster to compensate for cable stretch and or to fine tune the lever movement to brake engagement If brake is not engaging properly follow instructions for adjusting the brakes make sure brakes is NOT adjusted to tight WARNING Turn power switch OFF before conducting any maintenance pro...

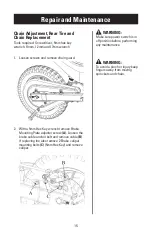
Page 15: ...d chain Chain Adjustment Rear Tire and Chain Replacement Tools required Screwdriver 5mm hex key wrench 10mm 12mm and 17mm wrench 1 Loosen screws and remove chain guard 2 With a 5mm Hex Key wrench remove Brake Mounting Plate adjuster screw A Loosen the brake cable anchor bolt and remove cable B If replacing tire also remove 2 Brake caliper mounting bolts C 5mm Hex Key and remove caliper ...

Page 16: ...m moving sprockets and chain Chain Adjustment Rear Tire and Chain Replacement 3 With 12mm and 17mm wrenches loosen the axle Remove the rear axle and remove the chain from the sprocket pull the wheel out Replacing the chain requires removal of a Master Link Removing outer retainer allows this link to be removed Be careful not to damage clip Note Install clip as shown ...

Page 17: ...Install the new chain or wheel by slipping the chain around the axle Slide the axle with hardware into the slots on the frame Maneuver the chain onto the sprocket on the rear wheel and motor 5 Tighten chain adjusters using 10mm wrench evenly to remove some slack from the chain as required TT250 TT250R TT350R B 1 Rear Wheel Axle B 2 Rear Axle Adjuster 2 B 3 Mounting Plate Brake Caliper B 4 Spacer 2...

Page 18: ...e cable wire into the cable anchor Install the cable to its original position and tighten securely 8 Tighten the brake mount plate bolts A and C securely Re attach the chain guard Test ride Readjust as needed Chain and Sprocket Notes The chain will typically have a loose spot and tight spot corresponding with a sprocket rotational position This is normal and common to all chain driven products due...

Page 19: ...d replace with a new one of equal amperage A small spark may occur when install the new fuse Requires 30 amp fuse Close the fuse cover and reattach the battery cover Battery Replacement Lead Acid batteries 2 12v 7ah should be replaced in sets only and with original Burromax Batteries Li ion battery 24V and 36V Non replaceable internal breaker only use the Burromax Li ion battery and Li ion Battery...

Page 20: ...eturn exhausted batteries to a federal or state approved lead acid battery recycler or a local seller of automotive batteries Electric Mini Bike Disposal Electric Mini Bike must be recycled or disposed of in an environmentally sound manner Charger Care and Disposal The charger supplied with the bike should be regularly examined for damage to the cord plug enclosure and other parts and in the event...

Page 21: ...ill recharge An excessive overload such as too heavy a rider or too steep a hill could cause the motor to overheat Replace the fuse with a new one of equal amperage Correct the conditions that caused the fuse to burn out and avoid repeatedly burning out fuse Contact your local Burromax authorized dealer for diagnosis and repair Charge the battery A new Lead Acid battery should have been depleted a...

Page 22: ...iably will lose some pressure between the point of manufacturing and your purchase Refer to instructions on page 8 of this manual to properly inflate tires Refer to brake adjustment instructions on page 14 of this manual Use only on solid flat clean and dry surfaces such as pavement or level ground The tires are inflated when shipped but they invariably will lose some pressure between the point of...

Page 23: ...ual to properly adjust brakes Apply a lubricant such as 3 in 1TM or Tri Flow TM or motorcycle chain lube the chain Refer to page 15 18 for adjustment and alignment instruction Problem Possible Cause Solution NOTICE When the Lithium battery has been run down depleted below the cut off voltage of 21v it may be necessary to disconnect the battery and then reconnect to get the battery to recharge Care...

Page 24: ...24 TT250 Side View TT250 Main ...

Page 25: ...lastic body shown below The total circuit amperage available is 2 8 Amps Do not over load We recommend max of 1 4 Amps per plug This is not a fused circuit and overloading or shorting this circuit will cause Controller Failure See page 27 for more information Never attempt to work on this circuit with the Key on ...

Page 26: ...26 TT250 Electrical Diagram Electrical Schematics Speed Control and Battery Charge Indicator ...

Page 27: ...t a fused circuit and overloading or shorting this circuit will cause Controller Failure Never attempt to work on this circuit with the Key on This circuit is designed for accessories such as USB Ports and Extra LED Lighting Accessories from Burromax are designed to plug in and are correctly matched for this cicuit others may not be This circuit is NOT Designed for other devices requiring higher a...

Page 28: ... warranty If you have purchased an extended warranty it must be honored by the store at which it was purchased For your records save your original sales receipt with this manual Fill Out the product registration page ONLINE or mail it to Burromax 1200 Reco Ave Crestwood MO 63126 All Warranty request will be evaluated by Burromax and final determination will be made at our sole discretion used in a...

Page 29: ...male Rider Is this your first Burromax product Other similar product owned before How did you hear about the product Age Zip Purchase Date PLEASE FILL OUT AND MAIL TO Burromax LLC 1200 Reco Ave Crestwood MO 63126 OR REGISTER ONLINE AT www BURROMAX com We welcome your comments and suggestions for Burromax products ...

Page 30: ... TT Series Electric Minibike 091218 FOLLOW US BURROMAX Burromax LLC 1200 Reco Ave Crestwood Mo 63126 WWW BURROMAX COM Email us info Burromax com CUSTOMER SERVICE SUPPORT Hours 9a 5p M F CST 1 800 742 1189 ...

Reviews: