background image

Advanced settings

7.

2

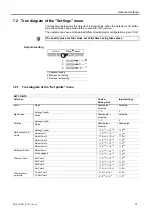
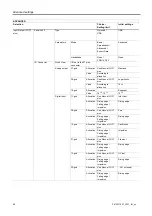
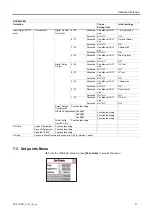
  Tree diagram of the "Settings" menu

The following table shows the detector's initial settings. When the detector is off, all the 

memorised values and parameters are saved for the next use.
The operator can save and download different leak detector configurations 

(see 7.8.1

2

)

.

The saved values are the values set at the time saving takes place.

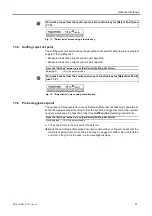
Set point setting

1 Exponent setting 
2 Mantissa unit setting
3 Mantissa tenth setting

1
2
3

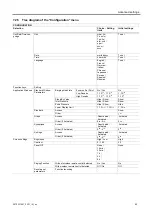
SET POINTS
Selection

Choice - 

Setting limit

Initial settings

Audio

Status

Deactivated / 

Activated

Activated

Setting (If valid)

1 - 9

3

Digital voice

Status

Deactivated) / 

Activated)

Activated

Setting (If valid)

1 - 9

4

Pollution

Status

Deactivated / 

Activated

Deactivated

Setting (If valid)

1·10

+19

 - 1·10

-19

1·10

-05

Hard Vacuum Set 

Points

Reject point

1·10

+06

 - 1·10

-13

1·10

-08

Sniffer set Points

Reject point

1·10

+06

 - 1·10

-12

1·10

-04

Probe clogged

1·10

+19

 - 1·10

-19

1·10

-06

7.

2

.1  Tree diagram of the "Set point

s

" menu

Reject Point 2 

1·10

+19

 - 1·10

-19

1·10

-07

Reject Point 3 

1·10

+19

 - 1·10

-19

1·10

-07

Reject Point 4 

1·10

+19

 - 1·10

-19

1·10

-07

Reject Point 5 

1·10

+19

 - 1·10

-19

1·10

-07

Set Point 2 

1·10

+19

 - 1·10

-19

1·10

-07

Set Point 3 

1·10

+19

 - 1·10

-19

1·10

-07

Set Point 4 

1·10

+19

 - 1·10

-19

1·10

-07

Set Point 5 

1·10

+19

 - 1·10

-19

1·10

-07

Other set Point

Pr. Set Point 1 

3·10

+2

 - 5·10

-5

2·10

-01

Pr. Set Point 2 

3·10

+2

 - 5·10

-5

1·10

0

Other pressure 

set points

39

0870231897_0001_IM_en

Summary of Contents for 0659230708

Page 1: ...Instruction Manual TAPIR Helium Leak Detector HL 2216 A 2021 12 Busch Produktions GmbH Schauinslandstra e 1 79689 Maulburg Germany 0870231897 0001_en Original instructions Modifications reserved...

Page 2: ...erating conditions 16 5 3 Set up 16 5 3 1 Storing the lifting handles 16 5 3 2 Control panel equipment 17 5 4 Filling with oil 17 5 5 Connection to the mains power supply 18 5 6 Operating for the firs...

Page 3: ...alibratedleak 30 6 5 3 Calibration procedure with external leak in Hard Vacuum test 30 6 5 4 Calibration procedure with external leak in Sniffing test 30 6 5 5 Calibration on concentration 31 7 1 3 Sc...

Page 4: ...75 11 3 Units of measurement 75 11 4 Dimensions 76 EU Declaration of Conformity 77 7 7 Configuration Menu 60 7 7 1 Time Date Unit Language 60 7 7 2 Function keys 61 7 7 3 Application screens 62 7 7 4...

Page 5: ...rs to the current state of the product s development The documentation remains valid as long as the customer does not make any changes to the product Up to date operating instructions can also be down...

Page 6: ...rious injury CAUTION Possibly imminent danger Indicates an imminent hazardous situation that can result in minor or moderate injury NOTICE Command or note Command to perform an action or information a...

Page 7: ...operator must handle the product using the devices shown on this label comply with the rules for moving the equip ment taking weight and dimensions into account Indicates an electric shock hazard in c...

Page 8: ...directive 2012 19 EU Pu_GL 1 Pu_N 1 Mu_GL 12856 Mu_N 31 Mu_Cal 1 Mu_LDS 1800 Factory Firmware Logiciel usine L0232 V3302 E17D L0264 V3200 FD87E7D L0285 V3200 8C9D DD MM YY 1 2 3 4 NOTICE PUMP IS SHIP...

Page 9: ...case of contact When the product s circuit breaker is set at O some internal components still have an electrical charge Make sure that the mains connection is always visible and accessible so that it...

Page 10: ...Filling with oil Oil must be added to the primary pump before the detector is switched on DANGER Health hazard in case of contact with the operating fluid Contact with or inhaling products such as oil...

Page 11: ...s pumping of condensing vapors pumping dust or solids particules operation in potentially explosive areas analysis of gas with a hydrogen concentration higher than 5 testing parts that are soiled or t...

Page 12: ...ly tightened To lift the product Use a lifting device appropriate for the product s weight Use a 3 section strap with the following characteristics length of each section 500 mm load per section 350 k...

Page 13: ...e inlet port In the menu Test check that the hard vacuum test method is selected that the air inlet valve is set to Operator Start a test by pressing wait until the detector reaches the most sensitive...

Page 14: ...ble for Europe France Germany and or 1 power cable for US 2 lifting handles installed on the product 1 calibration certificate for the internal calibrated leak 1 funnel 1 oil can 1 draining connector...

Page 15: ...SD card Detector inlet Inlet port Sniffer probe connection 1 STANDARD SNIFFER Primary pump Exhaust EXHAUST Air inlet Switch Circuit breaker 1 USB plug USB Neutral gas inlet purge VENT PURGE 2 RS 232...

Page 16: ...e detector s inlet port on the top Choose the location for set up according to the dimensions of the detector chapter Technical Characteristics see 11 2 Move the detector with a hoist using the handli...

Page 17: ...a horizontal position Open the cover Remove the oil fill cap 1 from the rotary vane pump 2 DANGER Health risk in case of oil contact The pumps are delivered empty of oil the oil is delivered in separa...

Page 18: ...ime and date the operator can modify this at a later time see 7 7 1 1 2 Max Min 3 WARNING Risk of electromagnetic disturbance The product s EMC behavior is guaranteed only if the relevant EMC standard...

Page 19: ...quality of the mechanical connections When assembling the vacuum circuit use accessories to shut off the product and make maintenance easier inlet shut off valves purge systems etc Comply with these...

Page 20: ...The detector s primary pump is equipped with an internal oil mist eliminator The operator can connect an external eliminator instead of this internal eliminator 20 0870231897_0001_IM_en Installation...

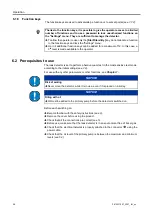
Page 21: ...Start Stop 3 Changing the application screens return to the home page standard screen from any menu 4 Remote control connection not available 5 Quick access to the functions Functions assigned to a ke...

Page 22: ...ing the values Moving to the next function screen parameter Return to the previous display Return to the previous display and confirm the changes made Return to the previous display without confirming...

Page 23: ...n 1 Standard screen home Information about the current test 2 Graph screen Monitoring and recording the leak rate and or the inlet pressure 3 Vacuum circuit screen Vacuum circuit of the detector and t...

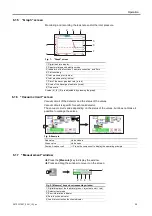
Page 24: ...creen Information about the test 1 Digital display of the leak rate green reject set point red 2 Bargraph display of the leak rate adjustable scale 3 Detector status and Detection mode 4 Access error...

Page 25: ...nalyzer cell Press the component to display the operating principle Fig 9 Measure key and corresponding window 1 Digital display of the leak rate green reject set point red 2 Detector test mode 3 Erro...

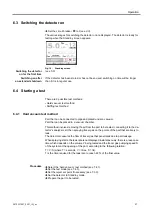
Page 26: ...minimum levels see 5 4 NOTICE Risk of seizing Never move the detector while it is in use even if it is placed on a trolley NOTICE Filling with oil Oil must be added to the primary pump before the dete...

Page 27: ...m the part to be tested connecting it to the de tector s analyzer cell then spraying tracer gas on the points of the part that are likely to leak The detector measures the flow of tracer gas that pene...

Page 28: ...the part to be tested to the leak detector inlet port The various test stages are displayed When the detector has reached the most sensitive test mode wait for the measurement to stabilise the measure...

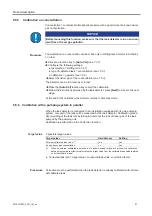
Page 29: ...brated leak in the range 10 8 Pa m3 s 10 7 mbar l s When switching the leak detector on calibration with the internal calibrated leak is auto matically initiated if the calibration parameter is set on...

Page 30: ...Correct the temperature month and year if necessary Select the tracer gas of the external calibrated leak see 7 5 3 Place the external calibrated leak on the detector inlet port Verify that the detect...

Page 31: ...is in an environ ment free of tracer gas pollution 6 5 6 Calibration with a pumping system in parallel Target value When the leak detector is connected to an installation equipped with its own pumping...

Page 32: ...illuminated on the control panel as soon as the value of the correction factor is not 1 The digital display takes into account the correction factor applied The bargraph display does not take into acc...

Page 33: ...tically when power is restored 6 8 Saving and downloading the product s configuration When a detector is installed or replaced it is helpful to copy the configuration all the pa rameters and operating...

Page 34: ...ss on the graph and on Scale to change the graph parameters 1 Digital leak rate display 2 Detector status and detection mode 3 Indicators of the functions Leak rate correction and Zero 4 Plot recordin...

Page 35: ...During a recording all the detector functions are available After the detector is switched off cut off at the mains or by the operator the recordings already made are stored in the memory For the next...

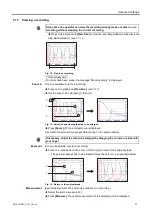
Page 36: ...mp and txt files include only the measurement points displayed on the screen to include all points you must be positioned on the relevant plot without zooming if a zoom was carried out before saving t...

Page 37: ...cept in the same decade Zoom out Zoom out available only for a recording Press on 2 occasions on the zoom 1 then 2 to return to the original graph The point 2 always has to be situated before the poin...

Page 38: ...point 3 Moment the measurement took place in relation to the start of the recording 4 Navigation between next previous recorded points 5 Displaying the tracer gas leak rate in red or the inlet pressur...

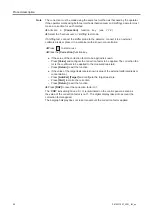
Page 39: ...Status Deactivated Activated Activated Setting If valid 1 9 4 Pollution Status Deactivated Activated Deactivated Setting If valid 1 10 19 1 10 19 1 10 05 Hard Vacuum Set Points Reject point 1 10 06 1...

Page 40: ...rator Delay 0 2 s 0 s Vent Timer Status Deactivated Activated Activated Setting If Activated 0 1 h 9 s Memo function Active No Yes No Display Time Status Deactivated Activated Activated Setting If Act...

Page 41: ...de tector Calibration valve Closed open Closed Loss Per Year 0 99 6 Reference Temperature C 0 99 23 Temperature Coefficient c 0 0 9 9 3 0 Year Refer to certificate delivered with the de tector Intern...

Page 42: ...mer Function launching Secondary Pump 1 Timer h 20 Time interval h 17200 Reset Timer Function launching Speed rpm If Hard vacuum test method 90000 Detector Information Access to Detector general infor...

Page 43: ...0 1 10 12 1 10 2 Stand By Value Hide Show Show Inlet Pressure Hide Show Show Extra Pressure Hide Show Hide Lower Display Limit 1 10 19 1 10 19 1 10 13 Standard Access Show Order 1er Graph Access Deac...

Page 44: ...Background Suppression Activation Off On On Crossover Pressures Gross Leak 2 5 10 1 1 10 1 2 5 10 1 Normal 5 10 1 1 10 1 5 10 1 Calibration Calibration Operator Start Up Manual Operator Calibration ch...

Page 45: ...s Serial link 1 Type Serial USB Serial Parameters Mode Basic Spreadsheet Advanced Data export Module Ext Advanced Handshake None XON XOFF None Power Pin 9 5 V ADVANCED Selection Choice Setting limit I...

Page 46: ...l I O 37 pins Inlet Vent Activation Rising edge Falling edge Impulsion Rising edge 30 gnd Allocation See Manual I O 37 pins Zero Activation Rising edge Falling edge Impulsion Rising edge 12 gnd Alloca...

Page 47: ...cation See Manual I O 37 pins GL Test Activation NO NC NO 4 23 Allocation See Manual I O 37 pins N Test Activation NO NC NO 3 22 Allocation See Manual I O 37 pins Filament on Activation NO NC NO 2 21...

Page 48: ...or parts that are accept ed rejected in a hard vacuum test Measured leak rate reject set point part accepted Measured leak rate reject set point part rejected The reject set point is memorized for eac...

Page 49: ...niffer probe Operating instructions The set point unit is the unit set for the detector Block the end of the sniffer probe from time to time with your finger to check that the leak rate is going down...

Page 50: ...Switching from Sniffing test to Hard Vacuum test After modifying the settings a transition duration of 30 s during which neither the test nor the calibration can be performed Fig 20 Method screen usin...

Page 51: ...be applied For quick access from the control panel set a function key for Correction see 7 7 2 Depending on the concentration of tracer gas used for detecting leaks the leak rate displayed changes Exa...

Page 52: ...nction to use to automate small production From the Settings screen press Test Inlet vent Inlet vent Activate the function Function activated if automatic is set Delay Setting required if automatic is...

Page 53: ...ctivate the display time delay On the value of the measured leak rate flashes for the set duration Off the value of the measured leak rate will flash until a new test begins Set the display duration F...

Page 54: ...arry out a test 4 He only on a very gross leak in case the detector does not switch to Gross Leak mode and remains in roughing Function activated and pressure 100 hPa pressure stabilized during at lea...

Page 55: ...Advanced settings 7 5 Spectro Menu From the Settings screen press Spectro 55 0870231897_0001_IM_en...

Page 56: ...rement 2 filaments in the analyzer cell Filament Indicates if the filament used is on or off when the detector is switched on Fil status Indicator of analyzer cell performance Initial settings between...

Page 57: ...d on Filament 1 Number of hours that filament 1 is on Press xxx h Counter reset to reset the counter Filament 2 Number of hours that filament 2 is on Press xxx h Counter reset to reset the counter Cal...

Page 58: ...for the pump XXX in relation to the interval set Counter Indicates the number of operating hours for the pump since the latest reset of the counter Time Interval Set the value for the counter When the...

Page 59: ...de Event Description I300 Inlet vent Inlet vent I301 Stp on pollution Test stops automatically if leak rate pollution Pollution I302 RVP ctr reset Primary pump hour counter reset I303 TMP1 ctr reset S...

Page 60: ...he leak detector can be shut down Optional to carry out an additional inlet vent before shutting down the detector press Stop Vent If the operator does not want to shut down the detector press Restart...

Page 61: ...location objective Select the Correction function 1 using the and Fig 29 Selecting the function Select the Mode function key 2 by pressing repeatedly key selected if background is white START STAND BY...

Page 62: ...The operator can hide one or more screen or switch the order in which they appear The Standard application screen is always available in 1st position The screen order can be modified press the order...

Page 63: ...for leak rate Leak rate not displayed if the value is less than the Lower Display Limit configured value From the Settings screen press Config Application Windows Std Window Parame ters Leak Rate Bar...

Page 64: ...e Press Change Password Enter the new password and validate User level From the Settings screen press Config Access Password User level 3 user levels can be used to restrict the display and operator a...

Page 65: ...pressure and cell pressure hidden Key valid Measured leak rate and reject set point displayed only in test Fig 38 Displays with Medium access Press and hold the key until the Settings screen is displa...

Page 66: ...s User Level Change the access level see below the limits for each level Operator with Full access changing the access level From the Settings screen press Config Access Password Enter the current pas...

Page 67: ...rt up timer From the Settings screen press Advanced Leak Detection Background Supp Activation Activate the function on if activated This function is recommended for testing very small leaks which impr...

Page 68: ...e limits allowed the leak detector is properly calibrated If the ratio is outside those limits a message appears suggesting that a full calibration of the leak detector be started 7 8 6 Leak Detection...

Page 69: ...inlet external Possible gauges The gauge and the cable are the client s responsibility Settings Internal T C or External T C Internal indicates the temperature at the detector s internal calibrated le...

Page 70: ...acquisition of data sent to the hyperterminal according to a defined time duration At any time a command can be sent to the leak detector Recommended mode during leak detector test procedure setting o...

Page 71: ...reen press Advanced SD card Load Detector Param Load the saved parameters onto the SD card Save Detector Param Save the leak detector parameters to the SD card View BMP View the saved bmp files Creati...

Page 72: ...ecifies maintenance intervals maintenance instructions shutting the product down tools and spare parts NOTICE Disclaimer of liability Busch accepts no liability for personal injury or material damage...

Page 73: ...riginal packaging Sending contaminated pumps or devices No devices will be accepted if they are contaminated with micro biological explosive or radioactive substances Hazardous substances are substanc...

Page 74: ...ction 2 5 m UK 0985230815 Sniffer probe 5 m hose 9 cm long tip 0659230817 Helium spray gun 0995230816 Inlet filter 5 m 1 0945232413 Inlet filter 40 m 1 0945232414 Transport trolley 0943232412 74 08702...

Page 75: ...rement Conversion table pressure units Parameter TAPIR HL 2216 A Flange in DN 25 ISO KF Pumping speed for He 2 5 l s Backing pump capacity 15 m3 h Start up time 20 C without calibration 3 min Noise le...

Page 76: ...133 1 1 Pa 1 N m2 mbar l s Pa m3 s sccm Torr l s atm cm3 s mbar l s 1 0 1 59 2 0 75 0 987 Pa m3 s 10 1 592 7 5 9 87 sccm 1 69 10 2 1 69 10 3 1 1 27 10 2 1 67 10 2 Torr l s 1 33 0 133 78 9 1 1 32 atm...

Page 77: ...of Electrical and Electronical Equipments 2012 19 EU This directive does not imply CE marking and comply ies with the following designated standards that have been used to fulfil those provisions Stan...

Page 78: ...of Hazardous Substances 2011 65 EU Waste of Electrical and Electronical Equipments 2012 19 EU This directive does not imply CE marking and comply ies with the following designated standards that have...

Page 79: ...Note 79 0870231897_0001_IM_en...

Page 80: ...taly info busch it Japan info busch co jp Korea busch busch co kr Malaysia busch busch com my Mexico info busch com mx Netherlands info busch nl New Zealand sales busch co nz Norway post busch no Peru...

Reviews: