background image

Bush Palace 

Dominator

 Setup Guide 

© 2017 Bush Palace Camper Hire 

I

NTRODUCTION


Thanks for hiring the Bush Palace Dominator.  It is supplied with everything you need to take it away 

and enjoy your holiday. 

These instructions assume that you have never used a hard floor style camper before; if you have 

there may still be some steps that are unique to this camper.  Please follow the instructions carefully to 

minimise the setup time and to ensure that the camper remains in excellent condition. 

Please also read the ‘

Additional Manufacturers Information

’ which covers some important care items 

that you are responsible whilst hiring the camper 

The instructions may appear daunting, but in practice they are easy to follow and you will have the 

camper set up in no time! 


We hope that the Bush Palace Dominator has everything that you need; if there is anything that 

you are not happy with we would ask that you contact us and give us the opportunity to fix it 

for you.  If you have any issues you can contact us on- 

Kathryn – 0435 918405 

David – 0407 780281 

Email help@bushpalace.com.au 

We would love to hear your feedback.  Please take a moment to leave a comment on Camplify, 

and send us a photo of where your adventures have taken you! 


Happy camping, 


Kathryn & David 

Summary of Contents for Dominator

Page 1: ...THE BUSH PALACE DOMINATOR SETUP GUIDE March 2017 Version 1 0 ...

Page 2: ...anufacturers Information which covers some important care items that you are responsible whilst hiring the camper The instructions may appear daunting but in practice they are easy to follow and you will have the camper set up in no time We hope that the Bush Palace Dominator has everything that you need if there is anything that you are not happy with we would ask that you contact us and give us ...

Page 3: ...R 7 KITCHEN SETUP 9 MISCELLANEOUS SETUP 9 SIT DOWN ENJOY 10 PACKING UP 11 INITIAL STEPS 11 HOOKING UP 12 FINAL CHECK 13 POLE GUIDE 14 INVENTORY 15 OPTIONAL ITEMS 18 TV DVD 18 SATELLITE DISH 18 Unpack 18 Pack away 20 INFLATABLE KAYAKS 21 Setup 21 Packing away 21 GAZEBO 22 GIC BLACK SERIES TRAILER CARE GUIDE 23 ANDERSON PLUG 23 WINCHES 23 JOCKEY WHEEL 23 STABILISER LEGS 23 CANVAS TENT SECTION 24 BAT...

Page 4: ... 12 pin socket to car using the portable brake controller if required Connect Anderson plug to vehicle if available The camper can not be towed unless the electric brakes are connected to your vehicle Make sure that the trailer handbrake is off check all lights for proper operation WATER If you intend to free camp please note that the camper is supplied with the water tank empty to keep the towing...

Page 5: ...st each wheel Put the jockey wheel into its bracket and tighten Disengage the hitch remove pin Raise the camper with the jockey wheel Move the vehicle away from the hitch Level the camper front to back using the jockey wheel to adjust the height again using the bubble level Drop each corner jack by pulling the blue handle wind them down using the winder handle in the front boot Replace bubble leve...

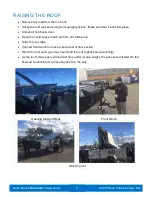
Page 6: ...atches door Open the control panel hatch and turn all switches on Undo the roof clips Connect front winch to hook at centre rear of floor section Winch the roof open you may need to lift the roof slightly before winching As the roof comes past vertical it will drop under its own weight the gas struts will slow the fall however be careful not to have hands etc in the way Opening the Roof Rack Front...

Page 7: ...ole 4 as the upright for the centre pole o Use poles 3 for the end uprights o Use 2 x pole 2 between each of the upright poles o Add a spreader pole 7 to each side of the roof o Add support poles 5 to either side or awning o Pull the awning roof across the poles and connect with the Velcro tabs and elastic hooks Open the camper door and lower steps Remove solar panel camp chairs and kitchen suppor...

Page 8: ...he internal roof these clip to the support hoops Clip the tent to the body of the camper using the press studs Velcro as appropriate The basic tent setup is now complete It is worth going around and adjusting all poles spreaders now to make sure they are tensioned properly without being too tight If they are too tight is can stretch and damage the canvas and will also increase the risk of heavy ra...

Page 9: ...s bottle MISCELLANEOUS SETUP Set up the window awnings if needed using 2 x pole 8 and spreader pole 6 for each one Front and rear window awnings use spreader pole 0 Set up the water heater using the instructions provided o The water heater can be connected to the water pump by running the water hose to the kitchen area and plugging it into the water connection there o Connect the gas regulator for...

Page 10: ...ro the ensuite room onto the left hand side of the awning Support using 2 x external 4 poles and guy ropes Pass the shower head through the small zip at the top of the ensuite tent Place chemical toilet in ensuite room and add chemicals as per instructions on bottles SIT DOWN ENJOY That s it All that s left to do is set up the table and chairs and relax Enjoy your holiday ...

Page 11: ...ndensation can form on an otherwise dry wall If the items have to be put away wet they must be opened and reassembled within 24 hours or mould may start to form If you return the camper wet we may have to charge an additional fee to cover the cost of drying and treating any mould including any lost rental resulting INITIAL STEPS Turn off all switches in control panel Zip all windows closed Disasse...

Page 12: ...nect rear winch to hook on right forward side of camper roof winch handle is stored in right rear small locker Winch closed stopping to make sure that all canvas is carefully folded inside the camper body When fully closed disconnect winch and wind in Return winch handle to storage Secure roof with all clips Close roof rack and secure clips Lock all hatches door HOOKING UP Raise front rear legs wi...

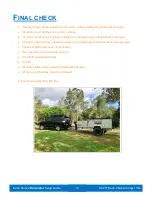
Page 13: ...e All cables and hoses have been neatly put in storage bags and returned to storage All poles pegs and guy ropes have been put in their bags and returned to pole storage Chocks Ramp removed and put away Roof secured with no canvas trapped Roof rack secured with clips Gas off All chairs table annex mat etc cleaned put away All doors and hatches closed and locked It should look something like this ...

Page 14: ...Bush Palace Dominator Setup Guide 2017 Bush Palace Camper Hire 14 POLE GUIDE ...

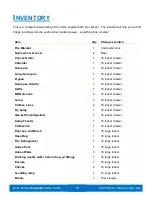
Page 15: ...r Frypan 1 r h locker drawer Saucepan Handle 1 r h locker drawer Kettle 1 r h locker drawer BBQ utensils 2 r h locker drawer Lamp 1 r h locker drawer Clothes Lines 2 r h locker drawer Fly spray 1 r h locker drawer Gas kettle collapsible 1 r h locker drawer Camp Toaster 1 r h locker drawer Clothesline 1 r h locker drawer Dust pan and Brush 1 r h large locker Hose Bag 1 r h large locker Fire Extingu...

Page 16: ...r Tea Towels 2 l h locker drawer Hand Towel 1 l h locker drawer Beer Coolers 2 l h locker drawer Tea 1 l h locker drawer Coffee 1 l h locker drawer Sugar 1 l h locker drawer Milk 1 l h locker drawer Olive Oil 1 l h locker drawer Salt and Pepper 1 l h locker drawer Paper towels 1 l h locker drawer Hotplate for use in BBQ 1 l h locker drawer Hot chocolate 1 l h locker drawer Steak knives 4 Kitchen s...

Page 17: ...Large knives 3 Kitchen sink Drawer Cleaning products Kitchen sink drawer Aluminium foil 1 Kitchen sink Drawer Cling wrap 1 Kitchen sink Drawer Tongs 2 Kitchen sink Drawer Gas fuse 2 Gas bottles First Aid Kit 1 Cabin drawer Sunblock 1 Cabin drawer Mosquito Repellent 1 Cabin drawer Tissue Box 1 Cabin drawer First Kit 1 Cabin drawer Mosquito coils 1 Cabin drawer Camping chairs 4 Cabin Table 1 Cabin Q...

Page 18: ...You may need to turn the antenna or adjust the angle of the horizontal arms to get the best picture Please see the leaflet in the folder for more details SATELLITE DISH This is a portable 85cm satellite dish configured for the Optus satellite that provides free to air services under the VAST scheme Viewer Access Satellite Television There are no subscription fees associated with the VAST service a...

Page 19: ...e been made properly the signal finder will now be powered on through the coax cable Using the elevation marks on the rear leg of the dish and the compass point the dish toward the satellite You may find it useful to use a satellite finder app on your smartphone to help here we use the satellite finder that is included in the Wikicamps application This has a camera function that allows you to see ...

Page 20: ...e decoder power cable and HDMI lead in its box into the satellite dish bag Fold the satellite dish and place it in the bag Carefully wind the 20m cable being sure to not introduce any kinks into the cable Place it onto the satellite dish Put the signal finder compass back into the pocket in the bag lid ...

Page 21: ...webbing strap on each side Make sure the bung is in before using but open it to drain any water after use Packing away The kayak should be dry and clean before packing away Fold seat flat by loosening webbing straps and Velcro strips The seat will sit flat if you rotate it 90degrees once straps are undone Deflate all inflation zones leaving the inflators open Pull the sides into the centre of the ...

Page 22: ...etup Stand the gazebo on its feet Pull the corners apart until they are fully extended horizontally Raise each leg to full height Peg down using the pegs and guy ropes provided Packing away is the reverse of the above please make sure that the gazebo is clean and dry If you have to pack it away in the rain please let us know so that we can dry it on return ...

Page 23: ...o assist in setting up To help assist with setting up and packing down please ensure to use both winches for setup and pack up Please note we JOCKEY WHEEL Always ensure your jockey wheel is secured with the handle wheel at least level with or higher than your draw bar This will reduce the possibility of damage being sustained However you must remember to loosen the handle allow the wheel to swivel...

Page 24: ...reme conditions some water may penetrate Seepage may occur in the seams through the needle holes created in the sewing process This is normal and can be corrected with the application of seam sealing compound It is suggested you purchase a wax stick or water proofing compound to keep with your camping equipment RAIN AND HEAVY WIND CONDTIONS When raining Please ensure to lower the awning to allow f...

Page 25: ...he body releases more moisture than the canvas can dispose of To minimize the chance of condensation we recommend slightly opening the window of the swag or tent to enable airflow on cold nights MOULD Most moulds need 24 48 hours of moisture to begin to grow Therefore if a suitable material in your camper tent is wet for more than 24 hours then you run the risk of mould starting to grow Many speci...

Page 26: ...ECAYS OVER 30MINS OR SO 12 75V 90 12 5V 80 12 4V 70 12 3V 60 12 2V 50 12 1V 40 REPEATED DISCHARGE TO THESE LEVELS WILL SHORTEN BATTERY LIFE 11 9V 30 11 6V 20 11 3V 10 PERMANENT DAMAGE WILL OCCUR 10 5V 0 We recommend to fully charge your camper trailer batteries with a suitable 240v battery charger before and after every use and If you re not using your batteries for long periods of time we recomme...

Reviews: