background image

Page 4

Preperation for use

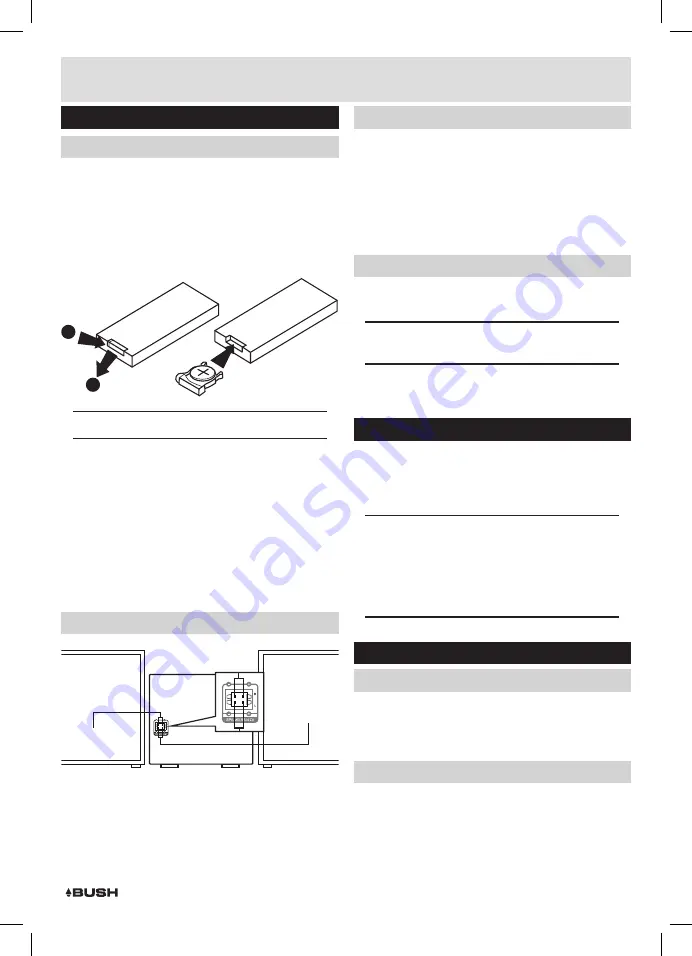
Remote control battery installation

1:

 Press the small tab (1) to the left of the battery insert 

(2) inwards . Then slide battery insert out of the main 
remote unit .

2

: Insert 

1

 x 

CR2025


battery

 into the removable battery 

slot

 taking note that the + polarity faces upwards .

3

: Replace the battery insert by simply pushing back 

into the space you removed it from .

1

2

 Notes on battery usage

•  Do not insert battery into the remote control in the 

wrong direction .

•  Do not charge, heat, open or short-circuit the battery .  

Do not throw battery into a fire .

•  If the remote control does not function correctly or if 

the operating range becomes reduced, replace the 
battery with a new one .

•  Improper replacement of batteries may result 

in explosive hazard . It must be replaced only by 
batteries with the same or equivalent type .

• 

Connecting the loud speakers

RIGHT SPEAKER

LEFT SPEAKER

REAR PANEL

1:

 Unwrap the speaker wires .

2:

 Place a speaker on either side of the main unit, 

preferably at the same height, and with at least 

150

mm between each speaker and the main unit . 


Connecting the loud speakers (cont)

3:

 Connect the speaker wires to the terminals on the 

rear of the unit 

(15)

 . Take care to match the speaker 

placed to the 

LEFT 

to the 

LEFT 

output on the rear of 

the unit . Repeat for the 

RIGHT 

speaker .

4:

 When connecting ensure the wire with a white stripe 

connects to the 

RED 

terminal and the wire with no 

stripe to the 

BLACK 

terminal .

Connecting the mains power

1:

 Connect the mains plug to a 

UK 

wall outlet .

2:

 Extend the pig tail antenna as far as it can go .

NOTE: The quality of the FM reception will be 
influenced 

by the positioning of the pigtail aerial . 

3:

 Press the 

STANDBY 

button 

(2

,

 18)

 to wake from 

standby .

Standby mode

1:

 Press the 

STANDBY 

button on the unit 

(2)

 or press the 

STANDBY 

button 

(18)

 on the remote to put the system 

into standby mode . To resume normal operation press 
either button again .

NOTE: This unit is designed to enter STANDBY 
mode automatically after 20 MINUTES 
(approximately) of inactivity. Press the STANDBY 
button to wake the unit. 
NOTE: When you power on the unit from standby 
the last used mode will resume.

General operation

Mute function

1:

 Press the 

MUTE 

button 

(33)

 at any time to silence the 

output . 

2:

 Press again to resume audio output .

Tone controls

Adjust the Bass & Treble tone controls if required.

1:

 Press the 

TONE 

button 

(28)

 on the remote control .

2:

 The first adjustment is Bass . Use the 

VOL+

/- buttons 

to adjust .

Installation

Summary of Contents for 267/6171 (D)

Page 1: ...installing or using 267 6171 D BUSH CD Hi Fi Micro System These instructions contain important information which will help you get the best from your appliance and ensure safe and correct installation use and maintenance If you need help or have damaged or missing parts call the Customer Helpline 0870 600 3030 AUDIO IN ...

Page 2: ...dio operation 5 Scanningforstations 5 Settingafrequencymanually 5 Finetuningthefrequency 5 Savingastationtoapresetchannel 5 Recallingstationpresets 5 CDoperation 6 Playback 6 SkippingTracks 6 FastSearchingTracks 6 RepeatOperation 6 Numericbuttons 6 Programmeplayback 6 RandomOperation 7 Connectinganexternalaudiodevice 7 UKMainspluginformation 7 Technicalspecifications 7 Care maintenance 7 Contactde...

Page 3: ...ctionsorasmarkedontheproduct Themainsplugisusedasthedisconnectdevice the disconnectdeviceshallremainreadilyaccessible Thissymbolmeansthatthisunitisdouble insulated Anearthconnectionisnotrequired CAUTION CLASS1LASERPRODUCT ThisproductutilizesaClass1laser ThislaserDVD Playerisequippedwithsafetyswitchestoavoid exposurewhenthedoorisopenandthesafety interlocksaredefeated Invisiblelaserradiationis prese...

Page 4: ...Tbutton 13 LEDdisplay 14 ANTENNAcable 15 SPEAKERterminals 16 MAINScable RemoteControl 17 REPEATbutton 18 STANDBYbutton 19 CDSOURCEbutton 20 FMRADIOSOURCEbutton 21 AUDIO AUX SOURCEbutton 22 RANDOMbutton 23 FFWD FRWDbuttons 24 PLAY PAUSEbutton 25 SAVEPRESETbutton 26 SEARCHbutton 27 MONO STEREO FM button 28 TONEbutton 29 VOLUME button 30 STOPbutton 31 SKIP PREVIOUS button 32 FREQUENCY FM ENTRYbutton ...

Page 5: ... cont 3 Connectthespeakerwirestotheterminalsonthe rearoftheunit 15 Takecaretomatchthespeaker placedtotheLEFTtotheLEFToutputontherearof theunit RepeatfortheRIGHTspeaker 4 Whenconnectingensurethewirewithawhitestripe connectstotheREDterminalandthewirewithno stripetotheBLACKterminal Connecting the mains power 1 ConnectthemainsplugtoaUKwalloutlet 2 Extendthepigtailantennaasfarasitcango NOTE Thequalityo...

Page 6: ...6 60 3 Whenenteredtheunitwillplaythestationfoundat thatenteredfrequency Ifstaticisheardandyouknow thefrequencyiscorrect re positiontheantenna Fine tuning the frequency Shouldyouneedtofinetuneafrequencyyoucan skip upordownthefrequencyrangein0 05MHz increments 1 Pressthe button 23 toskip0 05MHzupthe frequencyrange 2 Pressthe button 23 toskip0 05MHzdownthe frequencyrange Saving a station to a preset ...

Page 7: ...tonagainwillrepeatall tracksonthedisc 00 02 01 CD ALL Repeat Operation cont 3 TocanceltherepeatfunctionpresstheREPEAT buttonforathirdtime Numeric buttons WhilelisteningtoaCDaspecifictracknumbercan beplayedbypressingtherelativedigitonthenumber buttons EGtrack6wouldbe06 Toplaytrack12you wouldpressthe1buttonthen2 NOTE thedisplaywillnotreactinstantlyalthoughthe trackhasbeenselectedtoplay Afterafewseco...

Page 8: ...se 3 Amp hasbeenfittedtothisappliance Foryoursafety pleaseobservethefollowinginformation TheunitisdesignedtooperateonACmainssupply230 volts 50Hz Thewiresinthemainsleadarecolouredinaccordance withthefollowingcode BLUE NEUTRAL BROWN LIVE UndernocircumstancesshouldtheNeutralorLive wiresbeconnectedtothe E Earth terminal Technical specifications SupplyVoltage Mains 220 240V 50Hz Max PowerConsumption 20...

Page 9: ...laybacksideofthedisc Donotattachpaperortapetodisc Fingerprintsanddustonthedisccausepictureand sounddeterioration Wipethediscfromthecentre outwardswithasoftcloth Alwayskeepthediscclean Ifyoucannotwipeoffthedustwithasoftcloth wipe thedisclightlywithaslightlymoistenedsoftclothand finishwithadrycloth Donotuseanytypeofsolventsuchasthinner benzene commerciallyavailablecleanersorantistatic sprayforvinyl ...

Page 10: ...antee does not cover accidental damage misuse cabinet parts knobs or consumable items The product must be correctly installed and operated in accordance with the instructions contained in this manual It must be used solely for domestic purpose The guarantee will be rendered invalided if the product is re sold or has been damaged by inexpert repair Specifications are subject to change without notic...

Reviews: